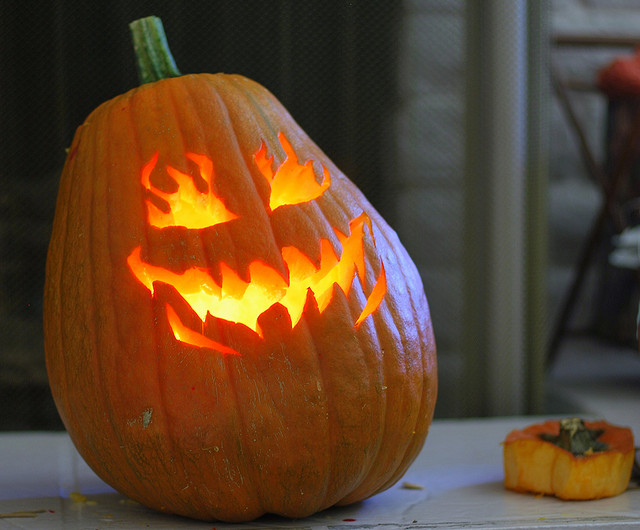
Legend has it that the first Jack-O-Lanterns were actually made from turnips, not pumpkins, and the devil was involved in the deal. These days, the bright orange fruit (yes, it’s technically a fruit) is the more likely candidate for ending up with a face on your front porch – no intervention from Lucifer needed. All you have to do is schlepp home a hefty round-ish thing and bring it to life.
Pumpkins are perfect palettes for creative expression, and carving one is a seasonal invitation to do something crafty for the sole purpose of having fun. Of course, they are also on the unwieldy side, even if they are more manageable than turnips.
Lucky for you, Adobe-Certified Instructor Jason Hoppe has a knack for pumpkin carving, and a few years back, he shared some very helpful tips for bringing your pumpkin to life in the fun, free class, Pumpkin Carving with Power Tools.
Rule number one? “Don’t ever use a knife on a pumpkin.” If you’ve made this mistake you know how it feels to risk life and limb to get an impaled kitchen knife out of stiff pumpkin flesh, it ain’t easy. Its also dangerous. Prepare for pumpkin carving by assembling the right tools.
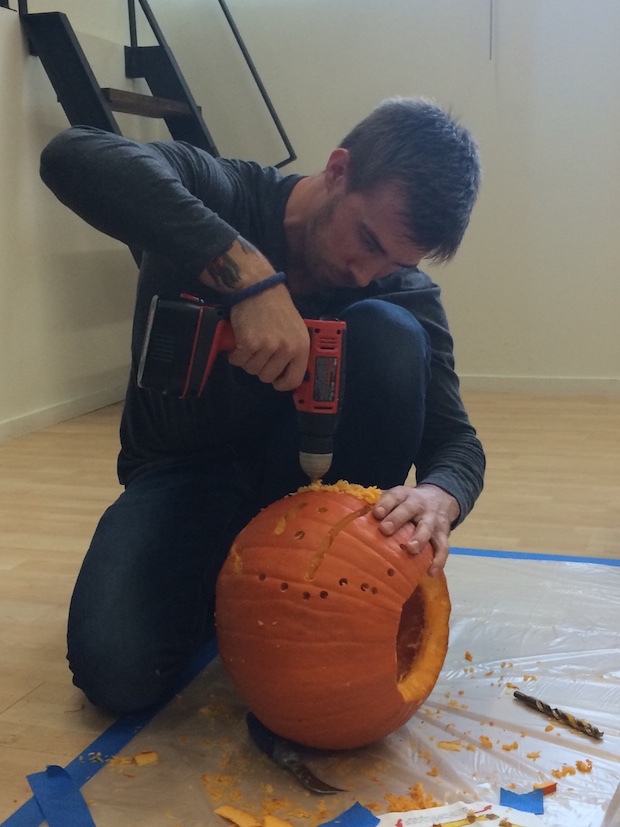 Your most essential carving tool is the serrated pumpkin carving saw because it allows you to pierce the pumpkin, but can be easily removed. Of course, there are a few more tools you can add to experience to make your pumpkin carving party even more fun. Here are Jason’s suggested tools:
–Pumpkin carving saw (fine and coarse blade) – pierces the pumpkin and can be easily removed
–Surface carvers – these handy tools help you shave off surface skin to reveal the white flesh
–Templates – simple printing paper with your intended design on it (by the way, you can download a bunch of free pumpkin carving stencils here)
–Painter’s tape – hold that template in place
–Pounce wheel – use this common sewing tool to outline your template — just roll it along to poke holes which indicate where to cut
–Ice cream scoop – easy removal of the seeds and sinew
–Reciprocating saw – a power tool for quickly cutting out your design
–Hole saw – get a perfect circle through power tools
When you have the right tools in place, you can quickly create a whole colony of pumpkin people. You can also make them easier to light by opening your pumpkin up from the bottom instead of the top – that Jason is just full of good ideas! And keep them around for longer with a rub down in denatured alcohol or a with a few spritzes of bleach.
Of course, if you really want to go all out on the Halloween festivities we’ve good oodles of Halloween Party Craft ideas from Marie LeBaron right here.