Lessons
Day 1
1Ways to Love Improvisational Quilting
21:40 2Building a Square with the Rotary Cutter
30:58 3Building a Square with Scissors
30:03 4Nate Quilt: Simple Log Cabin
36:43 5Building the Cabin: Adding More Rows
18:15 6Building Housetop Blocks - Part 1
31:14 7Building Housetop Blocks - Part 2
34:54Log Cabin Variations: Courthouse Steps
23:00 9Improvising with Triangles
33:40 10Using Triangles: Zig Zag
17:26 11Using Triangles: Star
26:43Day 2
12Improvising with Triangles: Flying Geese
33:18 13More Triangle Fun: Pyramids
26:09 14Creatively Combining Blocks
25:42 15Piecing Curves: Drunkard's Path
33:54 16Circle Variations: Half Moon Rising
23:58 17Improv Lines & Stripes Block
28:36 18Piecing the Stripe Blocks Together
17:46 19Improv String Diamond
32:33 20Finishing Your Quilt
22:03 21Basting & Binding Your Quilt
32:45 22Single & Double Fold Binding
26:51Lesson Info
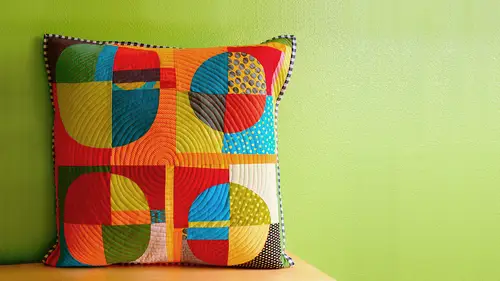
Improvising with Triangles
We have done a lot with just the basic block and strip around those blocks, but a man can't live or woman cannot live by, you know, squares alone, so we're going to do some stuff with some triangles and I'm going to show you you all a couple of simple little techniques that make making triangles ah whole lot easier for those of you that have made a lot of quotes before you're goingto especially with triangles, you're going totally recognize this little love kind of shortcut that I'm going toe show you in just a second we're going to start, eh? So what I have here on the screen is, uh and improvised pinwheel pinwheel is just a single block comprised of four half square triangles on dh they're just pointing in different directions so it kind of looks like a pinwheel um and this is a little quilt I made for a customer and um here too I mentioned several times that you want to have some kind of basic parameters so my parameters were again warm and cold and that it was in many of the blocks...
it's even more specific than that it was orange and green and ah, that I am that I wanted it to face you know, I wanted the the the orange tio function in one way and or green to function another way and so it that was really I mean it's a very simple little rule, but it creates a certain amount of unity where you can still recognize the block despite the fact there's aa lot of pieces added so that you can s so it can fit together so what we're going to do is we're going to make for pinwheel blocks on I'm going to show you a way that you could make four half square triangles all at once um love to half square triangles at a time that that's more accurate eso I've given everybody a black fabric and white fabric do you have to do this with black and white? No, I just thought that it would be easier to see the structure if we did it with black and white fabric and all the triangle ah and some of the curve samples have been made that way and actually I think it makes it really beautifully graphic kind of block on and the I had mentioned earlier that making these samples had really inspired me to think about making some different kinds of ah of improvisational quotes and it's it's the's samples that are that really kind of made me think twice or think about different ideas so what I did is I just free hand cut a whole bunch of black and white squares on and they're you know they're not cut to the same size and to make the half square triangles I'm going to pick two of life one in a black one and put them right sides together since they're the same on both sides you decide what that means now I'm going to recommend for those of you all especially if you're kind of new to this process that you go ahead and take your ruler this new your ruler is going to come back into your life just briefly to draw a pencil line um on the diagonal you can do it on the same diagonal I'm doing into the opposite diagonal it doesn't really matter as long as there's that pencil line that pencil line is now going to be kind of your raw edge of sorts, eh? So what you're going to do with that is and you can you can pin this together you could put a pin here and a pin on the other side so it doesn't shift. Um I don't think you're gonna have a huge problem with that. What you're going to do is you're going to start by sewing a quarter inch away from one of the pencil from the pencil line. I like to start what to start on the to the left of the pencil line, okay? And then you're going to kind of pull your kind of release your fabric, pull it away from your machine and then reposition your fabric so nowyou're quarter inch it's always going to be to the left of your pencil line your quarter inch away but now you're starting from the opposite end from the end that you just finished okay, release your fabric and trim your thread get your rotary cutter and basically just cut along that pencil line if you're nervous about it, you could use scissors um and then open it up and you've got to half square triangles okay um you might want to trim these up a little bit might not this one has kind of these, you know, this raw edge it's got a lot of frey to it so I'll probably trim that up um but only because I don't like the phrase um there's a fair number of people will tell you to press to the to the dark sides of people won't see the same you could do that if you want to I won't stop you so now you in one fell swoop you've got to have square triangles um and if you do this enough, you can do it without drawing the pencil line. You can just I where that midline is going to be and and just so on on opposite side of the midline and so what I'd like you all to do is start off by making four have square black and white triangles it's only going to take to a total of four seems but it's only gonna take two grounds at the machine yeah, is there a reason why you just press those two squares before you went to somewhere? They they just seemed a little wrinkly, you know? And when I'm if I'm going to just iet, which was what I'm planning to do, I do kind of wanted to be a nice flat surface I don't want some, you know, little bobble there to keep me from being able to see what I'm supposed to be doing that's a good question, and when you I I just I actually kind of look ahead, you know, trying to think of another example where you're told to kind of look ahead as opposed to right in front of you still don't have waken just just easily draw that line for those of ill students have killed two before. Is the triangle's a new technique or is this something you've all done before holly viewed on triangles? This is all new own you, sarah view, what two triangles before all of you for me, teo, only something you lady. So you tell me what we're trying I've done this before are ok, yeah it's a very traditional technique, isn't it the making those half square triangles that in fact I've seen ones where you take two pieces of fabric I don't remember they're going cut eight and a half by eleven and you draw all these lines that makes a little fish have you seen that? Yeah then you so on either side of the fish and it make I don't like sixteen half square triangles all at the same time it's not gonna work for improvisation but if you're making a half square triangles that uh uh that are all the same tithe just wanted drawn the fish kid all right, so now I have four half square triangles and I always have to refer I always forget, you know, so you want one where the dark triangle is facing to the one that's on the upper left dark triangle is facing to the right and one where the triangle is facing off to the right but it's a different angle day I don't know that I could probably explain this but, you know, just follow the example um and you'll get it so they basically kind of make ark's out that way on both sides. So the example to make to make them fit together on the example I used little bits of fabric to kind of sew them together, but for the one I'm going to make in class since I end up trying it on the other kind of triangle of blocks that I made I'm just going to use like little lengths of fabric and it becomes like just little touch accents of color in in this black and white field and I really really like it I'm gonna add a little bit of red here so these two guys our congee sewn together without trimming one of the things that I like to do is I actually like to nest the triangle seems at least as far as the quarter inch so about two here you don't have to do that you could just as easily you know line them up together but I don't know I like it just see it seems like the right thing to do for some reason I like to nest them together just a personal preference I guess I want them to meet up there and so that's my preference you know I didn't do it right oh yes I did yeah didn't position right alright someone trim that so and I'm ready to do the other half which they seem to be about the same size but when I put them together since I personally would like them all to meet up together I'm going to have to add something over here on this side of the one of the triangle's okay, so what one of the things I just did is I made just kind of a mental note to myself about which way the seam of the first said of triangles is facing so I could make a point of pressing the other scene the other direction I I am not averse to twisting it as I as I so but if I can go ahead and get it done now rather than later even better okay so what I've got here is I've got a situation where I got a little bit here and a little bit of their but to tell you the truth it's not enough to make me want tio ad because by the time it all gets it's going to get sucked into seem allowances so I'm not going to bother I'm just gonna trim earlier j k o you to ask me the someone had asked in the chat room about it can I get my points to me yes a cz long as I know so I've got these two eye this looks to be about a quarter inch this on along my left hand my left finger this one doesn't ok so I can actually go ahead and turn that down a little bit and when I turn it's just so I can kind of have better control over my blade and now when I saw these guys together my points will meet and so in the interest of being like houdini and proving what I'm saying I can go underwater for many, many hours um I'm gonna do it let's see yeah, they're pretty much met they could be even sharper, but yeah, so I just by controlling that seem allowance, I can, um I can get that same kind of point quality. I don't have to necessarily lose it. I don't know that I would. I would normally do that because I don't. It doesn't. It's not something that I'm interested in, but for those who do feel like it's going toe, um, mess up the integrity of the block for them. They can certainly do that, right. Okay, so there's one of those blocks, but we're going to do is make four. And then, just like with the log cabins were goingto ad strips to make them fit together. And you see that making one goes incredibly fast, making for now that you've done it is going to go even faster. Ma'am, I have a question. Sure. So my squares were not very even, huh? That's fine. So do usually trim down when you're like this. Or do you add more stuff or you don't have to? You haven't sown into anything? No. Yeah, so okay, I would. I would sew it together with. So what I did was first I sewed I saw this guy to this guy, okay thiss kind of this guy. But I noticed that they weren't the same size these two blocks, so I had to add something so that they would fit together but I wouldn't worry about the fact that they didn't make perfect half square triangles not even begin to and here's where you could else and you talked about chain selling this is a great place to change so yet because you could go ahead and make all four patches that you need for the block all in one fell swoop by chain sewing and so by chain sawing um and I could make it even easier here's where marking would make it even easier to change. So so you want to get a new pencil um so I'm going to mark my my mid point my diagonal midpoint okay on both of them you could use a disappearing fabric marker here too if you wanted to um pencil on the inside your quote is never going to show up no one's going to know about it um so I wouldn't worry about it, but if you feel like you don't want that pencil to be there that you don't want your batting has to spend its life saying they're gonna have to look at this pencil thin wyoming and then I could go ahead and start the second one and then come back to the first one way question coming in from line valka can you really use any shape or do you feel that the triangles can you really use any shape for this or do you feel the triangles do they have any significance because you use I mean other than artistically could you squares could use oh for like this kind of contrast ing to work especially in black and white oh yeah absolutely yes absolutely um you know I mean having kind of worked on this for for the class oh yeah all sorts of ideas about how this kind of idea could be expanded to other here's the other thing once you know how a particular pattern goes together I mean let's say it's monkey wrench or you know uh jacob's ladder once you know how it goes together it as a regular quilt you can improvise it all you have to know is how the parts go together finding a building huh? All right so I'm about to have four oh already to take to the next step this would also be a great way using the kind of black and white fabric till really learn a particular block and then you can play with it in terms of color so yes, I mean there's no real reason months to get familiar with the technique to use just two colors and no except that I personally I just like the drama of it yeah teo lines either side of that drawn line I was I was sewing yes it a quarter inch on either side of the line. Yes. So alison see, I've got one triangle here where I got a lot of extra stuff but um it's to my advantage actually in terms of making kind of off kilter looking pinwheel to keep it as opposed to trimming it to where it's a perfect little you know square I just which after you so oh, I just press it to whatever size side is most convenient for me but a lot of people will tell you that when you got a black and white you need to press it to the dark so that's entirely up to you you cut it in half yeah, you kind of didn't have along that line yeah, I could just tell that you cut it in half along that line yeah, that was the stuff I didn't see I was busy with my assembly line yeah that's ok, so when I put these two together I'm going to have this kind of space in the middle and I could like, you know, just make them to where they fit together by cutting or I could stick a piece of fabric in there which I think would be so much more fun and that's what I'm going to do well, I think I'm gonna need to do that too so ok if it's a need than this, ok the nice thing about consistently pressing toe one side whether to the darker light is it when you want to nest those seems it's it's it happens automatically you don't have to twist any scene all right so I've got my tube it's it's like football shape in the middle so I definitely want toe play that up and I'm going to do that with a little bit short treason between them yeah blood that up just like I showed you earlier which is going to follow that curve this's way more than I need but that's ok I'd rather have maurine this situation than less for sure and little by little kind of following that curve and easing the fabric in to place I'm going tio so the two curved pieces together okay this is another little kind of this is actually a dressmaker's kind of tip when you have a curve seem like this and you don't want there to be too much stress on the same point what you can do it's called clipping curves and it's just it's cutting into that fabric a little bit not to the scene because then you'll break your seem but just it relieves some of the poll so just around where the curve is aiken clip those curves he'll just help it to lay nice and flat it was laying pretty flat anyway but it'll help it just a little more now if I went ahead and and cut it here I would only have like a because of same allowance we would overlap like this and I'd only have like this tiniest bit of kind of football or whatever you want to call this this little shape in between um I could do that and that will actually look pretty good, but I think I'd like to have a little bit so I have to step back a little bit so there's a little fabric a little more fabric showing a little more of the green fabric showing you know, I'm going to the exact same thing holly hughes on something here that we have seen before but maybe it's because I don't know about sewing you've kept everything going it's all in just one line your desires pretty normal technique yeah just fascinated I've heard about it, but this is the first time well that's some you don't then it is what it sounded like a good idea it's great piecing yeah, yeah working on the train gone yes, it is changing very cool green right in the middle of the bit in between? Yeah, I mean that's the kind of thing that you just kind of see and you're like, oh, I want to take advantage of that and then you can do to make me go faster is good cause I'm always you know you're actually a bunting now yeah e so I've got two blocks. Well, actually there's a little mark there too, so I might want to do something about that, but I don't know. Um, I do know that in the original I kind of wanted them to meet oppa's much as possible to me, teo, to meet at this point as much as possible of the kind of seem in between. Um but I can go ahead and make my other four. I mean, definitely there's going to be in addition up here, um in addition down there so I could actually add that now and then make the other the other two pinwheel blocks and ah and see what happens so so many possibilities. Okay, it's gonna add this little bit of blue to the other end and then put the two together, make two more and put all four together and got the basis for the pinwheel. Sarah, how are you doing with your triangles? Looks like you got quite a few going there. Yeah, block yes, you have four sewn together. Yeah, you're doing a second. You guys second almost four sewn together. Great testing. We look at your first book, you've got there. Oh, purpose that's the standard on yeah, yeah, ok, that's good, stacey how we don't have that here I have not gotten the standard one but I have to know that I filled in that's very cool but you got something really different there is well like that green tag on the side there fill the space that's great yeah my block was too short so so you made it up that's good yeah you improved what a great idea so here you have got this curve and I could fill it in but I think this time I'm going tio just trim away and cut the other piece to match that curb now we did ask I think there's a segment one you were using some quite unusual looking scissors and people are asking about those again now they're specifically for left hands only know you can get these for right handed people for those of you choose to right with your right hands so uh they're just applications this is what they are but these air dingers which are fine german scissors and uh um but I'm sure that you confined they make you know left handed scissors or or right handed scissors of many different stripes there like a long time you know long time family owned um company they're the kind of says is you buy one pair and then you just get them sharpened their really quality says there's like buying a fine knife all right and then there were two all right so I would make two more just like this and, um, that would be the basis for my my pinwheel really like this little segment in the middle. Um, so good is good choice of color and smoking. I like green, you know, so I could go ahead and make two mohr, and that would be the next the next, you know that that would make the full block just like this one. The only difference between this one and that one is that I used little bits instead of big pieces.
Class Materials
bonus material with purchase
Ratings and Reviews
Me F
Another great class. I love the approach that encourages spontaneity and decision-making throughout the process! I was not at all put off by Malka's speaking style -- I found her informative, articulate, thoughtful and funny. I would, however, have appreciated much less time watching her sew, although I realize she likely did that in this class to allow her in-person students to have time as well. A bit tedious, however, when it's not live or you're not sewing along. I loved the idea from another reviewer to have samples of Malka's quilts hanging in the studio throughout all the sessions so we could refer to a finished piece that demonstrated the skill she was teaching. I would recommend this course to anyone who loves quilting or wants to learn.
user-5fbbc1
It was interesting to see how Malka goes about improv piecing and making her design choices. She makes visually interesting quilts with wonderful use of color. On the down side: 1.Technical issues need to be worked out. Chat did not work for me. I use Apple products. 2.Malka needs to find alternatives to "um" and "kind of". The course was too long. We do not need to watch Malka sewing so much...some is ok. More samples partially done would cut way down on sewing time. I would prefer to see examples of Malka's work hanging on the walls behind her, so we could see where she was going with her demos and give us some fabulous quilts to admire. I believe the sewers on the set would also have benefited from seeing samples hanging on the walls.
Sarah H
I have only watched one session, as I live in the UK and I did not watch it live. I have a busy schedule at present so will take awhile to work though them, initial thoughts were very good, I do like Malka's engery and free use of pallet. I look forward to watching them over the coming weeks and get back to you. I do like the concept of these classes and find them very useful. Thanks