Lessons
Day 1
1Class Instroduction
32:43 2Separating Yourself Through the "Getting Ready"
22:09 3Rules of Lighting
27:29 4Gear and Basic Lighting
31:31 5Shoot: Bride Getting Ready
43:27 6Points for Posing
45:13 7How to Fix a Pose
38:12Shoot: Wedding Party
37:49Day 2
921 Point Posing System Recap
40:09 10Bringing Your "A" Game
41:19 11Photoshoot #1: Reacting to the Environment
38:03 12Photoshoot #1: Review
21:58 13Rolling with the Punches Outdoors
23:45 14Photoshoot #3: Indoor Challenges & Posing
38:14 15Photoshoot #2 & 3: Review
52:13Day 3
16Importance of Challenging Yourself
30:51 17The Psychology of Sales
1:00:03 18Meeting with Clients
1:05:24 19Shooting the Wedding Party
31:22 20Flash Techniques
43:03 21Shooting the Details
54:09Lesson Info
Photoshoot #1: Review
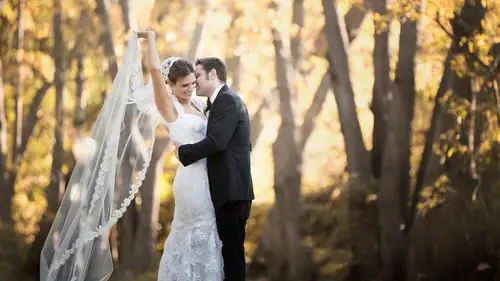
The first problem you have is major raccoon eyes, major raccoon eyes on duh! You can do your best by putting a reflector in the bottom in the floor and trying to get some light hit a reflector. So one thing we could do is you could, and we didn't have a chance to do it this time around, but you could, in theory, this is a solution. If you have a problem with cloudy skies, you could grab your reflector, put your reflector with your flash, understand on the flashed and put it right here and pointed it pointed right there and that's it. Okay, so you can put your post, you can have them stand. This will be fast enough to reach their head, even if there's tall doesn't matter. I've done this quite a bit of times whenever you have raccoon eyes remember, one of my big note not to do things is to not have catch lights on your subject's eyes. When you are being hired to photograph, you really, really want to make sure they look in their eyes, look alive. Um, I'll go through the photos off a line...
of that when I did at the end, where I had to pick up your dressing kind of just move around a walk. I had her I had a julia put the flash on a very strategic place when she moved her head to the left it would blast her face with a little bit of light on her dress and he will give her catch slits in her eyes even though it was raining even though I was in seattle even though it's cloudy even though the light was terrible the picture turned out beautifully because he was a solution to all these problems so if you're watching online and you have raccoon eyes not if you're watching and you have recognised while you're watching I mean if your bride and groom or your subject has recognized simply put the flash hit the reflector and he will solve that problem okay no because this is already orangey see you have pure silver uh she said with the cto way the city oh yeah, you could do it with you if you went to but I haven't have ah silver side if I had the silver sight I would put the quarter cto gonna warm it up but if you're shooting with with a gold or seabra side, you don't have to because it's going to reflect warm like backup if you put a cto and you have the gold this is like gold zebra you have a zebra which is golden white you're going to get a little bit too much orange in their face which could be cool I'm not saying it's not right you could do it all right so let me put this away here this forest you we just did was truly a problem solving situation I mean as soon as I walked out nothing was ideal nothing was ideal about it on duh and we have to learn to cope so so the initial photo that I took here the post is nice nothing wrong with it but it's definitely honey can you guys look at the light the lights very blue it's not attractive whatsoever doesn't give you a warm feeling of about it let me see here if we have okay um this is the final photograph after we moved a little bit andi we get something like this now granted we do have a burned face on that's when you would go in and just a flash real quick so if you do we know if you have your camera you can adjust the flash. That was just a matter of moving the flash twelve inches to the left and they would have taken care of that part but this photo looks like you're in the springtime it's in france or beautiful has got the cool it orange halo on the laughed it definitely solves a record my problem to have their life feels up now I think uh somebody had a question about oh yeah you had a question about with the light wrap around, let me tell you, if you have the flash in the back instead of in the front of your subjects, you wanna increase the esso because when you do, the sensor becomes more light sensitive and the light us behind will wrap around your subject better that's why you would back light them if your life is in the front of them, you would decrease the so because you don't want a blast him with so much like you don't want your light sent your camera sensor to be so sensitive to light when your flash is pointed directly at your subjects, right? So if you're watching out there um that's that's the reason why backlighting? Because she's wearing a veil you want to create a back lighting effect because illuminates the whole veil very what's the word angelic or whatever it was a very angelic field to it on yeah, I also raised my eyes so from one hundred although we have two, four hundred when we did that because I knew that the light would wrap around. Okay, let's, take a look. Look at the raccoon eyes. If I've ever seen any that is the ultimate raccoon I photograph right there now all I did hear what's tried to create a framing, a framing with the trees right on we started fixing the problem I am fixing the problem on we fixing the problem and we got we got into this situation here which is a little bit nicer I put his hands there because I was feeling like his hands kind of hanging down we're not doing anything we do it you agree? Look at this photo number nine three four look at the groom's hands they're just kind of hanging like a monkey, right? So by the way you see her hands were kind of tight too. Can I take a look at this one so much better right now if we had a little more time you get a job, make small adjustments I would have reflected to the front so when the life on the back hits the reflector it would bounce some of the light back into them. Okay, then we ran into some smoke. What was that like some sort of steam because of some pipe from the house or whatever on actually, that was a funny scenario because when I'm in new york when I was in new york, whenever I mean any part of the world it never fails that something like that always happens and you have two choices you can run away from it and be like, oh my gosh, this is terrible why am I doing this or you can embrace it and tried to use it to your advantage if you're watching online, I sure hope people realize that instead of running away from a I turned challenges into opportunities challenge is an opportunity so what would be a normal steam pipe just doing its thing turned into something like this, which is pretty cool looking picture number nine three, nine and then of course, once we position the flash properly, we got into a situation where we have this photograph I'm talking about the twenty one points or posting evolution this is posing evolution all over it because I don't know if you remember I was doing it quickly because he was starting to kind of rein so I said leg elbow and remember when I said please keep your arms out random ever so slightly don't keep your arms straight at all if she would have done it this way alone are you here while you're drinking warm tea it's not like it's gold outside or nothing what the heck is going on? Um can you go ahead and do keep your arms super straight and awkward let's say I wouldn't have paid attention to that and open up your arms stretch out the veil because because your arms are straight how does that veil stretch that look? No, so now does she look like she's trying to take off or something like yeah, all right, so look just drop this elbow bring your face straight, that's not good. Now bring your face slightly to the right you adding angles to her body. Okay, so there isn't why I did this is an imposing evolution. It took about three point check, so instead of having her body, I wanted to finesse everything I wanted. My brain thought this smoke looks like the sky looks like clouds looks angelic let's make her into an angel of everything and just don't look like, like, symmetrical and crazy. They're not in your face like what's up there kind of like, oh, everything's very angelic and put together so of course I'm going to bend her hurt every thing is bent, her collar bones are this with her face is this way her eyes her down. I soft in the entire thing. I could have made a mistake on going like this, change their color bones and stared at the camera. That would have been kind of like why you staying at the camera? Okay, um so this is so much more beautiful if you're looking at me with this camera right here, bring your face slightly to the left, live in a war and now look at your right hand so much beautiful that isthe see now listen, go straight, bring the collarbone straight to that camera now put your not change straight to that camera. Now put your eye straight at the camera, it's, like I'm posing for you. This is where the poses some doing it. Okay, so guy's out there is little details that make a difference there. Smoking the back was backlit by the flash. I put her in front of the smoke so she would be doing this that sky in this story, the smoke the steam would be behind her and it would be led by an orange light to give it a more more dramatic look. Okay, how we've been on a sunny day? I would actually put a blue jail on that flash because the sun would have warmed up her on the blue would have created a cool contrast. Okay, so give me a quick sec. Yeah. There's the color of the gel matter ifyou're specifically shooting in black and white? Not really. I mean, you can always change it, you know? She shouldn't roger there's no color information anyway, so you can always change the change it around. I used a orange jail and I kept to that simply because it's so blue, like the light, is so blue right now, so I just kind of tried to fix that problem. This is the problem classes were tryingto solve the solutions there was a wire haider here when she started when I told her to walk five steps back here just remember that I said what five steps back is because this bush is the dominant part of that scene on what did I say about distracting elements in a photograph balance them so I saw I quickly was aaron was you know it's raining on under pressure I see the the little bush and I'm like that dominates the frame right there you think there's no way I'm going to put the bride close to the bush because then you have double whammy problem if you put the bride five steps the other position yeah you have balance now your distraction turns into a balance you have a problem you turn into a solution okay now you look so she looks even more angelic with a whole veil going like this it's all coming down on this time for those of you wondering about the position of the flash this time the flash is actually pointed at her just pointed right at her okay um in my camera I lower the power of the flash because when you have to write flash I don't want it to overpower the bright okay so let's get some questions on the peoples on the internet and see what we can answer are you making fun of me right yes but I love this isn't you know just the internets have questions and I really like this question I know you talked about wrapping the light from the back and the placement of the flash already but sarah d had said I would really love to hear from roberto speak about the placement of the warming flash because her inclination would be to put it in front of the couple and would that be problematic and why is behind them better than in front of them? You're actually solving a problem off having too much the flash is a small light source oh, thank you, alan uh that's an excellent question and there's a lot of long answer to that one and I was like, I'll go step by step yesterday we spoke how the flashes of small light source right? If you're going to put a small lights or stores your subjects, you run the risk of creating harsh shadows, but if they're behind this object you eliminate all that if you have a high eyes so like four hundred that light's gonna wrap around anyway so there's no point for you to stretch we're not trying to create more problems we're trying to solve the problems. If you are ever going to point your flash towards your subjects, you run the risk off creating harsh shadows on something that looks out of place okay there's options to fix that though you could grab your flash no that's not the right one you could grab your um uh you see here this one here, if you're gonna point your flash under subject and you don't want to you want avoid those hard shadow problems you gotta turn this flash which is this small into a huge soft box how do you do that? Ah, so you do is you put the flat you have your assistant hold is right here the actual the sundance reflected the americans they can hold themselves like you don't have to have two people point point this flash put it put it this way like that if he is my subject, I point a flash on him it's going to look incredible because now you have a huge soft box or you can go up and have this go like this I know you can shoot at it and it will create a beautiful soft light because now you're turning the relative size of this into the size ofthe this okay remember you looked a little bit of light we need to cruise the power when you're doing that. Okay? So I hope that answers that question we noticed that you are always shooting down on your subject is that why is that? So when will you shoot up? Even in these outdoor situation, so remember imposing evolution I talk about the relative size of part of the subject emphasis is the size of them uh if you're shooting down you actually make him look a little bit smaller makes sense if you shoot up you make him taller there was some while you can get away with it is because I'm shooting with a seventy two hundred and I'm actually contracting the scene anyway so she's kind of up in your face look at this photo right here I'm shooting down right there you don't really tell you can't really tell but look how much bigger and more she takes he dominates the frame you cannot see that picture and she doesn't dominate she has she takes over your I had I think in this picture shooting up she would have looked maybe a three quarters toe half that size also the fact that I'm using a seventy two hundred increases compacts the scene on the fact that she's leading towards the camera and she is in this picture makes it so she's not actually angled away from the cameras something sense which is again part of the twenty one posting points you don't want her to go away that's the invisible plane angle check when I told her to look at her right she's going to lean her body towards the camera if I'm shooting from that angle if I'm standing right here can you come over here for a second and guys I don't know all this has to happen in your head like this you know I mean okay this do that again so you're doing this, you're holding your your does it give you the hands that gives the hand some thing to do. Okay, her veils flying. I'm shooting you from here and I'm actually having you turn your head towards the flash. The flash wass the flash was here. If you're wondering on the internet, why do I put my flash at a forty five degree angle is because I'm turning her face out of forty five degree angle, so if she would have looked that way now is going to hit her face in a very flat way the whole cheek will be illuminated. Okay, turn your heads line in this way now you get rid of that and you actually eliminate the front of the face beautifully. You don't want the cheek, you don't want to make her look like a tree look, she's got a big face you don't you want to make her look like she's got a beautifully illuminated well it face, which you do, by the way. So anyway, um, I'm contracting the steam on as you're walking forward and you're looking left, what is your body going to doe automatically going to leeds when you walk straight and you're looking to the left, you don't go like this and look to the left that would not work you automatically your prison your body is going to go with your eyes are so if you hold up your veil on your walking and your faces stores that left your body's gonna be leaning in that direction because I'm shooting down the my relative angle with her actually is equalized. Let me explain what I mean. This is an important question. That's a good one. Um okay, if I'm shooting from this angle this my angle that I'm shooting it is about my hand is about right there see that but she straight stand totally straight she straight now her angle it's actually totally straight. So you have a straight angle on my angle is actually turned almost at a forty five degree angle, right? That makes that makes her look stretched out. Yeah, so all you have to do is make those angles the same watch. You go ahead and I'm gonna turn. I'm gonna turn my camera and I'm gonna go forty five degree angle. Now turn your body towards the camera a little bit lean towards that a little bit. Let me see just from here. Go back to normal and just very lightly just lean forward on your veil keep your left, keep your face this way a little bit and as she's walking her body is actually helping me equalized the angle of my camera the worst thing you could do is have her looked the other way which go ahead and lean your body to the right on your shooting it from here now you're really causing massive distortion and it looks for the just listen to professional at all this almost looks like tricia's trash it if she's not angled she looks a little stretched out but the seventy two hundred dollars compact the scene so that helps you if she's going towards the camera it helps you equalized the angle a little bit and now you get rid of any distortion possibilities. Okay, so all these cuffs to go through your head before you can you think of good picture? Okay. All right, thank you. Do we have anything else? I have a question, roberta I know these work show was going to be all over the world and maybe these would help some people. What do you do when, um your clients have, like, really light? Uh, skin? Oh, how do you choose the right filter? Or gil? Ah, when your client have like, different and skins like you could make like the skin get really orange or like, I don't know just if they're pale taken to the nearest tanning salon quickly paronto just runs they're like homegirl there's like a mile away turnings long spray yourself come back to me spoken like a true person from los angeles yes, if you have a pale skin that's your first problem you see what I'm saying? I'm totally kidding my god ah I'm joking people I'm just making a joke ok? This is the x right color. Check your passport before I do most photographs when I'm with clients I quickly take a picture off the eighteen percent great card on that issue and then I do a custom why balance on my camera are based on this and then before I actually start shooting I think another picture ofthe this target chart. Okay. This collar target chart there recently is because if you look carefully here if you look at the second row there's are warming and cooling patches on when you when if you want to when you go in light room you do choose all those photos that you took outside and you click it click on the white selection white violence toe on light room on your click on one of those warming patches anyone people warm up everything by about five percent to ten percent the farther you go to the left the warmer it gets the farther you go to the right, the cooler it gets so if you combine photographing the eighteen percent great card and then you quickly turn this around and you take a picture off this off this target chart you're gonna have perfect, beautiful white balance. If your clients are pale, this will warm up their skin. Just that so they look natural and beautiful, okay, it's, really the best way. Otherwise, you're gonna have to do the color matrix on the camera and that's just too complicated. Okay?
Class Materials
bonus material with purchase
Ratings and Reviews
Sean
Roberto is a great photographer and a great teacher. Roberto took me a little bit to get used to because rather than just memorizing, Roberto teachers you how to think like a great photographer. Roberto studies the best of the best photographers and painters and he incorporates it in his photography business and his teaching courses. Over and over, I have heard other top photographers referring to Roberto. Cudos to Roberto, for being the go to Pros,' Pro. Roberto is a great teacher and a great photographer that takes beautiful pictures with mastery of beautiful light, posing and composition.
Nadine
Roberto is a photography mastermind. I'm very grateful for his CL courses that are available. He shares so much during these courses, I cannot help but making many, many, many notes and I'm sure if I rewatch it, I'll still learn new stuff. This course is not only for the wedding photographer, but the information he shares is applicable for all kinds of photography. If you want to learn how to make use of the gifts of any location (while throwing some very helpful posing advice in the mix), this course is for you. I'd also highly recommend his course "Location, posing, execution", which I saw before buying this one. And besides his very inspiring teaching style, he's also very funny! This course is a joy to watch.
ogonzilla
Absolutely amazing. Roberto's background as a classroom teacher (and crazy OCD perfectionist) is a true gift to us, the students. He has analyzed, practiced, and tried/failed his techniques countless times and it shows in this course. I have become so much more aware of an environment's "gifts" after taking this course. I myself was a science teacher (and am also a goofball) so his style of teaching resonates with me. While some workshops are amazing at making us feel inspired and fantastic, these are short lived emotions. Roberto's preaching of get out there and practice is a no-brainer!! Best course to get me started on my wedding photography career! Thank you Roberto!
Student Work
Related Classes
Wedding Photography