Retouching Tools for Landscapes
Lesson 17 from: Adobe Lightroom Classic CC for BeginnersJared Platt
Retouching Tools for Landscapes
Lesson 17 from: Adobe Lightroom Classic CC for BeginnersJared Platt
Lesson Info
17. Retouching Tools for Landscapes
Lessons
Introduction to the Catalog Style System
23:54 2File Location and Methods
41:25 3Main Structure of Adobe Lightroom CC 2017
18:09 4Importing A to Z
27:26 5Image Selection Made Quick and Easy
12:34 6Methods of Image Organization
29:26 7Preferences in Adobe Lightroom CC
28:30 8Library, Develop and Map Modules
10:58Book and Slideshow Modules
07:50 10Print and Web Modules
13:08 11Developing Techniques
16:51 12Synchronizing Adjustments
23:05 13Additional Editing Tricks
13:13 14Fast Editing Presets
24:18 15Quick Develop Tool
06:57 16Using Local Adjustments
31:58 17Retouching Tools for Landscapes
22:45 18Dodging and Burning with Landscape Images
19:11 19Additional Landscaping Tools
07:30 20Retouching Tools for Portraits
28:17 21Create an HDR and Panorama
16:00 22Manipulating Image Structures
11:24 23Module Presets and Hidden Presets
18:37 24How to Create a Portfolio
26:06 25Connecting Your Portfolio With Lightroom Mobile
12:22 26Using Adobe Stock
29:58 27Publishing Images to Social Media
28:16 28Creating a Layout for Books
26:56 29Exporting a Book and Beyond
19:11Lesson Info
Retouching Tools for Landscapes
All right, so now let's go back to, actually let's just work on this image. I'm keen on this image now, so we're just gonna work on it. So once I've got my basic settings down and I've got the exposure correct, and you can see that I did a little burning on this little shirt here, so I did that, I burned on that shirt so that it was darker. 'Cause if I turn that off, and you can turn off your entire brush by clicking on this. Any of the panels in Lightroom, there's always a toggle that turns off the setting so you can see, see how bright that is? And I want it to be darker so I just darkened it up. But notice something's happening. See how it's bleeding off into the lake? See that? So I overshot the shirt. So that's not good, 'cause I don't want it to look like I was burning that shirt. So what I'm gonna do is I'm gonna go and I'm gonna click on that brush so that I'm activating that brush, and I'm gonna show the selected mask overlay. And now I'm gonna show you the process of using th...
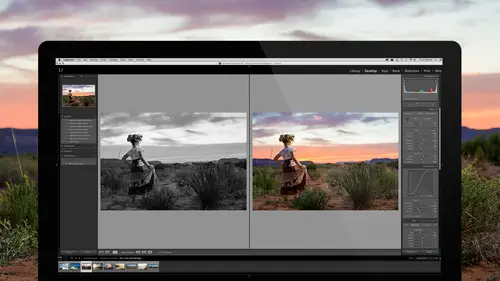
e Auto Mask. So the Auto Mask, if you come down here you can turn on Auto Mask within the brush, and I'm gonna put it on Erase, 'cause I want to erase out from the area that spilled past the shirt, and then I'm gonna turn on Auto Mask and I'm gonna cut 100%, so that means it's gonna pull out 100% of whatever, it's just gonna negate it, so total erasure. So now I'm gonna go out, I'm gonna come over here, let's just zoom in a little bit so we can see it, and I'm gonna use my pen tool so that I can be accurate about it. Okay, I'm gonna use my pen tool, and I'm just gonna go in and start erasing here, but notice that I'm able to avoid most of, now, it works better on, this is a kind of blue-ish water and this is a blue shirt, so it's gonna see the blue shirt as maybe a possible part of the water, but definitely from her skin I can go like this and erase and it's not going into the shirt because it sees the tonal difference and the color difference between the two, so it draws a hard line. It's very easy to do your masking. And then once you've gone along the edges of the shirt, then you simply come back and turn the Auto Mask back off, and now you can go back out and do the stuff farther away at 100% and just pull it all out. So now when I turn that off, now watch. When I turn this off and off, see how it doesn't bleed outside the shirt, and neither does it bleed onto her skin. So that's the Auto Mask, and Auto Mask can be very helpful in a lot of different situations. For instance, we're gonna go a little further with this. So if I want to make the background a little bit different than her, 'cause she's very warm and the background doesn't really have much of a color to it, so I want to intensify the background, let's go in and do something with, say, I could do it with the gradient just to deal with the sky. So I could just say "I want that sky to be more dramatic." So I'm gonna grab the sky and pull it down like this. When you make a gradient, you're just starting at 100% burn or 100% whatever, in this case all we're doing is a burn. I'm just gonna go to minus four stops, so you can see what's happening. Okay, so the controls are these. You can grab the top of the gradient and you can move it up and down and see, it starts at 100%, ends at 0%. This if 50 right here. And so I can make it take longer to get there or shorter to get there, to the point that it's just a line. Okay, so there, we want it to be a nice, slow burn from 100 to zero, then we can grab onto this line and we can tilt it. So I'm gonna tilt it like that, and then we can take on this line and extend the burn a little bit if we'd like. So I'm gonna go about to there. And then we can move the center pin and move the entire burn. So once we've done that, now let's actually do something real with this, and instead of doing an exposure change, just double click Exposure, it'll go to zero. So right now the burn is doing nothing. And then what I'm gonna do is I'm gonna come in and I'm gonna take the saturation on it up a little bit, and I'm gonna take the temperature down a little bit, and see how the sky is now becoming a little bit better blue? And then I'm gonna take the shadows, or maybe let's do the blacks. There we go. See how that sky is getting nice and rich now? I like that. So let's go with that as our change. But the problem is it's spilling in over her, and I don't want that to happen. So now I'm gonna go back to the Brush settings here, and notice that this has a Brush option inside of the Mask. So the Mask, I could click, create a new one if I want, I can edit the current mask, or I can brush on that mask. So if I click Brush, then everything changes. We're still working on the same gradient, but now we're actually brushing away. And I'm gonna come down here to the bottom, right here, and there's the Erase option still. So now instead of erasing from a brush that I was just doing, I'm gonna erase from the actual gradient. So I'm gonna go over here and I'm gonna click on Show Selected Mask Overlay. It just makes it easier for me to see what's happening. Then I'm gonna go and turn on my Auto Mask, because now remember, we don't want any kind of a line between that hat and the sky. So I'm gonna click on Auto Mask, and then I'm gonna erase out everything on this hat. I'm just gonna click on it and start erasing, and see how the line just stops right there at the edge of the sky? And then I'm gonna do the same thing right up here. And now I'm gonna do her hand, because her hand is different than the sky. It's orange versus blue. I'm gonna click on that and just, there we go, getting rid of it on the hand. Now, notice that I'm not working on the interior of the hat or on her face, and the reason for that is that Auto Mask is so indiscriminate that if you work on Auto Mask and it sees like a little blue something or a little dark something, it will try and avoid hitting that 'cause it thinks it's another line that has to mask out. And so when you zoom in, especially if you zoom in really close, you can see that, ah, let's see if I can find the place where it's done it. Sometimes it doesn't to it, because this is a pretty serious difference between the hat and that. But what it'll do, it'll see like these little spots in the hat and it'll try and not do those. And what happens is if you have like on a face, if you have like a shadow to a highlight, it'll see like blemishes and it'll see little shadows and inconsistencies in skin as things it has to protect and wrap around, and then you'll get like this data-looking stuff. It'll get real choppy. It'll look crunchy, right? And you can always get rid of it by painting away from it, but the idea is that you only want to use the Auto Mask where it's absolutely necessary. So I'm just going along edges like this to make sure that I don't use it in any other way. Now, the other thing that you should pay attention to is that if I'm painting here like this, it's recording this white, this kinda warm white, but if I go over here I need to re-click, because it needs to re-record that color and tone. You do a lot of clicking. Don't just paint and then keep painting over everything. Paint until you've run into another tone or another color. So for instance when I was on her hand, I made sure that I re-clicked and then painted on this hand so that I wasn't getting the tones of the white. It was registering the tones of the skin itself. So you want to make sure that you just keep re-clicking and then working on and then re-clicking and then working on, because the more you click the more accurate it can be, because, right, the first time you put the brush down it registers tone, color, texture, and then it tries to avoid anything that's not that. So the more you click, the more accurate it can be. So like don't go brush-sh-sh-sh, like that, just go brush, brush, brush, brush, brush, and that will make sure that it's really accurate when it does it. Okay, then once you're done with that turn the Auto Mask off, and that's when you come in to the rest of the area and kind of just remove all of this stuff interior. That's when you remove that. Jared, when you do that are you not wanting to, do you not need to click and re-click then, too, with the Auto Mask off? No, because it's not registering anything. It's just anything that's within the brush is gonna get removed. So now if you look at that mask, it goes, there's like a loose erase on it here just with a kind of a soft brush, and then when it gets up into this area here and up here, it's a very hard line between where the skin and the hat stops and where the sky starts. So now when I turn this off, now I can work on that sky and I can, see that? It doesn't affect her at all. So now I'm just gonna work on the sky. Now it's a little bit ore blue, which helps to match this, so I am done. All right. Okay, so Auto Mask is a really helpful thing. Also, since we're here, see that dust spot in the sky? I'm gonna take care of that by clicking on the Spot tool and just click on this, increase the size of the brush, click on that, and it just automatically chooses something from over here to put it there. But notice that my opacity is too low, so I just need to bring the opacity up so that it gets rid of that. And, there. So now that spot is gone. Now if you don't see spots in the sky, chances are you're not looking hard enough, because there's probably a spot somewhere in your image. And so I'm gonna reset this, because I wanna show you how to find spots. Reset that, there we go. Okay, there's the spot. But if I want to find spots and not have to zoom, because most people have to zoom in, and then they go like this and they look for a spot. Look around, look around, look around, and they have to be really careful to find it. Instead, when you're in the Spot tool, if you come down to this area right here, it's called Visualize Spots. If I click on that, do you see the spot now? It's really easy to see that spot. So now I just go in and from a distance I can click on it, it erases it, and it's done. So the spot visualizer is really helpful, especially when you've got like a lot of dirt on your chip and they're all over the place. Just click on that and then just go click, click, click, click, click and get rid of 'em. Yeah. Do you like to auto sync when you have like a consistent piece of dust, maybe, on your lens throughout all the images you took, you can just-- Yes, yeah, if I'm doing this portrait right here, and if I was actually gonna keep all four or five of these images, or six or whatever, that same dust spot is on every single one of those. And so I can go in here and just go, and if I recognize that too late, I can always click back on this dust spot tool and click on it and then just move the spot just an inch or two, and it just did all of 'em, because I was in Auto Sync. So now if I click on this one here, that same spot just got solved. Of course, she moved, and so if she had been a little bit further this way her hat would've been copied over there. So you just have to go through and make sure that nothing is, like, for instance, here, it's probably gonna be a problem. So this is, nope, not really, but there you go. So it didn't end up being a problem, because it's now over here. So the dust spot moves a little bit in relation to the photo, but it's in the same spot every time. Yeah. I believe you just answered my question. I was gonna ask does it correct, or does it grab, from the same position in each image? It grabs from the same pixel. So if you turn the camera, it's gonna be wherever that pixel is. Whereas if you do, like for instance if I were to take a gradient here, so this gradient like this. No, not there, we're on, there. We're on the gradient now. So if this gradient were to synchronize over to this image here, so let's just click on here and hit Previous so that it takes everything, see how the gradient comes from the top? And look, the hat, everything to do with it has changed, because it's not a vertical image, but the gradient's still come from the top. So a gradient and a burn and all that kind of stuff stay on the canvas the way they should, but that means that it's not gonna follow, like, so the spot follows the spot, and it twists based on whether or not you have, you know, turn the camera one way or the other. But the gradient is always gonna stay from the top to the, or bottom to the top, or right to the left, or it's just gonna follow the canvas, not the photo. All right. But that being said, also if you were to synchronize, let's say you were to take something here and you were to want to do a brush on her face, and so let's say you wanted to brighten it up and take the temperature down a little bit. So you did that to her face, and that's way too much, but you get the idea. So if you were to do that, then if you were to come over here and say Previous, you could actually go into that brush and find the Brush settings right there, and they're in the wrong place, you can grab them and move them to the right place. So if you have a situation where you have a model and you're taking a picture of the model and you photograph the model doing that, right, then you can paint her face with a brighter or paint her shoulders or her dress or whatever, and you can darken that down, but then synchronize the whole thing and then just go from image to image that you're gonna keep and just grab the pen and move it subtly based on where she's moving, rather than repainting the whole thing. And occasionally you might find, like in this case, that, see how it doesn't match, 'cause the angle is wrong? But I can put it in the right place, then I can go to the Erase, and then I can just start erasing out the areas that don't coincide correctly to the model's current movement. So I'm just erasing a little bit rather than repainting the whole thing. All right, so let's do something a little bit interesting here. So I'm gonna go in and look at this image, which is, so, sun was setting, we're out in the desert, and this is my daughter and she likes to be a princess, and so we're taking a picture of her in the desert. But here's a chance where the Auto worked. So we click on the Auto and it did a decent job, but, again, it brightened things up so much that it's probably going to be a little too bright for my taste. So I kinda got to readjust that a little bit, 'cause really I don't want the exposure up, 'cause see where the exposure is happening? Exposure is up in the sky and it's down here where the flash, 'cause there's flash right off to the right-hand side of the frame, kind of lighten her up. 'Cause what we're trying to do is pretend that the sun is actually still kind of hitting her, 'cause otherwise it's just the sun is already setting. And so we don't want to brighten her up all that much. I mean, we don't want to brighten up the sky all that much. What we want to do is we want to brighten her shadows up a little bit. And that's actually here in the Shadows area. So we're gonna bring the Shadows up more, and leave the Exposure down, because the exposure is more in those mid tones whereas shadows is that lower pile of pixels down here. So we're gonna take the shadows up quite a bit, but there we're gonna take the black down so that we still have nice deep shadows, like right up here in her hair and just right here on like the shoe and stuff like that. Okay, so that's how we want it to look. That looks pretty good. But now we're going to do a little extra work, and one of the things that we have to worry about is this. See that fringe that's happening right there? So we don't like fringes, but they tend to happen when there's a black coat with a white background or any kind of time where there's like a very hard edge with a dark and a light, so serious contrast on an edge, you get fringe. And so when you come into that fringe, you can come down to your Lens Correction area and there's a little option called Remove Chromatic Aberration. So to do that we just click on it, and I want you to watch the fringe. So in order to do that, if you go up here, let's see, there we go, right at the top of the navigator, you can see that there is an option to zoom in a little bit further on things. So instead of a one for one zoom, we can go to a, oh, that's a one for two zoom, let's go to a two for one zoom. There we go. So now you can actually see that fringe really well. Okay, so now that you're seeing that zoomed, and let's even zoom in to four to one. There we go, now you've got lots of fringe. When I click on Remove Chromatic Aberration, watch what happens. See how it tries to lessen that? It didn't do a great job at it, but that's great, because it teaches us that we can go further. So if it doesn't do as much, it usually works better on like a purple fringe or a magenta fringe or something like that, but if it doesn't quite get the fringe the way you want it, you can also go into the Manual Mode and now there's an area here that allows you to choose the color of the fringe. So what we're gonna do is we're gonna click on this white dropper tool, and we're gonna go in and we're gonna choose the color of that fringe, and we're gonna click right there, and that, oh, it's not doin' well. Let's try again. So you wanna just get rid of that fringe. And in this case it is not working all that well. Sorry, guys. I chose the wrong one. Do you see what's happening? Now it's trying to remove the fringe so much that it's got kind of a white edge around it. And we can try and play with that and mess with it, so you can just kind of work with this and see how much of that color we want to play with. But if it doesn't work, it doesn't work, so you can just go back, turn it on, turn it off, and then try again. So I'm gonna turn Manual off. Let's just try again, and just live with what we had. But in other cases where you have like a serious magenta one, you can go, and we probably have one here in this image here. If I zoom in. There, see that? There's a blue fringe on that one and there's a red fringe down here. So in this case, if I hit Remove, it pretty much did a great job, except see how that blue is still there? So that's when we would go into Manual, click on that little dropper tool, and say "Hey, look, this is what we're lookin' for," and then see how it got rid of it? So I just chose the worst case scenario and then I showed you how it really works. Yes. (audience laughs) And the reason it didn't work very well here is simply because she's orange, it's orange, and it's like "Hey, man, you want me "to get rid of an orange fringe "on an orange skin next to an orange sunset? "You're smokin' dope." (audience laughs) That's what it just said to me. Yeah. That's an aha for me. That's a pause moment, because I've only used the regular, just hit the Remove Chromatic Aberration. I've never gone to the Manual de-fringe and actually known how to do that. So I don't know about you guys, but that's awesome. It's pretty impressive, right? I mean, it got rid of that completely. So in most cases, that's the way it works, especially when it's a high-key portrait with white background and then a fringe. It almost always works. But when you're in a situation like I was just in, not so much.
Class Materials
Bonus Materials with RSVP
Bonus Materials with Purchase
Ratings and Reviews
Melissa Maxwell
Worth every penny. I am completely new to Lightroom and it really is like learning a new language. Jared Platt did a great job explaining the most efficient ways to utilize Lightroom. There's a lot of technical jargon that can often make creatives lose interest, but it's important and useful information. I've watched several segments again and again. He's added years to my life and I am grateful. He's not my favorite instructor on this site, though, and I made good use of the 2x button on the screen.
Kat Jones
Well, I've been a Photoshop girl since the beginning and have dabbled with LR and thought I knew quite a bit about it!! It turns out I've just been playing with bits of it! This is an amazing course. I will need to buy it for all the tricky bits that I just haven't quite grasped. Jared is amazing. Clear, concise, methodical, smashing. Thank you, Creative Live. What a service! Cat Jones Wormit Fife Scotland PS - Delightful to see Jared's Scottish piccies - very familiar, although not with the model!!!
Elaine
What an excellent class. I'm a semi-beginner, already know the basics, but wow ... this class adds an extra layer of super AHA moments that shave years off your life! What a great teacher, thank you so much Jared!