Lessons
Day 1
1Introduction
15:18 2Post-Production Workflow
26:52 3Troubleshooting
12:20 4Setting Up Hardware
29:32 5Create A Rough Cut in Prelude
43:29 611:30 am - Introduction to the Adobe® Premiere® Interface
31:56 7Configure Preference Settings
22:47The Media Browser
10:03 9Capture and Import Media
37:09 10Reviewing a Clip
29:17 11Create an Edit
24:18 12General Q&A
14:18Day 2
13Editing Review
18:24 14Editing in the Timeline
35:10 15Trimming
36:13 16Organizing the Timeline
31:19 17Labels and Markers
14:18 18Transitions
24:57 19Introduction to Audio
31:26 20Audio Editing
45:36 21Mixing in Audition
26:51 22Audio Effects
37:41Day 3
23Normalizing and Syncing Audio
24:54 24Text Effects
38:12 25Blend Modes
14:48 26Motion Effects
43:07 27Filter Effects
34:28 28Chroma-Key and Lumetri Looks
19:56 29Color Correction
57:31 30Editing a Mini-Doc
41:09 31General Q&A
26:54Lesson Info
Editing Review
Without further ado, I would love to introduce our instructor Larry Jordan. The man seemed to know also he is He is the perfect man to teach this course. Larry, what do you think about them? Apples. I think you are setting me up to fail. Thank you for that very gracious introduction. I enjoyed guys. Your description. So what the Ah ha moment. Waas as we were talking in the pre show. It's interesting to me and Jim, I'm sure you remarked on this that virtually every ah ha moment did not involve the technology of premier. Virtually every ah ha moment involved the business involved Workflow involved planning. It was that which surrounds Premier, which I think is a classic example that Premier is ah, hub around which a whole lot of other processes revolved. And we're gonna continue that that theory that that it is not just this one piece of software we were talking about yesterday about whether you should purchase a single software and get the whole creative cloud. Premier does not live in ...
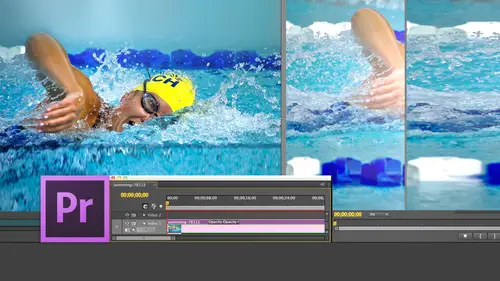
a vacuum. Premier hooks into so many other things that hooks into your business. It hooks into your audio. It hooks into your your planning and your story riding in your scripting. Video editing involves a ton of tools, and you want to make sure you've got access to all the tools that you need, because all it does is it makes you more efficient. So I thought, Susan, it was an especially insightful question when you asked what was the ah ha moment. I found that very interesting. So thank you. What I wanted to today is I want to take and continue our in depth introduction. Um, for day two. So what it says here on the slides, That's clearly what we're doing. We're gonna take an extended look into editing and Premier Pro. We spent eight hours, seven hours. I've got Jim's math skills. We spent seven hours looking at how to edit in in whatever this problems called premier, and I'm gonna do the exact same thing in about 2.5 minutes, we're going to review it, and then we're gonna learn how to trim clips will learn how to organize clips in the timeline, including how to apply markers and labels. We'll discover how to add transitions between between clips and transitions, provide our first big transition I to do blending like Jim does and we're gonna transition out of editing into effects. And then we'll take a deep look at audio theory. Editing and mixing audio is one thing I love talking about, in fact, and I haven't told him this yet, but Susan and Jim are going to be part of this incredible audio demo. You have never seen the like of it before. It is just amazing watching. Well, it will be amazing once I tell them what they're supposed to do. Anyway, That's gonna come this afternoon and then we're gonna Then one thing I found it useful is you'll notice that I'm not creating anything of any import. We're not really looking at. The content of the clips were really just say, edit this clip to the timeline, because what I'm showing his process, I'm showing how the software works. Something that I've discovered is useful in my teaching, as people would like to see how I actually cut a sequence. So toward the end of the afternoon, I'm gonna cut a about a 32 to 3 minute documentary sequence and we'll cut it with audio Will cut it with picture we're gonna worry about. The content will add B roll will add transitions. We want to text entitling because that's tomorrow. But it might be useful just to show how I cut a documentary because I've done a lot of them. And then we're gonna wrap up with some what I call editing utilities that can simplify your life. That helped solve difficult situations within Premiere. So that's where we're headed. What I want to do now is I'm going to start with an editing review. So let's push this button. Hide that and I've started Premier and this is the opening screen that comes up whenever you start premier and you could go to an existing project. But that's taking the easy way. No, no, no. We're going to create a new project from a standing start. My hands will not leave my wrist. Watch what happens? I click the new project icon and it says, What are we gonna call this? We're gonna call it my second project because it's the second day it strikes me as appropriate. Notice that it already remembers the location that we specified from yesterday. Oh, oh, Jim, I have this cool thing. If I go up here, go down Assistant preferences. I've got this thing called Pinpoint. We'll just reset the preference. We know. And when I click it and start pinpoint Ah, I have a red circle on the screen now. This software is so old, it's grandchildren have graduated from college, but it should work. And now you can see where my curse is. That not, I mean, is not technology wonderful. And we have the giant cursor to what? We did the giant cursor yesterday afternoon because I was asleep yesterday morning. So now we've got a red circle in a giant curse of the control room has just got to be euphoric. So anyway, the rest of these settings are exactly as we left them the last time. So once you've gone through the pain of doing this once, it remembers all your settings for the second time, you just have to give it a name and you don't have to turn on the red circle. That is an option on your system. It is not required for the operation. From here we click OK, and after a few seconds, we click OK after a few seconds. Premier itself opens up into its standard workspace. Remember, that's the way that Windows Air are aligned, and we'll just move stuff around to get it to fit. And we don't need the doc, so we'll just have it. Fill the whole frame. Remember, Project is a container. It contains all the different sequences in all the different clips. It's the big cardboard box in which we put stuff. So with that cardboard box, we now have to put file folders, which contain the actual edits that were doing this file folders air called sequences. So we go up to the file menu, go down to new sequence. There's a keyboard shortcut, which is command, and and those people that like to show off that they know really how premier works. We'll go down to this little thing just down here, which allows us to up. So I got to be in the project window, go down to this little things down here called New Item and click it. But frankly, why bother to drag the mouse all the way down to the bottom? The project window, in a project when do, isn't showing when I have to do is type command. And unless you're running on windows and I'm gonna ask Scott, who is our Windows expert, What is the keyboard equivalent for the command key in Windows? Yes. And for those of you, for extra points for the $250 question, what is the keyboard equivalent of the option key in windows? Ulta. I tell you, there was some fear in the households of America until you came up with that answer. That's right. So for those of you who are running premiere on Windows systems, the operations exactly the same with three exceptions one, you use control instead of command to you use Ault instead of option. And three, the keyboard shortcuts is inside the edit menu. It's not under the premiere pro menu. Other net the identity, They're identical. I'm going to select a steno Kelly, grab a mic. Okay. All right. Now I'm going to select Devi NTSC now, as you know, Devi is a standard def video format, right? Can Premier edit high def? Yes. Is the operation of Premier the same if you're editing high def or if you're editing standard, def, I believe it is an are the keyboard shortcuts the same if you're editing high def for standard death. Yes. So once you know how to edit in standard def, you can edit in high def with no problems. Yes, three out of three. Amazing. All right, And the whole reason for working in standard def is some of my footage is standard, def. I've got a microscopically small screen size for the purposes of today's demo, and so I'm just taking the easy way out and picking a format that matches the video that I have to work with. But the operation of the software, as Kelly has so brilliantly explained, is exactly the same. So I'm selecting standard Devi after a few seconds are container opens up. If the bottom of the project window we click this list icon, I can get a list of what's there now. I could have had I been paying attention had I not been so distracted by the eager faces staring at me across the room, I would have named the sequence when I created that new sequence, but I blanked on it, so instead you simply click on it. Once inside the project window, start with Larry standard naming convention, and we're gonna call it my project. Notice that I start with a space followed by S e que. So I know that it's a sequence now that's not really necessary, cause Premier, unlike Final Cut, gives us an icon which is easy to identify as a sequence icon breath. But I type sq anyway. And then I type 01 cause that way, Aiken differentiated from Project to World three. And because the project went always sorts alphabetically, it just simplifies my whole task of finding projects. Then I give it a name. The hyphen is there because it appeals to the graphics designer. And unlike Jim, I am not tasteful. Enoughto wear bow ties and then I press the return key, and it now accepts that project and notice that there's a label color. They're all sequences have a green label to remind you that it is in fact, a sequence. We'll talk about that more in just a little bit now. We need to import a clip. We can do that using the media browser, so click on the media browser and Janice, this is your time to shine. This is the heavy lifting This is the hard part. This is the big question. I need to know. How do I take any highlighted panel and enlarge it? A full screen. What key dough I use Tilda Tilda. Yes. And it blows up to full screen not to bring it back again. What did I use? Tilda? You are amazing. Amazing. Yes, it's the tilde key. The tilde key takes any window which your cursor is in and enlarges it to full screen. Doesn't even have to be selected. Notice that I'm here in the timeline. It is not selected. There's no gold box pressed until to keep blowing up. Press the tilde key, Bring it back down again. I should say, in the interest of political correctness that we're not blowing up the window air enlarging the window. I'm working on it. But I haven't got that my vocabulary yet. So we're in the media browser press the tilde key. My media is stored on the second Dr Susan. Am I going to quickly? For those of you who are taking notes. Good. Well, this is a review. So they know all this stuff anyway because this is everything we covered yesterday. So I've gotta squeeze eight hours of leisurely conversation down in tow. Only four minutes. But it's not a problem is the problem If people have to take notes, that's a division problem. Okay, good. All right. Well, then I'll continue. We go down to the folder called Source Media Double click it and now I'll go to What do we want to bring in? Let's spring in Dr Cerf clip. And now we're able to see all those different clips that we've got. So I'm gonna take Oh, let's click this one and notice that when you click inside the window that many timeline appears. But although this allows you to use the J K L Keys J to go backwards, Keita go to stop l to go forwards. We can't set ins and outs because this clip is already on our hard disk. We can only sit ins and outs when we're ingesting inside Prelude. So here. All I'm going to do is I'm gonna link to that particular clip. So when a right mouse click and I'm going to say I could import it, which makes it show up in the project window or opening the source monitor which makes it show up in a project window and opens it in the source monitor. I'm going to do open and source monitor. Press the tilde key so it goes back down again. Press that tilde key and there's Dr Serfs Image in the source. Monitor those of you that use final cut. No, this is the the preview window or the viewer and not go to the project panel. The media browser allows us to look through the application to everything. Underneath the project is the box. That's what contains all of our clip. So what we're putting together is being contained inside the project. Now what's interesting And you would think I would know this. But I tell you, there's stuff I discover every day is that when I go to the media browser and say, put it into the source monitor notice it's in the source monitor, but it has not been imported into the project window. So what I said before was incorrect. I thought it did both, and I was not paying attention. So let's just go hit the tilde key and let's go click here. And this time I'm going to say import and now it imports the file and notice when we go to the project window. Now the file is there. Weaken. Rename the file, by the way, by clicking on the name and rename it. Notice the difference in color and labels. Sequences always have a green color. Clips always have a blue color toe. Load a clip into the source monitor. Double click it. So now, Dr Surface loaded up into the source monitor the source monitor selected because it has a gold box around it. For right now, we're not gonna worry about the content. We're not gonna worry about the audio. So let's see Megan, time for your turn. In the hot seat. Grabbed the microphone. I want to indicate where I want this clip to start first. What determines where that starting position will be located? Yes. So I'm gonna just click. I just clicked right there. I don't have to drag the play. Had you just click and the play head jumps, play head jumps. Thank you. The play had jumps to wherever you're clicking now for $64. What key do I type to set the beginning of a clip? That would be the I? Yes. And what is the I short for? It is the what of a clip in? Yes, So we type the letter I to set the end for $128 which is to to the fourth power to the seventh power to the seventh part. Jim to the fourth to the seventh. Say seven. Excellent. Yes, to to the seventh Power. What key to we we kit to hit the end of the clip on? It's short for out. An excellent answer. What happened? Where did my in go? Where did my out go? Why don't I haven't in and out there? The answer is I didn't move the play head, So let's try this again. There's Thean. Let's just move the play head. Type the letter I to set the end. Type the letter O to set the out. But if you don't move the play head, you end up with nothing. Which is exactly what we had. Is my heart stopped just a moment ago? If we need to change the out, click hold and drag this icon right here. If you need to change the in, Grab that icon dragon right there. If you want to use the mouse, this button right there sets the end. This button right there sets the out. This jumps the play Head to the n keyboard. Shortcut is shift. I This jumps the play head to the out keyboard. Shortcut is shift. Oh, and now we have marked a clip. Okay, Megan, you are doing so good. We're gonna ask you one more question. If I spent time playing this clip and listening to it and deciding exactly where I wanted it to start for the right visuals and right audio with the process of setting the in and the out be any different new? That's exactly right. Just making a difference. That's why I can do it this way. If if we spend time listening to the content, it would take another minutes to find. Exactly. We want this to be. But once we have the play had set, it's just the letter. I once you have the play, had said it's the letter O. So this is why, when I'm teaching, I never worry about doing anything perfectly. Perfection is the enemy of learning. You spend so much time trying to get a perfect. You forget what it is you're trying to learn. I'm trying to teach you how to set the end. How the sethi up playing the play head is easy keyboard shortcut. As Scott said his space bar Jay to go backwards l to go forwards k to stop Jay to go backwards. L to go forwards, okay to stop space bar I o etcetera, etcetera Okay, so far with me so far. Right now, we need to edit this down to the timeline. So as Susan and I so carefully discovered yesterday, it is possible to drag a clip from the source monitor, too. The timeline dragging is for the weak dragging is for people who are self taught dragging. It's not for us. Dragging is time consuming. It's inaccurate. Costs us money. We don't like dragging. Instead, if you want to use the mouse, this button right here does what's called an override edit, which drops the clip from the source. Monitor down to the timeline at the position of the play head or, if we needed, insert a clip before ah clip or in the middle of a group eclipse. Put the play head where you want to clip to go click this button and click the insert key and were able to insert a clip like you insert in a word processing document. You say this is where I want to start typing and you start typing and the rest of your document is safe. It just inserts the text. At that point in time, we can get rid of a clip by highlighting at pressing the delete key, and all of our clips are gone. So what we've seen so far is this is how we edit clips to the timeline said in In Setting Out Mark it down to the timeline keyboard. Shortcut is period to do an override at it and comma to do an insert at it. And as we stressed for people like Janice who are making the transition from final cut to premier, don't even bother learning The premier shortcuts go up to Premier Pro go down two keyboard shortcuts and change the keyboard shortcuts from the premiere Pro default Avid's Media Composer five. If you're coming from avid or final cut pro seven. If you're coming from Final Cut and all the keyboard shortcuts that you've grown to know and love inside the application that you're migrating from instantly work inside Inside Premiere. Now one of things that has happened in the CC release it began with the CS six release and continued in Assisi is that Premier has slowly adopted Ah, lot of the keyboard shortcuts that final cut used. So many of the default keyboard shortcuts inside Premiere are already final Cut a lot final catalysed.
Class Materials
bonus material with purchase
Ratings and Reviews
Jfraz
I love this class. It is highly technically, but there is an awesome wealth of information to be had, even if you are a beginner. I've been struggling for a while, trying to look at YouTube videos and whatnot, but this class helped me make better sense of what I needed to do in all of my video editing. You get such a great foundation that's going to help you go further.
Valentine
I recommend Larry Jordan's course there is a lot of in-depth information that will help the beginner as well as the advance premiere editor. The only thing is that his humor is a big corky for my taste but if you look beyond that you get a lot from his teachings. He genuinely wants his students to succeed and get paid well in this field which its nice.
a Creativelive Student
This is one of my favorite courses on Creative Live. Larry Jordan teaches in a way that I can follow and is easy to stay focused on. He has a crazy amount of knowledge about this topic as do all the Creative Live teachers. I love this site so much, has done more for my business than all the other sites I have used combined. Keep it up CL!!