Working with Audio: Mixing And Syncing
Lesson 22 from: Adobe Premiere Pro CC Video Editing: The Complete GuideAbba Shapiro
Working with Audio: Mixing And Syncing
Lesson 22 from: Adobe Premiere Pro CC Video Editing: The Complete GuideAbba Shapiro
Lesson Info
22. Working with Audio: Mixing And Syncing
Summary (Generated from Transcript)
The topic of the lesson is working with audio in Adobe Premiere Pro CC, specifically focusing on mixing and syncing audio.
Q&A:
How can you adjust the global volume of audio clips in Premiere Pro?
You can right-click on the volume keyframe diamond and choose to view the keyframes as either clip keyframes or track keyframes. Switching to track keyframes allows you to adjust the global volume of all clips on that track.
Can you still add keyframes when working with track keyframes?
Yes, you can still add keyframes when working with track keyframes. This allows you to make specific adjustments to the volume at different points in the timeline.
Can you mix audio on the fly in Premiere Pro?
Yes, there is an audio clip mixer panel that allows you to keyframe and use sliders to mix your audio clips. You can also connect a mixing board to Premiere to have real sliders for audio control.
What can you do if audio and video become out of sync in Premiere Pro?
You can use the "move" or "slip" options to realign the audio and video. "Move" physically moves the video or audio to match the other, while "slip" does a slip edit to keep the points in the timeline aligned.
How can you record a scratch track or voiceover directly into the timeline in Premiere Pro?
You can use the microphone icons in the timeline to access the voiceover record settings. From there, you can choose your recording source, set a countdown, and name the recording. You can then record your voiceover and find the clip in the project for further editing or exporting.
Lessons
Understanding Editing: Bootcamp Overview
07:25 2Understanding Editing: Overview
25:25 3Understanding Editing: Video Examples
25:07 4Tour The Interface: Digital Video Workflow
16:38 5Tour The Interface: Project Panel
12:28 6Tour The Interface: Choosing Your Shot
07:18 7Tour The Interface: Music And Voice Over
10:31 8Tour The Interface: Video Tracks
05:26Tour The Interface: Edit Markers
08:46 10Building a Rough Cut: Cut Planning
21:46 11Building a Rough Cut: Selecting Media
25:01 12Building a Rough Cut: The Edit
30:50 13Building a Rough Cut: Edit Points
13:43 14Refining Your Edit: Preparation
10:29 15Refining Your Edit: Making Cuts
25:19 16Refining Your Edit: Using Markers
16:31 17Refining Your Edit: J and L Cuts
15:57 18Refining Your Edit: Replace Edit
05:04 19Working with Audio: Overview
17:43 20Working with Audio: Levels
13:36 21Working with Audio: Music
10:00 22Working with Audio: Mixing And Syncing
14:50 23Transitions: Overview
13:44 24Transitions: Effect Controls
09:31 25Filters & Effects: Overview
18:05 26Filters & Effects: Using Multiple Filters
22:18 27Motion & Animation: Motion And Animation Overview
09:40 28Motion & Animation: Movement With Still Images
26:56 29Motion & Animation: Picture In Picture
10:57 30Motion & Animation: Motion Effects
17:08 31Titling & Graphics: Overview
27:11 32Titling & Graphics: Advanced Tools
11:03 33Titling & Graphics: Roll And Crawl Effects
08:01 34Titling & Graphics: Working With Photoshop
12:17 35Speed Changes: Overview
21:12 36Speed Changes: Stills And Variable Speeds
06:23 37Color Correction: Overview
07:39 38Color Correction: Lumetri Scopes
11:32 39Color Correction: Contrast
21:37 40Color Correction: Advanced Tools
15:12 41Color Correction: Adjusting To A Master Clip
07:45 42Finishing: Prepping for Output
14:53 43Finishing: QC Edit Points
24:56 44Sharing & Exporting: Overview
29:05 45Sharing & Exporting: Size And Quality
24:46 46Ingesting Media:
28:39 47Ingesting Media: Transferring And Importing
31:15 48Media Management & Archiving
26:10 49Multi-Camera Editing: Overview
14:26 50Multi-Camera Editing: Creating A Sequence
20:04 51Multi-Camera Editing: Switching Multiple Cameras
15:31 52Multi-Camera Editing: Finalizing
12:37 53Creating Timelapses: Shooting Strategies
18:04 54Creating Timelapses: Editing Images
14:21 55Creating Timelapses: Importing Strategies
18:47 56Creating Timelapses: Animation
05:58 57Advanced Editing Techniques: Take Command Of Your Timeline
22:36 58Advanced Editing Techniques: Transitions
07:57 59Advanced Editing Techniques: Keyboard Shortcuts
12:00 60Advanced Editing Techniques: Preference Hacks
21:15 61Thinking Like an Editor: Editing Choices
31:55 62Thinking Like an Editor: Telling the Story
23:50 63Special Tools: Warp Stabilizer
17:59 64Special Tools: Morph Cut
06:56 65Special Tools: Green Screen
20:16Lesson Info
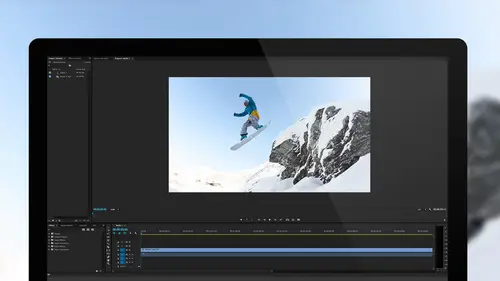
Working with Audio: Mixing And Syncing
Now, you may be asking yourself, and really, you're probably not asking yourself this at this point, I've done all this great audio work and smoothed out everything here to be perfect. I've keyframed it, it's all great, I listen to it, and I'm going, "It's all too soft, it's all too loud." I want to just bring up the global volume. So you can do that because there's ways to work with this as both clips or as a track. So we're look at this as clips right now, but if I right-click on this, this little diamond here, and we have a choice of looking at this as Clip Keyframes or Track Keyframes. So right now I'm looking at all the individual keyframes. You can see right here, it's up and down all over the place. If I switch over to Track Keyframes, for Volume, you see a straight bar. I haven't lost all that nuance that I built into it, but now I can globally bring volume up or down, or even within this I can still add more keyframes, OK. Generally, I use this for global, but do you see the d...
ifference, you can individually control things and then you just want to be able to control the whole level, the master track level. So I find this is really useful. You need to open this up enough to see this diamond. And then you can actually switch back and forth. If I switch back to my, from the track level to the clip level, you see all those nuances are there. So this is really useful. The only other time I find that I end up keyframing a track is let's suppose that I had music, and I had people talking and I had the music dipping under and what not, and I do that on a track level, I could swap out the music and my levels will still stay. So it's just something to keep in mind for controlling your audio tracks. So let's go ahead and look at some other areas with mixing audio, just some other controls you have. I'm going to reset the editing just for a moment, because I do want to point out that there's an additional set of tabs, there's an audio clip mixer, panel, so that if I select a clip here, and hit play, (gentle music) I can actually keyframe and use sliders. Now if you've ever worked in an audio studio, or ever seen an audio studio, you've seen those big audio control boards with the sliders, that's basically a virtual version of that, to control your clips, to mix your clips that way. So you could technically mix on the fly. And I'll play this, and you'll see I'll bring it up and down and then you'll see it on my keyframe, it will suddenly appear. Some people like that. As a matter of fact, you can hook in a control board into Premier, a mixing board, you can actually have real sliders to work with audio. It literally, in my opinion, is the best audio editing tool for a video editing tool, but that's what makes it a little more challenging for people who are new to the game. So for instance, I'm gonna go ahead and play this clip. (gentle music) And you can see that the slider's kind of moving a little bit here. Now if I wanted to, I could go ahead and hit play, have this loaded in, make sure I do not have that on mute and solo, we're good. I'm gonna turn on keyframing here, and now when I play it-- I mean, it is a business. I take people-- Softer. --from all around the world. And louder. --a couple weeks ago. And the whole purpose-- Softer. --is taking photographers to these places. And you'll notice, of course, it's actually right underneath where I want it to be. Those are all the keyframes that I just recorded on the fly. OK? By moving that slider up and down. So once again, what I did, is I played it. Thank you. You do a lot of travel. That's my clip on channel one, that's us talking. I have an empty audio track. So I can widen my levels and the trick is, for it to work is, you have to turn on this little button here, which is basically record my keyframes. In the hopes of getting great photographs. OK? What I really want to do here is just open up what all these locations are. We're gonna go back, ultimately, simple. You bring your volume up, you bring your volume down. You need to bring it up in a specific area, I like keyframing right in the timeline, because I can see my wave form, see what's happening. If I make a mistake, I can select it and delete it. If I want it to happen longer, I can grab it. If I need everything to be up or down, I hit the G key with whatever I want selected, and I would do adust the gain, but not an absolute adjustment, I want to keep my keyframes. And before I bring something in, if I know the audio is soft, I'll select that clip, and I'll do a gain adjustment prior to bringing it in, and I'll already have a clip that's louder. So those are some of the basics. Now, I did mention that we were gonna look at some of the other challenges with audio, and we'll do that over the next few minutes. One of the things that really gets people is if something goes out of sync. So what I'm gonna do here is I'm gonna just kind of clean this up, and put in a situation, actually make a brand new sequence here. We're just gonna grab a piece of video. We'll use this. Gonna click on there and do a match frame. I hit the F key. And now I have that. And I'm gonna drag that down and make an instant sequence by dropping it on this little piece of paper there. So I can make a brand new sequence, there we go. Mark in, mark an out, hit the period key. So I have a problem here, I brought this in, it didn't bring in my audio, why didn't it bring in my audio, we learned that in the previous lesson. This was turned off. Now it brings in my audio. So, if for any reason you have broken this apart because you did that infamous thing we learned you should never do, which is you unlinked things, OK, now. If I move this out of the way, my audio's gonna be out of sync. Let me make this a little bit bigger here. Now, we can't see, this is out of sync, so we're gonna turn on a preference, and if you go into your preference settings, under general, and we're gonna zoom in. There's a little checkbox here that says display out of sync indicators for unlinked clips. So what this is gonna do, as soon as I hit OK, is you now see how many frames out of sync this is. And this is something I actually like to have turned on by default. So the great thing is that I don't have to worry about sliding it back into sync. All I have to do is right click on this and I can choose to move it or slip it into sync. And I'm gonna explain that. So move, would physically move the video on top of the audio, or if I do that to the audio, move into sync, it would move the audio to match the video. Makes sense. But what if there was a situation where you've done all these J cuts and L cuts, and you have things blocking it, and let me go ahead and throw in another piece of video to block that. I'm gonna mark an in point, mark an out point, bring that all in. OK. So. I have this here. And I'm gonna cheat, I'm gonna break this, I'm gonna stretch that out with my trim. So now, I can't move this into sync. OK? Because it won't let me. Oh, it let me, and it did something bad, it actually screwed up my edit. What I really want is I just want my voice to match my mouth, so if I do slip into sync, it does a slip edit, just like we learned before, where it keeps the points here, in the timeline, but it kind of rolls to a different part so my mouth now matches my lips, so that's what usually you'll find you'll want to do, when you have a fully edited show and you realized at the end, oh, no, I accidentally threw something out of sync. So I'm gonna go slip into sync. You'll see, they won't physically move, but the little red thing will go away. And if I play this, you'll see my lips, and the nodding of my head, will match. Let's see if I actually voice in. Now I know you do a lot. So that's the way to fix it. Had the same problem here, again. I would right click, and this is an interesting one, because there's nothing at the end, you see we have more choices, OK? Which is. Move this into sync. We have our move and our slip. But I can, if I want to say, move everything else to match this. So generally, you've probably already cut your audio as a radio track, so that's probably good. The video just probably got out of sync, so usually you want to move your video to match your audio, as opposed to moving your audio to match your video, because then, I'll be saying something different, or Mark will be saying something different. It's one of those things that you play with it for a few minutes, and it just makes crystal clear sense. But the most valuable thing is, you don't have to do the math, you don't have to guess, you don't have to see if you can line up the mouth. It will line it up based upon the fact that these were once connected. OK? So I'm gonna say, slip that into sync. Get some craziness here. Oh, I'm a minute and 57 seconds out of sync. I have no idea what I did when I dragged this in. So. Let's see if we can. Here we go, it's all fixed. A number of years ago-- Once again, I'm not talking. Oh, I know, I grabbed the section where I was just nodding my head, so it's all in sync now. Now the good thing is, once you've done that. Select both clips, shift click on them. Right click, and link them back together, so you don't get back into trouble. So you probably got into this situation because you unlinked something or you moved something or dragged something and then it knows that that audio is not related to that video. There are times when you may actually need to do a shift. Sometimes you'll get, somebody will send you a piece of video, and it's actually out of sync on the master, on the tape, on the recording, there was a delay. And so, you have a slight flap, that's when you would actually unlink it, slide it a couple of frames, so they line up, and then link it again, knowing that these are gonna be out of sync, and guess what, so you don't get annoyed, you go back to the preferences, and you turn off show me the out of sync indicators because it's gonna ask you, it's gonna say, oh, you're out of sync, it's like, no I'm not. So that's how you would fix that problem. I want to cover, how do you record like a scratch track or a voice over, and you do this directly into the time line? So I can position it wherever I want. If I just want to record a scratch track, to start with, I would make a new sequence. But you can also record, say, you just want to voice over something that's already there. Can I, you know, you've already laid it down, and said, oh, I just want to voice over. You're doing a quick turn around of podcast or something. So the key is, you would go down to here, to these little microphones. Now, before I actually click that onto record, I'm gonna just open up the dialogue box for a voice over record settings. And what this allows you to do is choose your sources that you'll be recording from. So right now, I'm recording from just the microphone that's built into the laptop. But if I wanted to, I could plug in either a USB microphone or even like a headjack, like, you know, a pair of iPhone, you know, with the little speaker. It'll be a little bit better than maybe the echo here. But I'll be honest, there is pretty good noise canceling on most of these computers. So that's how you can choose what your source is, and I just did that by right clicking. And the other options you have is your count down, if you want to have it go beep, beep, beep, beep. So before you start talking. And also, to name this, because it's actually creating new media, and so it has to have that media, give it a name. So, usually, I pre roll and post roll. If my levels are too loud, depending on the mic I use, I can go in and turn down the gain. If the mic has it, if not, I go into the system controls and I pod down my voice. So we're gonna hit close on that. And now, when I'm ready to record, I need to pick the track I want to record on. I don't want to record where I already have audio, because it's gonna overwrite that. And normally, I would also do this where I would have headphones because I can listen, you hear that little echo there, because it's coming through the studio, it's actually getting my voice and playing back the other audio tracks, so I can record to it. So I don't necessarily want to do that with the studio, so if I wanted to listen to the other tracks when I record, I would leave them on. If I don't want to hear them, I would actually mute them, or I could solo my current track, so when I record my audio, it goes in. I'm gonna go ahead and try. We'll see if we have any feedback. Because I can listen. So now I can start talking, I'm gonna talk softly. If you notice, you can see my audio levels are recording, when I'm done talking, I simply hit stop talking, which is a difficult thing for me to do, and then I stop recording, and then you can see, there's my audio wave form. That I can now play back. Let's go ahead and see what that looks and sounds like. Talking, I'm gonna talk softly, if you notice. So it's as simple as that. Once you do the recording, if you want to find it in your project, if you right click on this, you can say reveal in project, it'll show you exactly where that clip is. And if you're really worried that, I don't know where I stored this, if you right click on it, you can also say reveal in finder. OK, and it will show you exactly where it went to, and remember, when we set up our preferences, we said everything was gonna be saved in the same area as the project, we can target where things are saved to. So there are my audio files, if I need to bring it to another location or e-mail it to somebody. You could use this just to record an audio track to e-mail to somebody. So it's a very nice tool, you don't have to use a separate audio tool to record sound, and it's just simple plug and play. A few controls. The key is, hit the microphone on an empty track or create a new sequence and go ahead and put it in there. And audio is simple as that.
Class Materials
Bonus Materials with Purchase
Ratings and Reviews
a Creativelive Student
I've never even tried video editing before this class. I opened the program once and panicked. After only 9 lessons I was able to throw a short video together (basic of course, but still pretty cool). I wish all of my teachers growing up were just like Abba. He goes over everything without dragging anything on for too long. He repeats things just enough for me to actually remember them, and he is funny. He keeps it fun and shows that even he makes mistakes. I can't even believe how much I have learned in less than a quarter of his class. I have a long way to go and am very excited to learn more. This class is worth every penny and more! I was hesitant on buying the class because I have CS6 and he works with CC, but I have already used what I've learned in his course to create a video. The first 9 lessons were already worth what I paid for the entire course. Thank you, Abba! You are an awesome teacher! You have me absolutely obsessed with creating right now! I highly recommend! You won't find this thorough of a course for this decent price!
Patricia Downey
Just bought this yesterday and cannot stop watching!!!! What a FANTASTIC teacher-- just love the way he explains everything. For someone like me (who has a zillion questions) it is perfect. As soon as he introduces a feature, he explains several aspects in such a way that's easy to grasp and remember. So, so happy I got this. Thank you Abba and CreativeLive!
a Creativelive Student
I am only on lesson 19 and I am so glad I bought this class, so worth it and Abba packs so much information into these lessons its crazy. I will for sure have to come back and watch again when I need to remember to do stuff or need a refresher. He is funny and quirky and a great teacher. I so recommend this to anyone wanting to become a better video editor!! I am coming from being self taught and using iMovie and he makes it so simple and understandable. Can't wait to learn more :)