Lesson Info
16. Working with Filters & Effects
Lessons
Class Introduction
03:37 2Exploring the Interface
11:29 3Meet Premiere Pro
08:43 4Building a Rough Cut
06:11 5Setting up a Project
07:10 6Importing Media
10:55 7Working in Timeline Part 1
15:21 8Working in Timeline Part 2
18:44Refining Your Edit
10:00 10Trim Tools
30:47 11Working wth Audio
13:28 12Adding Music
10:47 13Working with Music
16:53 14Basic Transitions
17:02 15Advanced Transitions
12:07 16Working with Filters & Effects
25:30 17Working with Nests & Sequences
13:09 18Motion Effects
26:03 19Rendering & Positioning
06:03 20Titles & Graphics
18:50 21Basic Color Correction
11:33 22Exporting & Archiving
23:30Lesson Info
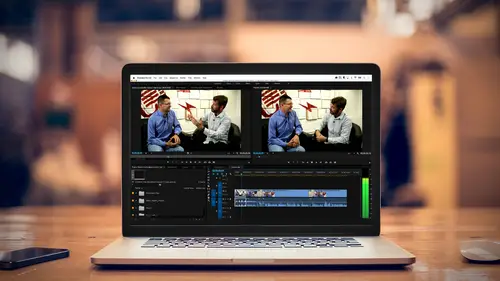
Working with Filters & Effects
We're going to apply video filters. We're going to modify them. We're going to combine them. We're going to do some audio filter effects. We've already done the Essential Sound Panel because I was so excited about that that I could not wait. We're not going to cover that again. And we are going to copy and paste effects. Effects are fun. Why are we using effects? We can use them for a lot of reasons. I can use an effect to fix a problem. Maybe I have footage that isn't stable, that's a little shaky. There is a video effect called the warp stabilizer that can stabilize video. May not make it perfect but it's pretty amazing. I can use an effect to fix an audio problem, to remove the hum of an electrical sound. I could use an effect to color-correct, to fix color that might be off. Maybe it's too blue because I forgot to turn the white balance to the correct color temperature. Or there might have been a big blue wall behind my person, and it was reflecting on them and causing them to be a...
little bit blue. I can use it to fix problems. I can also it to stylize something, to give something a unique look. Or to be creative, maybe I want to come in and have something blurry in the background and then come into focus, I could use a blur filter. Filters you apply pretty much like you do transitions, but the good thing about filters is you don't have to worry about handles. So you just go ahead and you drag it and you drop it on, so let's go ahead and look at how some filters will play out and how you can modify them on our clips. I'm going to go ahead, and this is a beautiful shot to start with. But I just want to show you how filters work. We will go over here. You see filters has its own tab. It's under Video Effects, and if you look closely, there is only one filter available. I bring this up point specifically. There is not only one filter available. But there will be many times that you discover your filters are gone, your transitions are gone, I don't know why. It's because most likely you have something typed in here, and it is filtering out anything that does not have the word dissolve. What happens sometimes, you can literally sometimes type a apostrophe, and now every single one of your folders look empty. If you're not finding all of your effects, if you're not finding all of your transitions, make sure there's nothing there. The x right here will make sure everything is gone. Now you can go ahead and you can see all of our video effects. Inside here, you can see all the different ones. These are actually really good. There's again, more third-party ones that you can work with, but there are a lot of great effects built into Premier Pro. I just kind of want to show you how they work. Some may not have a lot of modifications. For instance, the black and white filter is pretty black and white. If I go ahead and drop that on, it makes my image black and white. If I click on it and go to the effects control tab, we've been there before with audio. We've been there before when we actually put on the audio Essential Sound Panel. Here it is, black and white. I have no other modifications, other than the fact it just basically pulled out all the saturation. But other filters, for instance, I will select this and remove it. To select and remove a filter, you just can click on it and hit the delete key. What if I put in one of the blur filters. Type in blur. There we go, now I see my blur filters. This is a whole bunch here. Gaussian blur, very popular blur. You folks who work with photographers, it works really well and it renders really fast. I throw that on. I could drag it on, or if the clip is selected, I just need to double-click on the filter. It will automatically get applied. There it is, it is now put inside my effects panel. In this case, I do have some parameters I can modify. The blurriness, if I want it to be equally for horizontal and vertical, or just horizontal blurring or vertical blurring. We're just going to do a traditional blur. I'm going to do a pretty aggressive blur. Maybe I want to bring in the title sequence, and not have them distracted by the boat, and then I'm going to actually keyframe, like we keyframed the audio, we can keyframe filter by saying at the beginning, make it really blurry, and then over time, bring it into focus. We're going to do that in just a moment. But I want to point out something very specific with the blur filter, and a really great fix that's usually right in front of our noses that people don't take advantage of. When you blur something, it likes to blur the edges and think that the black outside of the frame of your image, is something you care about and blurs that. It looks horrible. You're like, why is it doing that, and then you go ahead and you go into scale, and you make it a little bigger. It looks like it solves the problem, but it's a lot of work. Repeat edge pixels will solve that problem. I'm going to press that button, and presto change-o. Boom, it now ignores the black on the outside, okay. Repeat edge pixels, okay. There I have my blur filter. If I want to change this over time, I can keyframe just like audio, any effect where I see a very small stopwatch. That is an indication in Premier as well as After Effects, that you can change something over time. The jargon we use is the word keyframing. It actually comes from the old days of the Disney studios where the master artist, the head honcho, would draw the key frame, say Snow White over here and the dwarves, and then Snow White over here. All the other animators would draw the animation between the two key frames. The computer are the other animators. We are the head artist, and that's how it works. If I wanted to animate this over time, I want to lock in a keyframe of it being out of focus. I'm going to position my playhead to this point here, I've already made it blurry. It's pretty blurry. And now what I'm going to do is I'm going to click on that stopwatch. As soon as I click on that stopwatch, it turns blue and it puts a little diamond here. That indicates that at that point in time on my timeline, it will be this blurry. Okay, and then I can go ahead and move it forward here, or I could move it forward down here. They're directly reflecting each other. And now, because I already have one keyframe in, any time I modify this number, it will create a new keyframe. I'm going to go ahead, slide that back to zero. I could type zero. Look at that, it has now created a new keyframe. I'm going to mute this because we do have a little bit of audio coming out and we don't need it. Doesn't necessarily want to mute on my computer. Hopefully, I'm not deafening people. But I'm going to hit play. As a matter of fact, I'll teach you something new. I like this, this is always an opportunity. I don't want to hear the audio. I don't know if I can turn it off the way we have it wired in the studio, but I can go down here and press the m key and mute this track of audio. So now I don't have to listen to it. This is really useful sometimes when you have a whole big mix of audio, and you just want to isolate it. Ah, no sound. Okay, so, I'm going to simply hit play, and I want you to watch the playhead. Somewhere along the way, I hid a couple of other changes. It'll be fascinating to see what I've done. Oh I've clicked on the audio. Let me go back in, there we are. I start here, beginning, hit play. Out of focus, it starts coming into focus. There it's perfectly clear as I go from this keyframe to this keyframe. I can actually create a nice effect that I can then leverage. If I don't like the timing, if I want it to be a little bit longer before it comes into focus, I can grab the keyframe, just move it to the right. Now it'll take longer to go from this point here to this point there. Let me go ahead and hit play. This has a parameter I can change. If you recall the black and white effect that I pulled on, it didn't have a little stopwatch. It is on or it is off. There are some effects and some filters that you can't keyframe every aspect. There are other filters like the color corrector, that has so many parameters that you can keyframe. It's something you can play with. It just takes some practice. All of a sudden, you'll have an aha moment. The key is, and I'll do this with another filter so you can kind of experience it. Let's go ahead, we don't want to do a blur. Let's pick something that would be complementary to this. We'll look at maybe, there's our lovely black and white. Stylize, let me check that. That's going to take a long time to render. Looking for the perfect one here. Something that's not necessarily the perfect one but it will allow me to show off a point. There is times when maybe you want to export your show with the name of the clip embedded in the output, so maybe somebody can look at the footage and say oh yeah, use this shot, don't use that shot. There's a lot of different ways that you can do that. One way is using something called clip name. If I drop clip name on here, you will see that it has the name of the clip now embedded here, and if I export this out, we will see what it is. There's our blur. So this is kind of nice. I'm going to look at this up here in the corner. Some of the things I can do is I can control the opacity. I can also control the background. I can say what track it's looking at as my source. Maybe I want to look at track two or track three, but right now, I just want to have this on it. The size is fine, justification's fine, I can position this wherever I want. But what I want to point out is that I am stacking two filters on top of each other. You can stack numerous filters on top of each other, but what's important is the order that the filters are stacked. This is actually a little bit reverse of the way people are expecting to see it if you come from Photoshop. What it's doing is it's putting on my Gaussian blur, and then it's putting on the clip name. If I moved the clip name above Gaussian blur, and I can simply do that by dragging it and letting it go, so the clip name is now on first. Then I put the blur. Take a look at what happens to my effect. It blurs the name. Then as the image comes into focus, so does the clip name. So if you are stacking multiple effects, the order of those effects will give you different results. If you're not getting the results you want, try flipping the order, okay. Effects can modified, effects can also be determined by their position to how they work with the other clips, and there are times when I may want to see what one effect looks likes with the other effect off. If you go over to any of our effects and you see this little thing that says FX, that allows me to toggle that specific filter or effect on and off. So I don't want to necessarily remove it, but maybe what I want to do is I want to see what it looks like with and without. That allows me to toggle an effect on and off, so I can focus on another effect. Then when I'm ready, I can bring it back on. That's the idea of working with filters. We learned how to apply it, we've learned how to modify them, we've learned how to combine multiple filters, and we've also learned how to do some basic keyframing of filters and how to modify those. As a little bonus, you'll notice these are little diamonds. A lot of times, when people are working with keyframes, they don't want it to necessarily be linear, a to b. They want it to maybe be gradual, to ease in. Anytime you see a diamond, if you right-click on it, you can actually control the curve of how it's getting from a to b. So, if you want something to be a little more fluid, you could go ahead and put a bezier handle in. You'll notice this has changed to a different shape. I want to point out something here. There's a little disclosure triangle. If I click on that, I can actually see the animation effect. There's my bezier handle, that's that wonderful mathematician, Mr. Bezier, who handles things well. But I can curve and I can say, I want it to be gradual and then quick. I want it to be slow and then flatten out. I want to be able to control this. Maybe I want to go here to hold. It goes boom, and then it just jumps. What's that going to be, it's going to go from fuzzy to clear. Try these, but I want to point out that each of these with a different shape implies a different way to get from a to b. That's how you work with those. Let's take a look at some of the audio keyframes that are available. Not audio keyframes, audio filters that are available. Once again, we'll go back here. Let's bring this fullframe by hitting the tilde key. We have nothing there. I'm just going to go ahead and close all video effects. Unlike the audio transitions where we only had three choices, with audio filters or audio repair, you have a lot of choices. Some of them come natively in the program, some of them are from the operating system. On the Macintosh, there's core audio. They can use that. There's a whole bunch of filters that if you've never worked with sound before, are completely confusing. I've said this many years, and I said it at the beginning of the course, most of the time when people start messing with audio to fix it and put on filter after filter after filter, and by the way, if you're talking to an audio engineer, it's an effect. A filter is something very specific. If you call an effect a filter, they will cut off your ponytail. Audio engineers know this because all the sound guys, you go to an audio conference, they all have ponytails. I have said the word filter one time too many and they banned me. There's a whole bunch of different things. Most of these you can look up in the help manual to see what they do, but some of them are just nice, that you want to put on a graphic equalizer to bring some audio levels up. You want to filter out some problematic bandwidth. As you can see, there's a whole variety here that you can apply. If I applied an audio filter, again, we'll do it to Colin a little bit later here. I want to make sure there's no filters on him, effects on him, so there we have, we do have a bunch. I want to remove all of these effects as a matter of fact. This is important also because it kind of is leading us to another area, but this is because I went in and I put in the Essential Sound Panel, and I said, make him sound good. It put in all these different filters and made him sound good. But let's say I didn't want to do that. I need to remove filters. Whether it's video or audio, I can select a clip, and then under edit, one of the places I can find remove attributes. Maybe I don't want to go in and remove the attributes one at a time, I want to just go ahead, select a bunch of clips, and go ahead and remove attributes. There used to be an option in the drop-down menu. My gut says that they might have moved it. I don't see it as an option here. That's what those clever engineers do, they stay awake at night saying, Abba, how can we confuse him. We'll go back to here, remove attributes. I get a little dialog box, and it will remove the attributes that are checked. In this case, there's nothing on the video, but I have three different audio filters on here. I can remove all of them or be very specific on the ones that I want to remove. I'm going to go ahead and remove all of them. I'll simply hit okay. And now all of those audio filters are gone. When I load this clip and I turn on the effects control panel, all those audio effects are gone. Now we can go ahead, and if I wanted to, I could apply one of these effects and modify it, just like we did before. Maybe I'll just go with, this is an old one, this is the vocal enhancer. I could double-click or just drop it on. Once it's dropped on, these are the parameters I can work with. Vocal enhancer, scroll this down a little bit, if I hit edit, it gets this little box here, female, male music, male. All the controls I have, and we're good to go. Some will allow you to go a lot deeper, but you can go in and you can modify different parameters. That's a very basic filter. If I went ahead and I wanted to go ahead and maybe put in a multi-band graphic equalizer, ten bands. Drop that on, look down here, ten band, custom set-up. It brings up a multi-band equalizer. This allows me to say, oh you know what, that ocean waves sounds, it's at about, the frequency is about 125 to 250, I bring that down and that's good. This is where I tell people again, the more you mess with your audio when you don't know what you're doing, the more you will have it sound bad. I fully respect sound people that know exactly what they're doing. I have to tell you a little bit of an aside story. I was working with somebody, I was doing some audio repair. There was this strange frequency buzz. I was using all my magical skills that I've learned over the years to find that exact frequency so I could put in a notch filter and take it out. A friend of his stopped by who was an audio engineer for literally 50 years. This guy was like, from day one, and he's in his 70s now. He was just visiting. He had him come down to the studio in his basement. He sees what I'm doing. My friend goes, "You want to give him any advice?" He goes, "Well play it." So I'm playing this audio clip with this buzz that's ruining the shot. I hear the guy, and he's going (hums), and he's like, "Take and put the notch filter "at this frequency at this width." I did that and it was gone. That guy knew exactly from listening for so many years, what needed to be removed, and to me, that's magical. So we can do the best we can with a lot of different elements, but sometimes when somebody does it every day for their entire life, they can just fix the problem like that. Audio, you have a lot of power, lot of opportunity to mess things up, one of the reasons I do like the Essential Sound Panel, because it's basically, I just check a bunch of boxes. It makes me look good. The last part of this that I want to talk about is (bang), we can cut that out in audio when we edit. I wasn't even asking the crew here. I was pointing out that I can just find the frequency of that and remove it and it looks like I am flawless. That's what editing is all about, unless I trip. You can copy and paste these effects. You get a look that you like, you want to put it in other clips. We taught you how to remove them but you can also copy and paste. If I go over here, and I'm going to just add a look here, and we'll do a little bit, but I'd give it maybe kind of a nice cinematic look, drop that on here. So I have this cinematic look and I'm going to go ahead and maybe put on another filter here. Let's close all our audio effects. We'll go back to video effects. Maybe we'll do some strange color correction. We'll deal with brightness and contrast. Bring that up. Brighten it up and harder contrast, so we create this wonderful look. This is like, I will patent it and sell this look. You know what will make it even better is just a little bit of a Gaussian blur. This is what happens when I let my kids cook. They create something as horrible as this. So Gaussian blur, boom. Not that you would ever want to do this in real life. I have these three filters, I love them, I love this look. I want to be able to copy them onto this clip. I simply hit copy, command-c is copy. I go onto the clip that I want to paste it to. I choose paste attributes. Keyboard shortcut for that, but if you want to go here under effects, there should be paste attributes. On a Mac, it's command-option-v. I think it's control-option-v on Windows. Could be control-alt, I'm sorry, there's no option in Windows. No options in Windows. But I say paste attributes. I get a dialog box similar to the remove one, and I can say, of the attributes I copied off the first clip what do I want to paste. I can say, you know what, don't need the Gaussian blur, but I do want all the vocal stuff because I liked it from the previous. I simply hit okay. It has now pasted everything on this clip to this clip but the Gaussian blur. Once again, it's just a regular copy, command-c, but it's not a regular paste. A regular paste is command-v. In this case, it's option-command-v, or on Windows and I'll double-check this, I believe it is alt-control-paste. We can check on that. I will have these keyboard shortcuts as a handout in both Windows and Mac. Any questions come in in the last. They're so mesmerized. We had one layering question. This was posted by Svenska. Svenska wants to know, is the layering in filters order like Photoshop or is it different in Premier Pro? For example, in Photoshop, I go to the layers panel and move one layer before another to get the effect I want. How does that work in Premier Pro? It's a great question. It actually is the inverse. It's the opposite of how you would expect it. In Premier, it goes from top down. Whatever is the first effect goes into play, and then the second, and then the third. That's why when I moved the blur above the clip name, I'm sorry, if I moved the blur below the clip name, the clip name came first and then it got blurry. With Photoshop, you kind of work from the bottom up. You start adding your adjustment layers above things. It is a little bit inverted of what you're expecting to see.
Ratings and Reviews
Maude Colin
This class is exactly what I needed! I've been trying to understand Premiere Pro for a year now and I've never been able to do anything with it. I had the feeling that I would never succeed and yet... Abba Shapiro is not only a great teacher, but also the kind of person that makes everything looks so simple. I loved that class and even though I've got everything I needed from it, I really want to do the Premiere Pro bootcamp this year. I want to go further and learn Premiere in depth, just for fun cause that's what it was! With Abba Shapiro, I had fun learning this super-complexe program! It was fun, easy and super rewarding!!!
perrault095
One more amazing class from Abba! The is a fantastic teacher who would explain complicated issues and make it souds so simple. Lots of information to work with. Really great speaker and his humor is brilliant. Love his class!!! Will be rewatching it again and again.
Yevhen Byelyakov
An awesome class that makes the initial hoorays to Premiere Pro so much less intimidating and is guarantee to save you a lot of time. I've created about a hundred clips over the last year or so and after this course identified a huge amount of productivity boosters and also learned a few things to improve the quality of my produce. Looking forward to more in-depths courses. One last comment -- it is basic and gives cursory overview of the topics listed. Do not expect anything too deep or advanced but if you're self-taught, Youtube-style person who still drags the clips around or copy-pastes attributes across all clips, this course will be a great way to improve many of the routine tasks.