Lessons
Class Introduction
02:34 2How to Use Bedsheets as Backdrops
05:37 3Effectively Use Color Theory
06:07 4Set Design and Prop Placement
05:02 5Shoot Props and Self-Portraits for Composites
13:41 6Composite in Photoshop®: Selection and Shadows
33:25 7Composite in Photoshop®: Lighting and Color Adjustments
19:43Lesson Info
How to Use Bedsheets as Backdrops
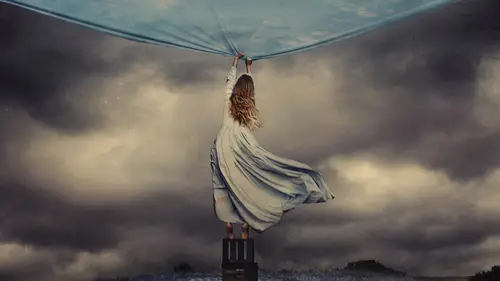
here we have a number of different backdrops, and this is how I typically work with a couple of amendments, which will tell you about later. I have these bed sheets. They came from goodwill. They really inexpensive, super easy to get, and in fact they're even wrinkled. And that's OK, so they don't have to be super smooth. But the smoother they are, the more seamless you're going to be able. Teoh work with sheets. So, for example, if you're going to create an image on this sheet, if if your goal is to create an image where your set designing and you have props all around you and you're going to create without removing somebody from this background, of course, the smoother the background, the better. Same with for compositing. The smoother this background is, the easier you're going to be able to erase your subject off of the background. But it's not necessary. I don't even own an iron, and it's OK, so I work with the wrinkles, which I'll show you later in editing how we're going to work...
around the wrinkles that we have. But for now, just know that if you are like me, and you have no idea how to iron things. You'll be it. Okay, so don't worry about it. So we've got these backdrops, but not just one. I have them clipped on here and we actually have multiple backdrops. And I thought this would just be nice and easy. And it's something good to even keep set up a home. If you have the ability to just clip your backdrops up, I don't, though I don't own any backdrop stands. I don't own any C stands. In fact, I own absolutely nothing fancy at all. I just have bed sheets and duct tape, and that's really good for me. So my typical process would actually be to just take whatever she'd I want duct tape it to the wall, and that will be OK. It doesn't really matter. It might fall down a few times, but who cares? That's the fun of it. So I've got all of these sheets and I have multiple sheets for a reason. Instead of just having red or black or white, we've got red, black, white, gray and gray is probably going to be your best friend when it comes to backdrops. Because Grayson neutral. So if you use gray, then you don't have to worry about too much because gray can be blended into a lot of different backgrounds, and you can also cut a lot off of a grave backdrop. But what you really want to look at is who is your subject and exactly what are you trying to do with that subject? So, for example, I've got this black piece of fabric here, and since I'm going to be photographing myself right now, I have blond hair. I think we can all agree on that. So if I go ahead and put myself on the black, my hair is going to stand out quite substantially. True, yes, that's a good thing, because that means that there's a lot of contrast between my hair and the backdrop, something that I'm looking for when it comes to cutting hair off of a backdrop. If you want to keep your subject on the backdrop that they're on, then it's simply a question of what color is best for the image that you're trying to create. I personally love to create with a good black backdrop. The first thing is that it sucks the light away, so it's not going to reflect anything or be distracting in the background. And it also creates a really nice, moody image, which I think is simply the most atmospheric, beautiful thing that you can create visually. But that's just me. If you like something else, go with something else. So the other backdrops that we have are good for other things. We've got this really bright red color, which could have been any color, quite honestly, could have been blue. It could have been green. It really doesn't matter. And this is the same principle as green screening or blue screening in film. So if you have a color that contrasts with whatever you're trying to cut off of it, it's probably gonna be a lot easier to isolate that color and get rid of it. So that's why you would want to use a colored backdrop like this, something really bright, something that won't show up naturally in somebody's face. Now, in this case, if I had red lipstick on, that could be an issue. But if use blue or green, you're less likely to run into that problem. This can also be good if you know where you're trying to move your subject to. So let's say that you wanted to move somebody to a room with a red wall in it. Well, doesn't it make sense to use a red sheet? Because then you don't actually have to erase the background. You simply blend the sheet into the red wall that you're moving the subject to, so another example of that would be this white sheet. Here we've got white or cream color, and this would be generally problematic for my skin color in my hair color. Because it's almost the same. There's not a lot going on here that's going to separate the subject from the background. If that's the case, if you have something that matches the skin toner hair color, yes, it will be more difficult to cut. So I wouldn't want to use this if I was trying to cut myself off of a background. But let's say that the room I'm trying to put myself in is white or cream colored. Well, this could be really great because first of all, it's reflecting the same light that that room would, and secondly, I can blend this background into that room that I'm trying to move my subject to. So all of those things contribute to what backdrop I would like to use, and in this case, we're going to go over the pros and cons of each one and try to figure out which might be best for our shoot.
Ratings and Reviews
Kamand
I started to use Photoshop just for two months now, and I just came to this fruitful tutorial from the Adobe Photoshop official page for beginner tutorials. And I can say that it was amazing. For me that had already learned the basics of software, her amazing lessons were a chance to dig even way deeper into the color theory and light/shadow/color aspects of photo editing/compositing. Besides from that, it was a real inspiration on how we can use our simplest tools and options we have even at "home" to just start building our little home-studio and start photo shooting, compositing and eventually CREATING inspiring, mesmerizing artworks. HAVE FUN CREATIVES! =)
Ahmad Mostafa
Great, great to watch, great to listen and great to learn from, loved the instructor.
Deann DaSilva
Fantastic, super helpful. I love her creativity and imagination. Her technical explanation is spot on. Thank you Brooke.