Lesson Info
7. Cloning and Simple Compositing in Photoshop
Lessons
Class Introduction
02:06 210 Tips and Techniques for Shooting Wedding Portraits
22:13 3Shoot: Groom Portraits
21:28 4Shoot: Bride Portraits
25:07 5Shoot: Wedding Couple
10:57 6General LR Base Tone Recipes and Batch Processing
27:41 7Cloning and Simple Compositing in Photoshop
11:13 8Color Adaptation, Content Aware and Median Blur
07:48Lesson Info
Cloning and Simple Compositing in Photoshop
Let's go on to Oh, shop. All right, let's do this. So what I'm gonna do first is let's go ahead and just grab any image. Let's grab. It's got one of these guys. Okay, Let's see which one do this one. I think it's really cute. That expression. Okay, I'm gonna press control your command. You to take this from light room to photo shop. Okay, we're now in photo shop, and tip number one is very, very simple when you are cloning. And by the way, we use Photoshopped for literally 1 to 2% of our images. 98 to 99 of our images out of 100 are gonna be done in light room. We only do photo shop, but we need to retouch something for the blogger, an album or some like that that we actually need to. I didn't actually get in there and do or for composite type work, which we're gonna demonstrate in just a second. But simple composites, quick composites. That's what we do. So, with cloning, I'm gonna go to a spot healing brush. You can go to healing or smiling either way. Okay, So what? I'm gonna show y...
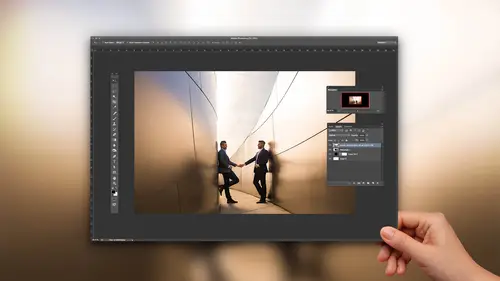
ou is. We use random brush shapes and only got to do is this is how the brush normally comes like this. All I do is tilt the angle a little bit and then make it more of an oval shape. And that automatically gives you a little bit better of a clone. Because now the shape isn't so circular, right? A circular shape. When you clone things in, it's gonna draw attention. This is a little more randomized, so the shape fits into the image a little better. So we would clone the exact same ways. Everybody, which is just create a new layer. And we always make sure that we're not working on, you know, the the back on itself once we get into Photoshopped, were destructive editing. So all I would do is I would target certain things that I feel like might be a little bit distracting. Generally, we're not going to really modify anything that's a facial feature, right? If it's a part of their face, we're not gonna change it. If it's a temporary part of their face like a blemish, is it some like that? That's what we'll fix. What you gonna do is. Make sure this little button right here sample all layers has turned on. This is really far away from me. Okay? And he's gonna bring this guy in, use your left and right brackets to control the size of it and just remove whatever it is that you need to remove that looks, you know, a little bit off. So this little thing underneath the hair right there is a little bit like if I was actually blow this up, I'd fix it. This is, like, so tiny that you don't really need to worry about this stuff. But what I typically recommend, if you press control zero, it'll zoom you out to the full fit view, right. Press have to go full screen and control zero command zero to go out to this 100% view. What I usually recommend when you're retouching, especially for wedding stuff, is zoom on your screen to about the size that it would be when it's blown up. So at the studio will actually put a ruler like a little measurement just on the screen so you can actually see like Oh, this is an eight by 10. Okay, so you put a little measurement there. You blow it up and you go. Okay, that's eight inches. And now retouch. That makes sense. Because what happens is people go like this and you're like fixing like, every single thing, okay? And you go through the entire image, and that was a really terrible clone job. But you go through the entire image doing that and what's happening. You're over retouching because you basically if this image were actually blown up at this size, I mean, that would be, like, what, 100 inches on a on a campus or whatever it is. So you're doing too much work. Okay, so press controls your resume out. Command zero press Z drag until it matches that ruler. So just put a little measure up on the screens. We can make sure that you're not over retouching. Simple compositing. You guys can do simple compositing. Put the camera on a tripod, take a shot at your light in there, remove the light for another shot, and then we can simply composite it out. It's a super easy process. I'm gonna show you how to do it right now. You can do it to remove a light. You can do it for creative purposes. So in this scene I took an image with a couple in it because I know the couple can't hold still for 30 seconds. So I put the couple in it, shot it at a quick speed again. We're on a tripod. I put the nd filter on. We slowed it down a 30 seconds with an nd filter during the day. So we get that beautiful, wispy look, That fog you look in the ocean. And then I added a mist spray. You guys saw incredible games. We teach how to do that a lot in that class, we had a Miss Spray to get this nice flair, and we combine all three. So I want you guys how to do that. Right now, this is like another one of our bo shop magic pieces. Um, okay, let's go over here. Watch this HDR natural color. This is the preset that dials in, like, basically an HDR presets. So if you look that recipe we're pulling on, the highlights were pulling on were bring up shadow. They're pulling down. Whites were adding a lot of contrast cause that process does kill law. The contrast. So what I'm gonna do now is just dial in a good white balance. So it's not so nuclear. I'm gonna pull down the exposure a little bit. I know what for this one. This is a little bit like I kind of don't like my images that candied. So let's just do like, uh, neither a black crusher signature color, mostly signature color will keep it there. Okay, So again, jot down this recipe. All this does is it pulls the highlights in the whites downs, we can retain color, right? We're adding shadows. We're reducing blacks a little bit to get our contrast. We're adding a little bit of over a contrast were to go ahead and brighten up. What I'm gonna do is tweak going to reduce a little the vibrance and add a little bit more warm to the image. I want to make any other adjustments. I can, but let's call that good right there. Okay. So it looks okay. Now, I'm gonna select all three of these images there shot with the exact same settings or the exact same exposure, at least close to it. Okay, so we try to approximate the brightness to make sure that they're close. We're in a press control shift s or command shift s to bring up our synchronized settings. I haven't done anything locally they need to worry about. Plus, this was on a tripod, so I'm just gonna click check all synchronise, so color tones are going to for the most part match. Now all we're gonna do is with these three images. I'm gonna go into the develop module, and I'm gonna look from image to image to see if there's any shift in color and temperature. Okay, So what I'm noticing is that let's see the shot could be a tiny bit more warm exposure wise. It's pretty dang accurate. This one's pretty good too. Might drop it by one little clique. Okay, so I'm just evening everything out. That's it. Once I'm done evening out and everything has been applied to it. I'm gonna select all three meters by holding shift and left clicking. Right click go Edit in openess layers in photo shop again. I I don't think these ones thes might be shrunken down. I tried to keep the files as small. So when you download, they don't take forever. These ones are the actual CR twos. Now the you'll notice that this shot right here that is showing the screen that's actually my safety shot in case I decide that I don't like the spray effect. I have a shot without it, you know? I mean, so I take a safety shot and I'll add the spray. So that way, it's not just a spray effect, but I think for this image I'll probably use just the spray. So now they're loaded up into layers on the right side. So Photoshopped did all the work like it did all the work, transferred everything into one single file. All I do is select all three images. This is a magic button right here. Go to edit Ottawa line layers, press auto click. OK, even when you're on a tripod, there's a tiny bit of movement and shift. Generally, unless you're using like a shutter release and really being super careful. What you'll notice is, though it does a little bit of a shifting shift along the edges to make sure that everything now is lined up. Okay, so now everything is lined. Our top layer is that layer of the couple. And what I want to do is actually do this. This is simple compositing in its glory. Okay, press alter option and click the mass tool that adds a black mask. So if you just press the mask button is gonna add a white mask if you hold down. Alter option adds the opposite. Okay, press B to bring up your brush. Shrink that brush down. We're in a paint white end just to reveal the couple. Done cool. That's all it takes if you if you shoot it well and you make sure everything is kind of done in in terms of, ah, like the color grading and everything. The color grading matches. It's literally 30 seconds inside a photo shop. You can knock out a light stand. You can place the couple back in the scene if you had to slow down the shutter. You know, whatever you need. Now, I would zoom in and just make sure that you kind of refined. Sometimes you can have a little bit of an edge around them, so just kind of zoom in. Make sure that it's cleaned up, you know, if you need to and do that. But this already looks pretty good. Okay, we would save this out. Hit control. W go back to light room. And this is where we would actually do it Any additional process. So sometimes we'll actually go and we'll say Okay, now, I want this as a 16 by nine. I'm gonna change the crop. I want to add in my radio to kind of pulling a burn. We basically reprocess this. So it's three fried beans. You guys will know that. Well, if you watch more of my classes, okay? So you could do whatever tweaks additionally over that sky cloud Ocean. Let me show you this. Ah, Okay. I'm gonna increase the size of brush. Wow. All you do is subtracted off them. Okay? Take a look before. Cool. Pretty nifty. All right. Okay. What do we got next? Okay, so let's go back to the slides. So this previous one is the exact same technique. We just knock out the the light. So now we end up with that final lit image without our person it. Right? So this is the steps with all these different techniques. I include the steps, guys, just so you can have something to look back at. So she went on a tripod light room to rob, process the master image selected, sink them right click, edit it and open his layers and PS and then from photo shopping and select all layers auto line and then just simply mask is desired. Okay, if you've done everything correctly up to that point, then they should blend nicely. If you haven't, you might need some adjustment layers just to blend in contrast in color. But it's a little bit beyond kind of what we're gonna do here.
Ratings and Reviews
Ahmad Mostafa
Very nice class and very nice instructor, a lot of information is presented in a cool and easy way, you will love to follow along with the instructor. Thank You.