Color Correcting: Architecture Photography
Lesson 4 from: Advanced Color Correction in Capture OneDavid Grover
Color Correcting: Architecture Photography
Lesson 4 from: Advanced Color Correction in Capture OneDavid Grover
Lesson Info
4. Color Correcting: Architecture Photography
Lessons
Class Introduction
03:10 2Advanced Color Selections
26:44 3Color Correcting: Product Photography
06:34 4Color Correcting: Architecture Photography
06:09 5Color Correcting: Travel Photography
07:07 6Color Balance Tool and How to Save Styles
14:13 7Dive into the Color Editor's Skin Tone Tab
14:04 8Color Manipulation for Portraits: Headshots
07:36Lesson Info
Color Correcting: Architecture Photography
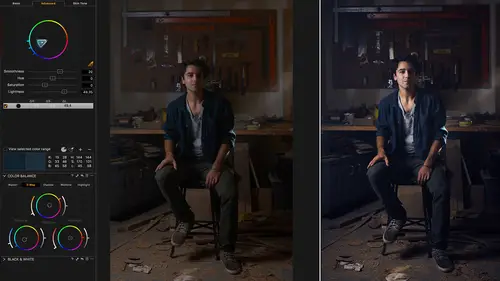
So, architecture can be a bit tricky because we've got various different light sources, moving around and so on. So here's a shot from Paul Reiffer, a friend of mine. We can see the image as it comes straight out of camera and then after a few adjustments and things. So we'll concentrate just on the color side of things. When we adjust this shot, you can see there's also some other perspective changes going on as well, which is additional tools in Capture One. But let's think about the white balance of this, first of all, because this is, obviously, white balance does involve the color. But when we have mixed kind of light sources like this it can be a little bit more tricky to get it right. You can, of course, try auto, and see how that does. Pretty good job, actually, on this one in particular. We can grab our color picker and decide what should actually be the hero of this shot. I imagine for this shot, it's the China World Hotel, as such. So we can actually use that as our potentia...
l point to just pick up a white balance, for example, which isn't too bad, so we can click around and get something that we think is good, and then I think in this case I would probably go for something a little bit warmer. So even just a quick white balance tweak like that works pretty nicely. What else I would do to this image color-wise is let's first of all do some base corrections, so let's bump up the clarity a bit and then bump up our contrast a little bit. So it's looking a bit healthier. And if we see that we've got so a little bit of kind of color bleed or highlight in the center as such. So let's just take down high dynamic range, like so. Now if we go to our color editor, and let's just reset that, for example, we can then sort of break up this image into different parts, and think how do I want to treat this? What's the purpose of showing this image? So let's grab the color picker and if we go over to China World Hotel, let's grab the second one for example. Don't be afraid cause the first click I did wasn't super successful. So don't be afraid to zoom in a little bit to get now a more accurate pick, like so. So now we've got this color pick, and again, we're not necessarily changing the color, we're just maybe enhancing how that color looks, so we could actually brighten the whole China World Hotel or darken it a little bit like so. We can make it more saturated, we could then pick our sort of blue tones like so and just take the saturation down on those a little bit as well, if that's interfering too much in the main image as well. And also, if we find that it's a bit distracting over here that we've got the glow of the lighting from the road, there's nothing to stop us doing the same thing again. Quick local adjustment, let's call that road. Take in a brush, let's make it nice and soft, if we just do a quick kind of brush over here, M to see my mask, and then we're gonna use the color editor again, pick inside here, so let's pick up one of those warm tones. Let's say over here, like so. Zoom back out, and then now within my color editor if I just wanna darken that part of the road so it's less distracting and leaving, if you like, the hotel perfectly alone because we're only working within this mask and then I can also desaturate it a little bit as well so it doesn't have that distracting color. So if we option click on the reset we can see before and after, like so. So even especially with tricky situations like this at night and if we take that other example that we saw in the first presentation, this one here. That's how it was shot on camera and then with pretty much nothing else but a white balance tweak, then how it is appeared. So if we go back to the unedited image, bump up our exposure, and then drag down the Kelvin slider, you'll be able to see it does kind of hit a point where it changes quite dramatically. So even if you have an image that you think looks kind of irreparable like that, that's a really good example of how much scope there is in the role file for actually getting something that was closer to how you remembered it with just a simple exposure change and then a simple white balance change, like so. Now we can take this further again, if we went back to the color editor, we can pick our sky. We can make that a bit more saturated and maybe a bit moodier, and then we can take our foreground colors let's say, pick around here, as such, and then if we wanted to, we can brighten our foreground, just by using the color editor, and then take the saturation out of it a little bit as well, like so. So we can really manipulate how it looks even though the raw file looks something quite underexposed and very difficult lighting conditions as such. Yes, it's gonna be a bit noisy. If we zoom in, so we can see some noise, but it's definitely not an unusable image as such.
Class Materials
Bonus Materials with RSVP
Ratings and Reviews
Dan
Can you get all this stuff online? Probably, but it's great to have it all in one place and it's pretty comprehensive. David doesnt waffle it's pretty much pure content so it gets a thumbs up from me.
Jakob Lehner
I use CP1 for about two years now being pretty happy with it and my color editing skills. So I thought, nahhh not for me I know it all... After some time I bought it on sale and I couldn't be more wrong. I learned much more in the first 40mins than in the last 2 years from YouTube tutorials. This one is really great, highly recommend it!
user-940746
David's knowledge of the color correction process in CaptureOne is amazing! This class has not only adde to my knowledge of color correction, it has shown me how to do it with a quicker and easier process.