Dive into the Color Editor's Skin Tone Tab
Lesson 7 from: Advanced Color Correction in Capture OneDavid Grover
Dive into the Color Editor's Skin Tone Tab
Lesson 7 from: Advanced Color Correction in Capture OneDavid Grover
Lesson Info
7. Dive into the Color Editor's Skin Tone Tab
Lessons
Class Introduction
03:10 2Advanced Color Selections
26:44 3Color Correcting: Product Photography
06:34 4Color Correcting: Architecture Photography
06:09 5Color Correcting: Travel Photography
07:07 6Color Balance Tool and How to Save Styles
14:13 7Dive into the Color Editor's Skin Tone Tab
14:04 8Color Manipulation for Portraits: Headshots
07:36Lesson Info
Dive into the Color Editor's Skin Tone Tab
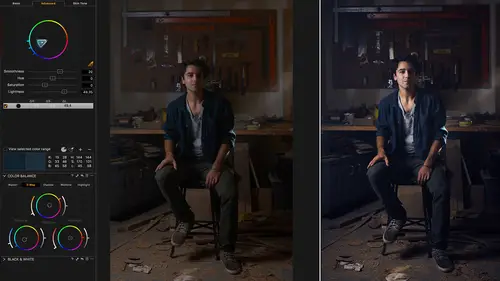
There is also a specific tab just all for skin tones. You'll see it looks kind of similar to the advanced tab but it has this extra section down here at the bottom called uniformity. Uh, so what the uniformity tool does is allow you to take a, if you like a range of skin tones, across someone's face or body or whatever and then blend it down into one uniform skin tone. Obviously we can control that to some degree because it can look a little fake filter if you like, if you have this amazing skin tone across your whole face and body that looks exactly the same with no contouring or nothing, but we can certainly use it in a subtle way to just improve, uh, the color of people's skin, as such. So the way it works, what we do is, we'll dive into first all of the various different features of the skin tone tab and then we'll kind of go over it again but we'll repeat it across a few different examples and how to use it in the best way. So, let's pick, this is our subject here. Uh, another sho...
t from Zach Sutton who we used earlier. Now his skin tone's pretty good, but, uh, if we just zoom in a bit closer you can see just the kind of five o'clock shadow sneaking in and the skin tone varies from here to here for example. And generally on people's necks, the skin tone can vary a little bit as well. So what we want to do with the skin tone tab is really tell Capture One what your ideal skin tone is and then we can use other tools to convert all the remaining tones to that particular other one. So let's uh, zoom in a little bit. Look on our subject. Take our skin tone color, pick it, note it has a different icon to this one. You can also pick up all your various different pickers here. And it does have a shortcut as well, like so. Um, but I always tend to pick it from the editor itself. But once you get comfortable then you can just go straight to it from the cursor tools. So let's grab this, and what you're looking to do when you pick is pick um, if you like, the preferred skin tone. So if we look on our subject's face, where is his best skin tone? So I'm going to sort of go around, click here like so. Now what Capture One gives you is, like before, it gives you a suggested range that probably covers all his skin tones. So let's zoom out a bit and then turn on view selected color range and then you'll see the actual skin tone pick like so. Now, like before uh, we have a smoothness slider, so if we need to like, maybe creep out our range a little bit. Like so, then we can do so. And additionally you'll see another slider on the right hand side. It's probably unlikely you'll have to touch this slider but it's worth knowing what it does. Now the way the color editor is drawn, it's a two dimensional model. So if you think at the center we've got the zero saturation towards the edge, maximum saturation, and then the color, sorry, the color spectrum around the circle as such. What you can't see on that two dimensional model, excuse me, is the density range. So what the slider does at the top is also limit the density range of your select as well. So, for example, if we go all the way down here, that's like the darkest density, so we get none. If we go all the way up the top that takes us up to the brightest density. So it's kind of a cap of where do you want the density range to cut off, as such. As I said it's probably unlikely you'll have to play with it but it's useful to know what it does, as such. So if you only wanted to pick out some really deep skin tones we could drop that right down, but otherwise you'll pretty much have to leave it untouched. You'll also see another slider on the left which will come into play a bit later, so hold that thought. So with view selected color range turned on we can see we've got a fairly, sort of, reasonable pick of uh, his skin tone range. So let's turn that off. So if you think anything above this line is about selection and then anything under that line is about adjustment. So we have the same adjustments again, hue, saturation and lightness. So if I wanted to desaturate his skin or increase saturation in his skin I could but the uh, the strength of these sliders are ramped down compared to the sliders here. So they're quite subtle adjustments. So you'll see even if I pull them left and right to the maximum, that they have quite a subtle effect. So that's deliberate compared to the advanced tool tab, as such. Now the really clever bit is about the uh, uniformity sliders down here at the bottom. So what the uniformity sliders do as I said in the brief intro is that they take your picked or desirable skin tone and then all of the other skin tones on a person and then compresses that down into that desirable picked uh, skin tone. So once again this is where this range comes into effect. So our selected color range here, like so. So what's going to happen, as I drag this slider across hue, any hues in this selection will be transformed to my picked color. So as I drag this to the right any hue in that selection is to my picked color. Now an obvious thing that you'll see a change in is his lips. So if I go all the way across you see his lips change like so. And that's a bad thing, because we don't want to change the color of someone's lips. So if you think about what we did earlier, that we used an additional local adjustment to control it better. So generally when you're using the skin tone tab you probably want to be using a very basic local adjustment as well. But you'll see if I bring hue across to the right, saturation, and then this is where we have to be careful, lightness, like so, then you see it changes all the tones into that picked point. Now it's not effecting the background too much, so we've got away with that but we don't want it effecting his lips and we probably don't want it effecting eye color and especially when we come to beauty, for example, we don't want to be effecting, you know, makeup tones and things like that. So this definitely is a case where we can do a quick, uh, rough local adjustment. So let's reset that, go to local adjustments, make a new layer and we just call this skin. And once again we don't need to use any of the uh, kind of more advanced options of local adjustments. We're just going to do a very simple mask, like so, so we're going to have our opacity and flow at maximum at 100 percent and then we'll have a relatively hard edge to the brush. So the hardness is how soft, if you like, the edges are to the mask. And then we're just going to do a quck mask around the edge like so. You might want to spend a bit more time than me but you don't really want to sit there watching me draw masks so I'm just going to draw around the edge then we're going to use the shortcut which is going to be fill mask, up in the sub context menu here. That will fill everything in, and then as we don't want his lips to change I just press E to get the eraser and then we just cut out, like so. And don't get too concerned with being super accurate but you'll find it much easier to do if you're using a pen and a tablet, like me, I find it quite difficult to do with a mouse. So there we've got our rough skin tone mask. So lets turn our mask off with M, and again if you want to get into the, the heavy stuff with local adjustments and all the powerful things you can do then um, if you join the advanced photo editing class, that's where we really get into all the power of, uh, the local adjustments. So now we're got our mask, just on the skin. We're going to go to the color editor. Like so, take our picker, zoom in a bit, let's pick our nice skin tone, lets go around there. You can always, if you don't like the look of it, you can always reset and pick again. Now because we've done a local adjustment mask I'm actually going to be quite bold, oh, I'm in the advanced tab. Deliberate skin tone, let's try that again. Pick my good skin tone. I'm going to be deliberate and then actually open this out quite a lot. Because I know I've got my local adjustment mask, uh, if I turn on, uh, view selected color range. Lets just move you up, so we can see. If we turn on view selected color range, we've got a pretty good selection but I don't mind that I'm getting some of the background because we've already covered that with a, uh, local adjustment mask like so. So now if I grab hue, like so, saturation and careful with lightness. Obviously if we go too far it just looks very strange (laughs) So lightness is something you have to moderate a little bit, and then this way we can get our nice even skin tone. We can turn this layer on and off. Lets get my local adjustments out. Woops, undo that. Get my local adjustments out and then if we turn that layer off then you can see the changes that it's doing to the skin. And if it's too much don't forget you can just back it off a little bit. If you want some kind of variation, I'd say be very careful with lightness because it just looks strange if you go too far and it ruins all the nice modeling you've probably done with your lighting for the headshot anyway. So if we just bring these down a little bit we get a nice even skin tone. You can see if we zoom in 100 percent, if we turn that layer off you can see the skin tone differs here, turn that layer on and then we have a nice even skin tone like so. Now it might seem, well that's quite labor intensive to draw that mask and pick, and so on. But you get pretty fast at drawing masks and also if you imagine you had to do that kind of color blending in Photoshop that's actually a pretty difficult task. I personally wouldn't know where to start but any of you watching can easily get to grips, uh, with uh, the various skin tone tools. So don't forget of course if we then just wanted to tweak the hue, uh, or the saturation, we can use these sliders as well, so we can really fine tune the skin tone. And also now that we have our pick and our uniformity sliders brought up if we drag this one this can actually, see, it moves our picked point and that will make the skin also more saturated or less saturated. If you grab this point you can actually give your subject any skin tone that you wish. If I just pull it down here then this gives you an indication of exactly what's going on because all of the colors in that range are now being converted to that picked color. Of course, that doesn't look good, so lets move it up to something a bit more sensible. But with very little time and a small amount of practice you can get really good uh, at uh, adjusting skin tones. Any questions on the use of the tool? Have one from the audience too? We're okay here Dave, from the studio. Yeah, fire away. I actually have two. Okay. One is can you add to the mask or subtract from the mask at this point with an image? Yeah sure, so if, So you could take his eyes out? Yes, exactly, so if we thought, oh, you know what it's just messing with uh, his eye color, woops, a little bit, we could uh, just look at our mask, we could take E for eraser and then we could just take them out like so. Especially if there was makeup or anything. And you'll see a different technique in a second where we can actually create a skin adjustment brush and then brush on our adjustment if we need to be a little bit looser and a bit faster. And the other question is, is there a, a keyboard shortcut or combination to adjust the brush size and hardness? Other than just right click? Yes there is. So we can do square bracket, so if we do square bracket we can go bigger and smaller. If we do shift square bracket then that changes the, uh, the hardness. Okay great, thank you. Okay. Otherwise it's right click and drag. And if you want to edit those shortcuts don't forget you can go to edit keyboard shortcuts go to other and there's a whole category for local adjustments and we can even add shortcuts for adding new layers for example. So if it's something you can, you do a lot, then you can drive adding layers uh, with shortcuts you can see the shortcuts here for brush size. You can add your own shortcut for opacity as well. And most importantly there's shortcuts for fill mask, but that's something I generally don't use because then it's, obviously, very difficult for you to see what's going on. But anything in the local adjustments tool, like, uh, invert fill is also driven by shortcuts too.
Class Materials
Bonus Materials with RSVP
Ratings and Reviews
Dan
Can you get all this stuff online? Probably, but it's great to have it all in one place and it's pretty comprehensive. David doesnt waffle it's pretty much pure content so it gets a thumbs up from me.
Jakob Lehner
I use CP1 for about two years now being pretty happy with it and my color editing skills. So I thought, nahhh not for me I know it all... After some time I bought it on sale and I couldn't be more wrong. I learned much more in the first 40mins than in the last 2 years from YouTube tutorials. This one is really great, highly recommend it!
user-940746
David's knowledge of the color correction process in CaptureOne is amazing! This class has not only adde to my knowledge of color correction, it has shown me how to do it with a quicker and easier process.