Building Paper Strips & Blocks
Lesson 3 from: Layering in Adobe Photoshop for Digital ScrapbookersTraci Reed
Building Paper Strips & Blocks
Lesson 3 from: Layering in Adobe Photoshop for Digital ScrapbookersTraci Reed
Lessons
Intro to Scrapbook Layering
04:15 2Paper: Your Layout Foundation
11:35 3Building Paper Strips & Blocks
12:04 4Create Chevrons with the Shape Tool
05:24 5How to Line Up Repeating Shapes
04:10 6Custom Shapes with Polygon Tool
09:27 7Make Your Own Pennant & Banners
10:47 8How to Add Interest with Your Photos
05:10Creating the Perfect Cluster
11:52 10Embellishments with the Visual Triangle
12:57 11How to Use the Visual Triangle with Pictures
03:06 12The Rule of Three
02:18 13Using the Power of White Space
04:43 14Using the Rule of Thirds
08:42 15Learn the Importance of Shadowing
10:30 16What is the Brush Tool?
05:16 17Using Brushes in a Layout
06:04 18Using Paint in a Layout
03:23 19Understanding Blend Modes
07:21 20Creating Mixed Media Mash Ups
05:19 21Using Layer Masks
02:41 22How to Blend Photos
03:16 23How to Blend Papers
02:17 24How to Blend Text
01:13 25Lighting Effects: Learning Radial Gradient
05:17 26Lighting Effects: Learning Inner Shadows
01:51 27Dodging & Burning Washi Tape
07:58 28Creating Custom Journaling with Text Tool
05:41 29Journaling with the Pen Tool
06:46 30Incorporating Journaling in the Design
04:29 31Making Stamps from Fonts
06:49 32Different Ways to Cluster with Alphabets
07:54 33Adding Embellishments to Titles
04:24 34Drawing Banners to Title Cluster
03:20 35Creating a Stitch Brush
12:21 36Creating Other Types of Stitching
08:03Lesson Info
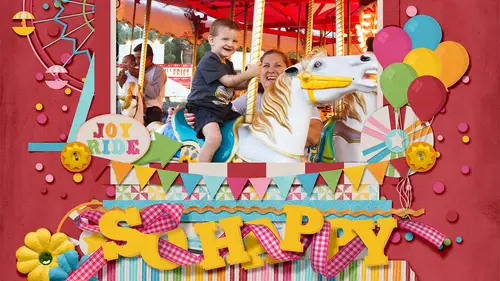
Building Paper Strips & Blocks
Let's talk about paper strips who uses a lot of paper strips in their eye nose paper strips are very popular. They're a great way to add a lot of patterns to your page, so I really like them too. It's good, this papers should play out so paper ships generally people use them underneath a photo and they're a great way of of adding interest to a cluster. But you can also use them as an actual design element and beat make them very visual, and they're very easy. Tio draw, all you have to dio is use your shape tool, so I like to use the rectangle tool, and I don't even worry about making them all different to begin with. I just draw one rectangle, and then I start clipping my papers to the rectangles so here's one paper and then I'm going to duplicate the rectangle and I'm going to move it command t makes it easy to grab when it's underneath things, and then I will clip another paper to this one and then let's start drawing some up top, so we're going tio man j command tea to make it easy ...
to grab and move it up, and then we're gonna clip another paper to it go online because danielle in chorus, saying they absolutely love love love paper strips yes, paper ships are so I'm so important to us. We love them because we like a lot of color. And we like to use all those pretty papers. Because with digital, you never use it up. It's always going to be there for you. So you can use is many pattern papers as you want, tio and it's. Never going to go away in it. It's. Very exciting. So that's, exactly what mom, interest, such as. I like to build my backgrounds with the papers. Because if there are a lot of papers in the clip kit that I like it, it should be indecisive. Okay, so this is the beginning of this play out, but this is kind of boring. All of the paper strips looked the same, and we want to add a little bit of interest, but we made them all the same size. And so what we can do afterwards, now that we have some, um, some idea of where the layout is going to go. We can edit the size and remember, if you hold down all it will pull from the center so it will pull out on both sides and not just one side, and you could make it a little bit smaller, too, by holding no old and now we want the point is to vary the size and shape of the paper ship so that they're not all the same so let's make this one a little smaller to smaller and it's okay if you don't want them all to be centered I'm kind of o c d and they like them all to be centered but let's not center one just to torture me and you can see in the in the end lee out I this is where I build my title work so this one I'm going to make a little bit bigger you couldn't even feel free to overlap them paper strips are fun and they are easy and they literally you literally can do whatever you want with them you don't have to follow any rules you don't have tio make sure that they're all the same size you don't have to make sure that they're not touching it's totally going to be up to you what you like and what you want to d'oh so that's that's a good start for the paper strips um if you wanted tio instead actually I I picked up a really cool trick and I thought about it last night and I want to show you how to do it and I picked it up from steph over the sweet shop it was part of a class I just thought I just thought it was so amazing and what we're going to do is we're gonna warp one of these paper ship so that it looks like you cut it by hand because you can cut straight, even when I use the paper tumor it's always cricket. So we're gonna warp one of these paper strips so that you can see that maybe we hand cut it may be so what you need it is you need to rast arise the paper's trip. If we were to do this technique on the actual paper, it would work the paper and that's not what we want. We want to work the the shape that we're using for the strip, so we're going to rest, arise with layer, and then we're going to go to, um, filter distort, wave the wave tool again, and we want it to be a very long wavelength again, we want one generator because we don't want to work it too much. We're not that crazy with our scissors, we want one and at ninety nine and then we want our amplitude to be huge, too, so we're going to d'oh one, nine, nine, nine just because we wanted to be super subtle. Now you can go in and you can play with this technique and make it as not subtle as you want, tio but what I like to do is I like to make it super subtle to begin with and then let me undo it so you can see how subtle it is so this is with it worked and this is unworthy even see how subtle it is. So if it's too subtle weaken just pit command uh sorry we can just hit command f and do it again so command f which would be control f on a pc and you can see now it's really starting to get worked if we did it again it might be a little bit too much but you can see that it's kind of going in here and it looks like you were maybe a little bit crazy with the scissors it's just a fun way to add a little bit more realism to your paper strips we do that already by varying besides by varying the shape but it's a fun little warped tool I like the work tools obviously so I would go in and do that. I'd probably if I did it toe one I go in and do it to all of them and you don't have to repeat the process all you have to do is rast arise the layer and then hit command f to run the filter again on all of these trips were all about quick and easy ways to do things we don't want toe reinvent the wheel every time man f me enough to do it twice and it's so subtle probably nobody would notice except you but its fun and then imagine adding one of those warp shadows that we worked on in the shadow class to it as well hey, a couple of quick questions coming because they people confuse when you said you don't save your psd files you know it's like judges two two uses immediately picked up sort of years picked up that immediately so we'll see how well how do you save your files and why don't you? So we're going to talk about saving tomorrow are we're going to talk about saving in the layout design class but I will address I don't save my psc files I'm a horrible digital scrapbook err on lee because I know that I will never ever go back to it ever again even if I noticed down the line that there's a mistake I'm not so cd that I'm going to have to fix it so I think that mistakes are part of your scrapbooking if you were paper scrap booking and you misspelled something most likely you're not going to go back and redo the entire page because you misspelled something you'll scratch it out you'll ignore it you covered up with an embellishment so I think that it's part of the process is teo have mistakes and I definitely have layout so have mistakes and spelling mistakes or I stayed the layout once where I was using a template and forgot to clip a paper to one of the paper strips so the layout's done in blues and there's this big black paper ship on the bottom yeah, I saved and I just said ok, I totally did that on purpose, I swear so I saved my files is j peg files at the highest quality setting? I actually don't even save my files is twelve by twelve I say them is a by eight because that's how I print I don't think I'm ever gonna want a bagel twelve by tall book I prefer it by eight I know this is all blasphemy but I like to save I like to save hard drive space more than anything else and I don't know that's just where I started and that's just what I d'oh do however save my design files now I went for a long time without even saving my design files but then I realized I was being really hard on making it really hard on myself down the line so let's move on to the next style okay, so we have paper strips and then we have paper blocks and it's a similar concept but we this is a more of a foreground technique than a background technique it's making of the blocks part of your design so there's easy way to do this um and make it even let's open up this psd file and my favorite thing ever is the grid does anybody hear scrap of the grid on no, no grade? Wow! Ok, so the great is my favorite thing ever and what it does is it allows you to align things perfectly you for titles, you can use the smart guides, but I find them distracting sometimes, so I like to really make sure that things are perfectly uniform in size now it doesn't have to be like this doesn't have to be exactly one, two, three, four inches long and long as it goes from one grade line to another good line I'm happy so a really easy way to make sure that everything is the same size is to turn on the grid and then draw your shape the same size. Now I can make other shapes skinnier, but as long as they're all the same height and they match this photo with the great on even if I go back and change the size later and I want them to be a little bit wonky starting at the beginning with the grid on helps me to make a paper block to play out like this so you would just draw your, um, draw your paper blocks and then you would clip your papers to him again and you're good to go. I'm not going to clip the papers. We already covered that, but there's a lot of different ways to use paper block so you can do it like this, where you would have a bunch of rectangles. You can have a bunch of squares where you draw them all the same size. Did you know that you can, instead of clicking and dragging to draw with your shape tool, you can double click and choose the exact size. I don't like this properties thing over here tries in crazy, but you can say I want a two inch block and it will do two inches exactly for you, and then you can say I want lots of two inch blocks, so if you hold down command option and shift while you drag on a shape or anything, really, you can create another copy as you drag and holding down shift will keep it dragging in a straight line. So with the grid on this is why I use a grid, you can just move it perfectly, evenly spaced every time.
Class Materials
bonus material
Ratings and Reviews
Corrina
I have recently discovered digital scrapbooking and have been using a great scrapbooking software that I downloaded on-line. There are limitations with the software that prompted me to look deeper for ideas. Traci's course was fantastic! I learned so much from her not only in scrapbooking layouts and using different elements in a page but my level of understanding of photoshop has improved dramatically. The presentation was easy to follow and broken into perfect chunks to go back and review the techniques. Thank you so much Traci for presenting this awesome course. I will look for more of your courses. Your scrapbooking is beautiful and inspiring!
ChristyWhitehead
I'm a photographer. I do a lot of graphic design for my business. I feel like I'm fairly knowledgeable. I saw this class being shown for free on Creative Live one day and it wasn't my first choice to watch, but was the best out of the list... I was wrong. This is a great class. I didn't expect to learn that much and I've been learning a lot! Great info!
LourdesM
This course was amazing. I learn some things I didn't know how to do. Traci is simple and straight forward in her teaching. Very easy to understand.