Equipment: Selecting the Right Gear
Lesson 6 from: Advanced Lighting for Adventure PhotographyMichael Clark
Equipment: Selecting the Right Gear
Lesson 6 from: Advanced Lighting for Adventure PhotographyMichael Clark
Lessons
Class Introduction
03:25 2Evolution with Lighting
04:44 3Why Use Artificial Lighting?
06:43 4Pre-Production and Pre-Visualizing
07:16 5Equipment: Overview of the Gear
25:28 6Equipment: Selecting the Right Gear
24:05 7Strobes vs. Speedlights
08:01 8Lighting 101: Flash Sync Speeds
14:35Lighting 101: Flash Basics
24:46 10High-Speed Sync (HSS) vs. Hi-Sync (HS) vs. HyperSync vs. Leaf Shutter
14:50 11Gear Requirements for Hi-Sync (HS)
12:29 12Flash Exposure
21:39 13Pre-production and Location Scouting for Rock Climbing
06:02 14Gear on Location: Rock Climbing
07:04 15Rock Climbing Photography 101
11:37 16Rock Climber: Environmental Portrait
24:22 17Finding the Shot
13:48 18Capturing the Action: Rock Climbing
07:09 19Shooting at High Angle: Rock Climber
21:15 20Digital Workflow: Overview
16:09 21Editing and Post-Processing of Rock Climbing images
30:17 22Cyclocross Photography 101
11:32 23Location Scouting for Cyclocross
05:36 24Gear on Location: Cyclocross
11:42 25Intro to the Cyclocross Rider
16:29 26Capturing Action: Motion Blur
43:13 27Communication with Athletes
18:55 28Variations of the Shot
23:21 29Cyclocross & Trail Runner Portraits
40:40 30Location Scouting & Planning the Shot
09:20 31Capturing the Action: Lighting Set Up for Trail Running
37:01 32Editing and Post-Processing of Cyclocross Images
21:34 33Editing and Post-Processing of Trail Running Images
07:52 34The Business of Adventure Photography
17:42 35Image Critique with Chase Jarvis
48:41Lesson Info
Equipment: Selecting the Right Gear
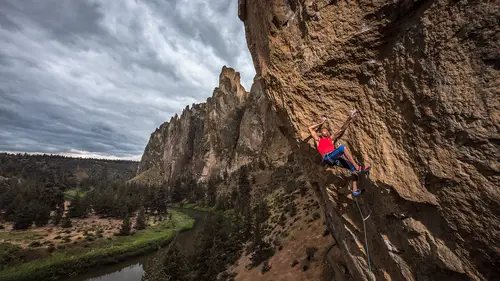
So selecting the gear, as I was saying, you know, it depends on what I'm shooting. If I'm shooting rock climbing, I'm probably not gonna have more than one flash. It'll probably be a 1,200 watt a second because the light's gonna be far away. If I'm shooting mountain biking, let's say, I can probably just use the ELB 400s, because they're lighter, and if I can light something from 20 feet away, that's more than enough room to put my flashes out there and not have them be in the picture. So, I basically select the lightest weight gear I can, and work with that. If I'm just doing portraits, I mean, even with a pretty significant modifier on this guy, you could do all the portraiture you want. And the batteries, you know, I think on this one you get 350 shots per battery, so I could take two or three batteries, and I'm never gonna go through all those batteries on a shoot for a whole day, even if I'm shooting at full power. So it just depends on what I need. As you asked earlier about whic...
h camera system, you know, it depends how far away from the car we are, and how I have to pack it to get there. If I have an assistant, if I don't, so a lot of these things decide themselves just you know, depending on where the location is. I'll figure this out on a location scout, 'cause that is critical for figuring out what you need to take and how you're gonna get it there. You know, is it a super steep, sketchy trail to get in there? Well, then I may not be able to carry that 100 pound backpack, because I might fall off a cliff just getting to the location. I always take hiking poles with me if I'm carrying the huge packs these days. So there's all kinds of considerations, not just for photographic, but how your outdoors skills are if you're shooting action. If I'm shooting a portrait, we might be fairly close to the car and I can take everything and the kitchen sink in the back of the car, and then figure out once I get there how to tailor that for that shoot. Yeah, I was just curious. How often are you, for action stuff, not portraiture, but for action stuff, do you ever bring soft mods into the-- Softboxes? Yeah, or do you just pretty much strictly with reflectors? If I can get the light close enough, I will use some softboxes. I didn't have in here, but I think in the slides-- Let me go back. I think there is a picture of one of my favorites. Yeah, it's this guy, the Deep Octa on the end there. It's a pretty sizable softbox. 39-inch? I think it's the 39-inch or 100-centimeter for the international folks. And often it has double diffusion, so there's an interior baffle, and then there's the exterior one, and there's some special sauce for that lightbox. Similar to the Octabank, it's one of Elinchrome's magical softboxes for portraits and for action, and often what I'll do for action is I'll take all the diffusion out, or put the interior diffusion, which creates a little crispier light. It's like a big version of this, where the box comes out to here and it's giant, especially for mountain biking, like that mountain biking image in the trees that I showed you. And I'll show you some more of those. One of the modifiers was that softbox, and on the other side was this guy, so sometimes as you'll see in some of the videos we do, I'll put a softbox up front for a softer light on the front side of the subject, and I'll use this or a smaller reflector with a grid spot, so it'd be something like this with a grid in it that's collimating the light so it's more directional on the back of the subject, so it creates more of a realistic, you know, as if that was the sun hitting the back of the subject and I have one light out there. 'Cause I think one of things in lighting adventure sports is I talked to Rob Haggart, I just actually talked to him again, the guy from aphotoeditor.com in an interview and we were talking about you know, this alien light coming out of nowhere to light your subject. That's rampant in the outdoor industry and I'm guilty of that myself, so I can't say anything, but you know, we're still refining how we're lighting these sports so that it looks somewhat natural and not completely artificial. Because in my world, in the climbing world, it's only started in the last 10, 12 years, that we're even lighting these sports. You know, we were looking at the skateboarders years ago, or skateboard photographers years ago, and they were lighting stuff all over the place 'cause they're shooting in the middle of the day, you know, at the car park or right next to the big corporate building, lighting stuff at high noon when the light was horrible, so they kind of had to light it. And so, I guess it was 2003, 2004, a bunch of us started thinking like wow, we should bring that to climbing photography. And I will say it wasn't well received at the beginning. Everybody was like why are you lighting this beautiful climb? But it took us a few years to figure it out and we're still evolving how we're using adventure lighting for all these different sports, which is very exciting. Did that answer- Yeah. Your question? You know, I'm usually not using a stripbox for sports. This new Litemotiv Octa is basically a heavier version of that Deep Octa, and if I'm close to the road, that's actually an amazing light for you know, using to light athletes. You'd have to be a little bit closer, just because it's a softer light source, but there are a lot of stuff where I need to throw the light really far. There's this, there's also, I think it's in here. Let's see if-- I don't think it's right here. It might be farther along. I'll show-- Elinchrome's got a new high performance reflector that's like twice as big as this. It's super polished on the inside. It's actually more efficient than this reflector. But it's so efficient it's like having the sun there. And it mimics the sun extremely well, almost too well, and it's giant, so it's hard to transport. You wouldn't be able to fly with this thing very easily at all, but if you're driving or something and need to get light really far out there, and want it to look like the sun, it's a possibility and I've used it a few times on some shoots. But somehow this has kind of been the go-to reflector for me over the years. Are your strobes weather sealed, and if they aren't, how do you protect them? They are weather sealed to some degree. I think Elinchrome doesn't call these waterproof. They call the new ELB 1200 water-resistant. I would say they're definitely extremely highly water-resistant. I've shot with my old rangers, which have been around for a long time in full-on sideways rain in Patagonia. And the way-- Let me just move this guy. So the battery comes off of this. We'll show you. So basically you pull this slot, and the battery comes off, so you see the battery contacts are underneath, so water would have to go down through this tiny little crack that's sealed, back up and then onto the contacts before it would stop working, so I can essentially sit this in a pool of water up to the level of those contacts and the old rangers, it's like twice as high. So I've had my rangers sitting in like three or four inches of water, while they're firing and still doing fine. You know, any time you have water though, around a strobe you gotta be careful because you know, you don't want anybody to get electrocuted. And those are super easy to snap on. Oh, it's already on. Let me just lock it down. It's not quite as water-resistant with these guys, 'cause the contacts are right in here, but still I've shot with these in sideways rain. There is, on the flash head for the ELB 1200, there are some slits that are open here, so you know, water could get in there. That shot of the snowboarder from Angel Fire, I'll just tell you that story because that's super informative. I was blown away. We were using the ELB 1200s with this modifier with grids in them. I think they didn't have grids, it was just this modifier. And it was snowing so hard, my camera was completely soaked. I mean, everything was just dripping wet, and at one point my assistant said, "Hey, should I brush out the snow from the reflector?" And she turned it to me and this thing was half filled with snow, like really heavy, wet snow, and I was like, "Uh, yeah, we should turn that out." And so she dumped it out and I watched the strobe spit water off of the flash tube the next time we shot. Just to see that it would keep firing, and I mean, literally, everything I owned, I only had the D810 with me. This was in the bag. I think I was shooting with my 24 to 70 for that shot, but literally, it was so soaked that right after that shot we went back, you know down to the base of the ski area. I laid everything out on the carpet and just let it air dry, 'cause I didn't know if this was gonna keep working for the rest of the day. So that just gives you an idea of how much punishment these can take. And I know also, this little head on the Quadra, lots of people for years have thought it doesn't look that tough, it looks plasticky. I have subjected this thing to such torture and never have had a head go down on me. I had a head fall on a Hollywood Beefy Baby stand from like 14 feet in the air with the Deep Octa. It caught some wind. It had two 25-pound sandbags on the stand, so we had like 45 pounds or more on the stand. And it went down and hit hard dirt, not quite as hard as this wood floor, but pretty close. Smacked the back of the head. Everybody on set was like wow, that thing's dead. Walked over, picked it up, not a scratch on it, so you know, they've really made-- That's the other thing, the other reason I'm using Elinchrome is 'cause they've really made strides to make this stuff as light as possible but still as tough as possible. I've taken this exact setup to the Amazon twice, where it was 108 degrees, 100% humidity, bugs like you've never seen in your life. We did much worse than the lighting did, I'll say that much for that trip. But so, go ahead. George Locke asked what about water housings for your cameras, I guess? Is there anything else you use there? I do have a few different options. I've got that Ewa-Marine bag you saw, and then I also had a little picture of the surf housing I have, is from a company called CMT Housings and it's basically one guy in his garage who makes custom carbon fiber housings. And the reason I use those as opposed to AquaTech or some other brands out there is 'cause these are the lightest weight surf housings on the market, and because they're carbon fiber, and he custom makes each one for your camera and your lenses, so you have to send him your camera and lenses sometimes if he hasn't made it for that camera before. And he can put, he can make a custom housing for this that is not carbon fiber so it can send out a signal to your strobes if you're shooting in the water. The problem with that for using the sky ports is that you need access to this, and you need to be able-- You need to be able to touch all these buttons to adjust the output of the strobe and/or the settings on here. So typically when I'm shooting something like kayaking or something where I need a waterproof housing, I'm using a Ewa-Marine bag, which is the big plastic bag with the Ziploc closure. It's not quite as easy to deal with, but it's easier to manipulate the settings. I'm not really shooting surfing in the water with this setup at this point. That would still need to be figured out. 'Cause that would be really hard to pull off while you're getting bashed by waves, adjusting your high sync settings on your transmitter. That would be exciting. Well, it's good to have challenges. It's good to have challenges. It's on the docket for something to try. Fantastic, so another great question, thanks for your questions coming in. This is from Mata Hoohoo, who is wondering about backing up your images on location. If so, how do you do it? Especially if it's like raining and storming and snow? Yeah, I mean, these days I am, because both of these cameras have two memory card slots, I'm recording images to both memory card slots every time I shoot. The Hasselblad only has one, and then when I get back to civilization or back to either a hotel room or a tent, or wherever I have a laptop or something I can back up with, I will back those up onto additional hard drives. I just had a shoot actually, a couple of weeks ago where one of my memory cards went bad, and so I used that secondary memory card, so I highly advise shooting to both cards if your camera allows it, 'cause it's just an extra backup. And the other thing I will say is, didn't really talk about gear, but on planet Earth right now, this is the second most archival storage system on the planet. The first best archival method is pen on paper, or you know, a print. That's more archival than this, 'cause a print, you know, from an Epson printer these days might last 300 years according to the latest testing. All of my cards have swam in the ocean with me. SanDisk probably doesn't want to hear that but, and they still do great. You can break this card into 10 pieces, send it back to SanDisk, and they can probably still get 97% of the images off of it. So that's pretty amazing stuff. I talked to one of the engineers about this. There was a guy, I don't know, like 10 years ago I remember, set up his camera remotely for a demolition of a building, and you see these pictures. It was on all the major blogs of like this giant piece of concrete flying at the camera and it became bigger and bigger and bigger until that was it, and they found the sleeve that the card goes into and recovered the card that was broken into four or five pieces, and you're looking at the images it shot, so obviously it got all of the images off of there. We don't have time to really go into how the cards work, but the cards are pretty impressive, as long as you treat them well and don't you know, delete too many images and you can screw up the card so that you lose images in a certain way. But as long as you reformat them in the camera, they're pretty solid. Well, I'll bet if there was someone who could tell us how it works, that would be you. I'm sure there's people who know way more than I do, but you know. A question from Homey Design says what handles are you using on your ELB 400? Did those come with the packs, or is that something special? These did not come with the pack, and I think the overhead camera can probably see this. They're made by ProMediaGear, which is a custom tooling company out of the United States. And it's something that snaps onto the top. It's an all-metal construction, and it just gives you two handles. There's still two clips right here that you can put a shoulder strap on if you want. The other really cool thing about this is they have all these screw mounts on the side. They make a little gizmo that you can screw in here, and then you can have the light, the battery pack hanging on the stand, like right at whatever level you want. And it's just this tiny little clamp that clamps this onto the stand, which is really nice. So that if you need to walk over there and change something you can do it right there without having to bend over, and if you need to move your stand or your lights and you're out in the outdoors, you don't have to pick this up separately. So kind of a cool little extra there. One more quick one. Do you, you showed us that gray card. But do you use a ColorChecker Passport? I do sometimes. As well, for corrections? Sure, and actually I use, with the Hasselblad, the ColorChecker Passport. I didn't put it on the table. It's in my bag over here. Because it has a little more options, because it has a red, green and blue patch, you can actually, you know, for like a still-life photographer, the color chart is great because they can dial in the color exactly with that red, blue and green patch or patches. But for my Nikons, this works a little bit better for doing in-camera custom settings, because I think the ColorChecker Passport has a gray card on it, but the trick with the Nikons at least, this isn't the case with Canon and some other cameras, is you have to fill up the entire frame with the gray card. So that's why I have a big one of these, because I have to get close, and that's why it has a focus target on it, so that I don't have to turn off the auto focus to take a picture, so in the Nikons, you change the white balance to preset. And then you hold down the button 'til the preset starts blinking, and then you have the person hold this and you zoom in or move in close, fill up this, in the light that you're shooting in, like these lights that are hitting me, and take a picture, and it's not actually taking a picture. It's just lifting the curtain, or the mirror out of the way and taking a reading of this, and then it tells you good or bad in the Nikon cameras. With Canon I think you just take a picture of it, and then in the camera you select that picture and it takes a reading off of the picture itself, so it's a little different. So it depends on which camera you're using as to which one of these will be the best option. And for here, there's no custom, for the Hasselblad there's no custom white balance setting, so that's why I use the ColorChecker Passport more with that. Right, thank you. With white balance and shooting raw, what's the advantage of setting up a custom preset in your camera on location, under the conditions you're lighting versus doing that in post? It just gets you closer, you know. I'm of the mindset, since I used to shoot slide film for the first half of my career, get it as right as you possibly can in the camera. It just makes it easier for me after the fact, you know, and it may be that I take a custom white balance reading, say if I'm shooting a portrait, but I want to add a little more saturation or tweak the skin tones just a little bit so they fit whatever I'm trying to do. So it's just a starting point, and it's, in some situations, you know, I'll admit that Canon has always done better with white balance, auto white balance than Nikon has in the past. I mean, Nikons now have awesome auto white balance, but in certain situations, like especially at the end of the day or early morning when you're shooting in that golden hour light, digital in general, this is not talking about any specific camera, does not deal as well with these glowing orange tones as film did. And so by doing the custom white balance, I know at least that I have neutral or the exact color that was actually present in the image. I mean, that's the beauty of digital is we now have way more accurate color, as long as we're taking the right steps, than we ever did with film. 'Cause film, you know, Fuji Velvia had glowing greens and this and that, super saturated. That was not accurate to the exact scene. And one of the things when we shoot portraits, I mean, even looking at me, we have more red in our face than we like to think we do. We have this imagination of how skin tones look for all different races. And so by having a custom white balance, I at least know it's accurate to the scene and that's a good starting point for me to then do whatever I need to do for that portrait or that scene. You know, a shot like this, obviously it doesn't really matter, and I didn't go up there and do a custom white balance for an action shot. I'm working in raw, so I just deal with it after the fact, unless it looks horrific in the camera or something. And I might even be tweaking the white balance into fluorescent or tungsten to adjust the color balance of the sky to the athlete, or using a gel, so there's all kinds of options there. All right, maybe one more question before we move on to strobes and speed lights. From Dpics, did you talk yet about tripods and-- If you're using them-- I haven't. And when and where? That is a great question because with this guy I try to use on the Hasselblad, a tripod as much as possible. It's an amazing thing when you print an image of yours at five feet long, or you know, a meter and a half, you start to see all of your little issues with camera handling, shutter speed you chose, especially the new Nikon D810. When that camera, the D800 first came out, it was a revolution at 36 megapixels. Everybody was like wow, this is unbelievable. I'm not the steadiest guy in the world. I drink maybe a little bit too much caffeine for that, but the D800, when it first came out, I couldn't get a sharp picture to save my life hand holding that camera at 250th of a second. At 500th of a second, like maybe half of them were sharp. They improved the shutter in the D810 so that now at 500th of a second, I can-- You know, they reduced the vibration. At 500th of a second I can pretty much nail it and get a sharp picture every time. But still at 250th of a second, which is the top flash sync speed of this camera, it's not always sharp, 'cause there's some camera movement that's being imparted into the images because there's so many pixels densely packed onto that camera. And this guy, you'll notice I don't have a camera strap on it. I just have this, I think it's a clutch by Peak Designs. It's just a little hand strap, a) because I'm not typically hanging off a cliff, and if I am I'll wrap, put something around here to clip this into my harness. But I pretty much have to put this on a tripod because a) it weighs seven pounds just with this lens on it, and b) the auto focus is super sensitive to camera movement, so if I'm like shaking with this camera, trying to focus with the one focus point in there, it won't actually lock on. And just when you got 50 megapixels, if you want really sharp images, it behooves you to use a tripod. So I have a variety of tripods, both super heavy, you saw the one in the picture is a really, I think it's the heaviest duty Gitzo tripod they make with the Wimberley head on it. That's for shooting surfing with like a big 600 millimeter lens. I have a little bit smaller Gitzos. I think I have three or four tripods that I've collected over the years. They're all Gitzos with different heads. I've got Kirk photo ball heads on it, which I think that ball head, the BH-1 I have can lock down with 60 pounds on it. And then I have a lightweight Gitzo that's over here that's an Acratech head, so it's a much lighter head for if I'm just traveling with say this and a smaller lens. We'll bring that in here. Thank you. So you can see this is my lightweight tripod head, and the Acratech is great for the outdoors because the ball head is fully exposed so I can clean off dirt or any stuff on the ball head. I have the Really Right Stuff plates on all of my stuff. You can see here on the Hasselblad, the Really Right Stuff that allows me to mount it this way or that way on the tripod. All of my 35-millimeter SLRs have it as well. So it just depends on the situation, if I need it, but it's better if I have it on a tripod if I'm trying to make really big prints, that's for sure, and I just match the tripod to the situation. You know, we all hate carrying tripods and stuff, but there is a reason they exist, and they can really help you get quite a bit sharper pictures.
Class Materials
Bonus Materials with Purchase
Ratings and Reviews
norah levine
This is a course that I could watch repeatedly and be able to learn something new each time. Michael is a truly an expert in his field and is so generous with his knowledge. This course really breaks down the process of adventure photography, but it's more than that. I don't think you need to even be an adventure sports photographer to get tons out of this course. Michael is really good at breaking down some very complicated technology. Thank you!
a Creativelive Student
Great course that combines the technical aspects of shooting with light in different situations, with the art of making a great image of athletes. Michael is a great teacher and I'm sure his lessons will continue to help guide over and over again!
Jeph DeLorme
Great class with dozens of tips, ideas and lighting strategies for tough outdoor lighting challenges. Advanced class taught in a way that allows even a beginner to get a handle on lighting tough situations. The location videos provide real life examples that make this class a definite must have for my Creative Live collection. Thank you Michael Clark and Creative Live! Jeph DeLorme