Lessons
Class Introduction
03:25 2Evolution with Lighting
04:44 3Why Use Artificial Lighting?
06:43 4Pre-Production and Pre-Visualizing
07:16 5Equipment: Overview of the Gear
25:28 6Equipment: Selecting the Right Gear
24:05 7Strobes vs. Speedlights
08:01 8Lighting 101: Flash Sync Speeds
14:35Lighting 101: Flash Basics
24:46 10High-Speed Sync (HSS) vs. Hi-Sync (HS) vs. HyperSync vs. Leaf Shutter
14:50 11Gear Requirements for Hi-Sync (HS)
12:29 12Flash Exposure
21:39 13Pre-production and Location Scouting for Rock Climbing
06:02 14Gear on Location: Rock Climbing
07:04 15Rock Climbing Photography 101
11:37 16Rock Climber: Environmental Portrait
24:22 17Finding the Shot
13:48 18Capturing the Action: Rock Climbing
07:09 19Shooting at High Angle: Rock Climber
21:15 20Digital Workflow: Overview
16:09 21Editing and Post-Processing of Rock Climbing images
30:17 22Cyclocross Photography 101
11:32 23Location Scouting for Cyclocross
05:36 24Gear on Location: Cyclocross
11:42 25Intro to the Cyclocross Rider
16:29 26Capturing Action: Motion Blur
43:13 27Communication with Athletes
18:55 28Variations of the Shot
23:21 29Cyclocross & Trail Runner Portraits
40:40 30Location Scouting & Planning the Shot
09:20 31Capturing the Action: Lighting Set Up for Trail Running
37:01 32Editing and Post-Processing of Cyclocross Images
21:34 33Editing and Post-Processing of Trail Running Images
07:52 34The Business of Adventure Photography
17:42 35Image Critique with Chase Jarvis
48:41Lesson Info
Flash Exposure
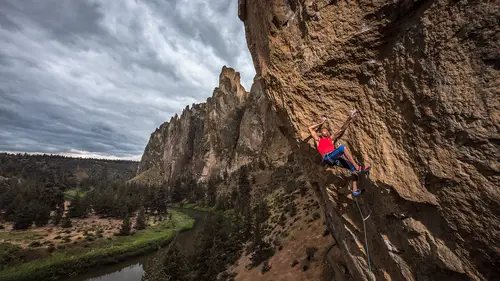
Alright, and before we start going into the field, there's one last thing we have to talk about, which is how do you balance the flash with the ambient light whether you're inside or outside, so let's get into that. It's not as difficult as it may sound from the last segment we did, and I realize we went from zero to like hyperspace in a matter of minutes there, and if you're confused about it, you can go back and watch that part of the class or we'll keep talking about all of this stuff throughout the rest of the class, so don't freak out if you got confused in that last section. So, a lot more text to throw at you here, talking about balancing flash with ambient light, so this is how I would do it. This is the simplest way I know how to explain balancing flash with ambient light for normal sync speeds, so that means you're at 250th of a second or 200th of a second or below on your DSLR, or if you're shooting with medium format, it's all the same. So, you know, these are some pretty b...
asic things. Find the camera angle you wanna shoot from. I typically shoot in manual mode all the time. You know, when you're using a strobe, strobes are manual. You turn the dial up, it's more power. Turn it down, there's less light coming out. If you're using a speed light that's automated, it's a little different scenario 'cause it's automatically figuring stuff out, but let's just stick with strobes or your speed light in manual mode for this exercise. So, the first thing I do is forget about what I'm shooting. I just wanna figure out the background lighting, so if I'm taking a portrait of somebody and the sky's behind them, I want to expose for that sky behind them and figure out what the ambient light exposure without flashes is for that background. If I'm shooting a climber on a cliff, I could care less about the climber on the cliff at this point. I'm looking at the sky or whatever is in the background, so it's just using your camera in manual mode, and establishing the exposure for that ambient light shot. And then, once you have that established, let's just say for an example it's 1/25 of a second at f/8 at ISO-100, and those are the three main numbers we're gonna work with. That's the background exposure, and let's say I wanna choose, at this point, how dark or light the background is compared to my subject. Typically, with flash, you would darken the background, because if your background's brighter than your subject, that might attract the viewer's attention to that part of the background and not to your viewer's face. If you are gonna make the background brighter than your subject, say for a portrait, just make sure the bright background is all the way around your subject, like when you're shooting on a white background in a studio. Otherwise, the viewer's eye's gonna go directly to that bright thing in the image. So, typically, you're either matching the strobe with the ambient light so that the strobe is the same brightness as the ambient light in the background, which looks like a fill flash more, and you can't tell that the flash is being used so much. Even more typical is that you underexpose the background by like a third of a stop to a full stop, somewhere in that range. So, at this point, you know, where I say decide how much darker you want your background to be, I will just say, so we're at this 1/25 of a second, at 5.6, ISO 100. I'm not gonna change the ISO or the aperture. I could just bump my shutter speed up to 200th of a second, and I haven't even turned on the flashes at this point. Now my background's gonna be 2/3 of a stop underexposed because of how I've set up the camera. So, next step is put your subject in the frame, wherever they're going to be, and you've probably figured this out to some degree, because you chose your shooting angle from where you're gonna place your subject, so next scenario is put your light up, wherever it's going to be, and then in normal flash modes, 'cause we're still below our sync speeds, remember? This is very typical. I would take a light meter and walk out right in front of my subject, so let's say it's just a portrait. I would put it at their chin or their forehead or in various places and take light readings and adjust the power on my strobe until it matches that f/5.6 that I'm going for. So that's very simple, you just turn it up or down until you get 5.6 on your meter. If it's somebody who's gonna be moving, I will go to that place where they're going to be when I'm gonna take the picture as they flow through the frame and take the light reading there until it's 5.6 for this scenario, and if you aren't using a light meter, you can use the back of your camera and the histogram, but just be aware, the LCD is not calibrated. You know, the colors may be a little bit off, but you're looking at pure brightness, but also realize if you're standing in full sun doing this and your camera brightness on the LCD is at zero or the normal brightness, it may look super dark, so that hoodman loupe to really get in there and look at it, and still, you know, it's a little dicey if you're just doing it off the back of the camera, 'cause you're not getting super at. That's where the light meter really comes in handy, because you can get it within a tenth of a stop right off the bat. So, once we have it all set up, we have our subject lit well, we have the background dialed in, you know, with this scenario, we can adjust the shutter speed to darken or brighten the background, so let's say I'm at 200th of a second, like I said, at f/5.6, at ISO-100. Our background is 2/3 of a stop underexposed. Let's say I only wanted 1/3 of a stop underexposed. That means I could bring it back to like 1/60 of a second or 1/125 of a second shutter speed, and maybe get that closer. It has more of a fill light instead of overpowering the sun, and if the subject still looks a little dark or too bright, I can adjust my aperture, you know, slightly to adjust the brightness or darkness on my subject. That's kind of standard 101 lighting. Of course, if you change those numbers really drastically, as you know, the shutter speed and the aperture have an overall effect on the brightness and darkness of your image, so you can't take this super extreme. That's one issue with the Hasselblad, you know. If I want to darken the background at 1/800 of a second and I started at 1/100 or 1/125 of a second, it's gonna adjust the overall exposure to some degree, so that's a different scenario that most people aren't running into. But that's kind of my standard way of adjusting flash to ambient light, alright? And that's the simplest way I've ever learned to explain it, because if I try to just think about the aperture numbers and the flash power numbers, I get confused in the math. Even though I was a physicist, it's easy to get confused in the math, but here's a good example. So, this is Caroline, the Kenyan runner who won the Boston Marathon last year or the year before, I can't remember, but this is in Santa Fe, where I live, so I'm exposing for the sky, and then I turn up my flash until she is illuminated, and this is a very slow shutter speed, because I'm doing a motion blur with her, and you can tell there's a motion blur because, you know, you can see through parts of her body here because of the motion blur. Even though it's a rear curtain sync, 'cause all of the motion blur is behind her, and I had to adjust the flash so it didn't illuminate every reed of grass in front of the camera. So, that's a pretty easy way to set up your flash with the camera and adjust the ambient light settings. So, again, to reiterate, in normal flash mode, aperture controls the light on your subject. Shutter speed controls light on your background, which is great, 'cause it makes it really easy to make adjustments on the fly after you've established your settings. But, for hi-sync, for hyper-sync, you can throw all that out the window, 'cause that will not work, because not only is your aperture and your shutter speed a variable, your flash power is a variable, your ISO is a variable, and the slice you're taking out of that light is a variable, so if I change my shutter speed from, say, 1/1000 to 2/1000, I've changed the width of that slice I'm taking out of my strobe, so that means there's five variables we're working with instead of just two. So that makes it a little more complex, but it's exactly the same setup, to some degree, in terms of balancing the light. So, you find the camera angle, I shoot in manual mode. I use the camera light meter, just like I did before, to establish the exposure for the background, and then I decide how much underexposed I want the background. So let's, in this scenario, say I'm shooting at 1/1000 of a second at f/ at ISO-400. I'm just picking numbers out of the air. And I want the background to be a full stop darker, just for simplicity of this exercise, so that means I can go from 1/1000th of a second to 1/2000 of a second with my shutter speed. That halves the length of time the shutter is open, and that makes my background one stop darker. There's no flashes set up yet, so when I look at the back of the camera, I'm looking at a picture that's dark, and the histogram has moved over to the left, and there's a giant gap. There may not be a giant gap, but there's a gap on the right side of the histogram. Everybody with me? Alright. Cool. So, then you position your subject. You position your light, and then that's where you dial up the power on the pack until it looks good on the back of the camera, and until your histogram looks good, so the histogram is key to this, because you may or may not be able to see. If you don't have the loop and you're out there in broad daylight, you may not be able to see the brightness on the back of your LCD, and if you start changing the brightness, 'cause I know on my Nikons, I can do plus five or negative five in terms of brightness of the LCD on the back of the camera. I'm sure it's the same on Canons and most cameras out there. It might be different numbers, but if I increase my brightness on the back of the LCD to plus five, and I just go off the brightness with that LCD, you're headed for disaster zone, because that has no relevance to what the actual lighting looks like, and here's the kicker. So like before, if you wanted to adjust the darkness or lightness of your background, you could just change the shutter speed. You can't do that anymore, 'cause if you change that shutter speed, you not only change the brightness or darkness of the background, but you change the strip of light you're taking out of your flash, so what do you do? So, let's say we wanted to have the background a full stop underexposed. Let's say we only want it 1/3 of a stop underexposed. Well, you go back to whatever I think I said, number four here, but you go back to positioning your light, and then you start over and you redo the entire expose for the background thing, so you again assess your background exposure. Start from there, from the beginning, and then walk through this process again, and it's not as hard as it sounds. It just means I have to, so let's say the same example. 1/1000 of a second, f/4, ISO-400. Let's say I wanna be 1/3 of a stop underexposed instead of a full stop, so I'm not gonna go to 2000. I'm gonna be at like 1250 or 1500th of a second if I wanna be at half stop, and so I set those settings, and then again, I turn the power of the pack up and down until I get the right brightness on my subject, and you know, it's not as accurate as using a light meter. It's not like you're gonna nail it within a tenth of a stop, but by doing this over and over, you'll get the experience to figure out when that exposure's feeling good, and mostly by looking at the histogram, so you don't wanna clip too many highlights unless you've got the sun in the back of your picture. You know, turning on the blinkies on your camera can help as well. If I'm shooting a portrait, I don't wanna see any blinkies or any blown out parts of the histogram on the face in any color channel, so typically, on my camera, I have it set up so that I can see the average histogram, which is the main one that you see, and then also the red, blue, and green channels, and I don't wanna see any one of those channels blown out on the face, typically, because if you do blow out, you know, say the cheek, the light's over here and the cheek's blown out a little bit and you're trying to recover in the software, in Lightroom or Adobe Camera Raw or whatever software you're using, Capture One, there can sometimes be like really weird halo effects that have little color tinges or fringing to them, which is pretty unsightly, so that's what I'm thinking of when I'm doing a portrait. So, that's how you balance hi-sync or hyper-sync with the ambient light, so the kicker here, though, is that your pack can work in hi-sync at most power settings, like we found out the Broncolor can do it in the top six power settings, which is great. Elinchrome, it's identical all the way through the entire power range of the pack, from down to, you know, a few watt seconds all the way up to 400 or 1200 watt seconds, so for portraiture especially, it's great, 'cause that means I could shoot wide open at f/1. in hi-sync, and I don't have to do all the games of putting like a whole bunch of diffusion on the strobe to get the light down to 1.4, and I can shoot at 8000th of a second if I need to, in broad daylight, and get a super shallow depth of field, and you'll see this tomorrow when we do portraits with the cyclocross and the trail runner. So, just to give you an idea, before and afters for these, and this first example isn't the exact same shot, 'cause they were shot at different times of day, but this is what it looked like when I shot this image. This is ambient light, no strobe. This is what it looked like with strobe, and these are the ELB 400s, the little guys, so these aren't like huge, heavy, powerful packs. I carried all this gear out there in one backpack that wasn't even that big, and we hiked for 30, 40 minutes to get to this place, so I mean, that's pretty amazing, to look at that image, and I love that the aspens were gold, This is at Telluride, at the Telluride Mountain Park. Cool place to shoot. And I could take it at the same time of day and make it look like that. It's pretty phenomenal in terms of what we can do, and don't really worry about the info down there. That doesn't really matter. That's just however bright it was. We adjusted the shutter speed and the ISO and the aperture to get the lighting dialed in like I just described. I think there's another example, so here's the ice park, and this wasn't done on hi-sync. This is four years ago, done on hyper-sync, With hyper-sync, it's a whole different ballgame, because you are very limited to what power settings you can use on the pack. I think, you know, with my old Rangers, in the S-Head Elinchrome Rangers, with the PocketWizard Control TL system, there are transmitters. PocketWizard coined the term hyper-sync, so it's their system. You just have to guess and see what happens, and you just get good at guessing, and this is why, with hyper-sync, you have to stand in your front yard or your backyard and guess for like an hour, and figure stuff out at certain distances, and you just have to know, so for this thing, the ice climber was 200 feet down in this gorge at the Ouray Ice Park. I'm on the other side of the gorge, standing in the viewer's boxes. They have these boxes set up, and this is the exposure without flash. This is the exposure with flash, so in this scenario, it's dark, because it's evenly being illuminated by the flash and there is no background. Everything's foreground, so you know, I could have exposed it with ambient light and it wouldn't have been as dark as that previous slide, as we saw earlier in the class today, but just to give you an idea of the illumination, and in this one, especially, she's way down there, so I'm shooting way down in the gorge with a 70 to 200. It's not like she's really close. I also shot this same image with a tilt shift lens, doing the opposite thing. I don't think I have that picture in here, but where I tilted it, and the only plane of focus is right there with her, so it's kind of making the little miniature thing happening, which is another cool image. So, here's one of the pictures that we shot on the pre-shoot, which you'll see here shortly. This is with no flash, and you'll see, 1/800 of a second, f/5.6, ISO-800. I've darkened everything down. I'm exposing for that sky, and I even have the sky like a half stop to 2/3 of a stop underexposed, and you see I've essentially created a silhouette here, but once I illuminate the climber, it's the same exact settings I just had. I just turned the power on in the pack, which, in this instance, the pack was about 100 feet away, so we had it blasting at full power. The other thing to note is that there's a slight gradation in this image. You can see it from bottom to top, so the flash curve at full power on this was not perfectly flattened out like it is on the ELB 400s, so there's a little bit of a gradient, but it's not that big of a deal. You can see how I worked it up. It's really easy to take out the gradient, and it's a very slight gradient in this example, but you know, just going from that shot we just did to this shot, it's pretty drastically different and pretty remarkable that we can create something really unique, and Kai was so strong. That was like playing around for him, just hanging off that hold. He could have hung on that hold for 20 minutes, I have a feeling. Because a lot of this is advanced, maybe some of these are clarifying. Totally. Or just confirming that people are understanding certain things, but this came in from Story in Pictures, who said you mentioned this iconic I-585-D U-meter, which you said does high speed sync reading. For HSS, yes. For HSS. Does that mean that we can actually use it to meter the flash setting? Not for hi-sync or hyper-sync, so remember, there's four different flash things going on here that are different in how they work. High speed sync, so I think it's the Sekonic 858. They're new, top end. I think it's like a $700 meter. Can actually measure high speed sync, which is what your Canon and Nikon speed lights do, and what the Pro Photo B-1 does, so what it's doing is it's measuring those super fast little blips of light and telling you, well, all those blips of light are at this power output, and it can figure out what that is, which is totally different than taking a slice of a big, fat flash pop, so there's no way to use a light meter for the hi-sync or the hyper-sync. There is one way to do it with high speed sync, and that's that brand new meter from Sekonic. Right. The little one that I showed you that I have cannot do that. Okay. And that's a brand new meter that, you know, it can tell you the flash duration of your strobe, so it's a pretty advanced light meter, and I don't know that there's even going to be a flash meter that will work with this. Maybe there would be, for the hi-sync stuff or the hyper-sync, because it would have to be able to put in which camera you're shooting with, which flash trigger. I mean, it'd have to put in so much information, and then you'd have to tell it exactly what shutter speed you're using and exactly this and exactly that, and what the overdrive sync setting is on your trans. I mean, it would get ridiculous, so what I just went through is way easier than some flash meter. You'd have to be typing on a flash meter for half an hour. Right. Just to get it to work. So, anyway. Thank you. A side note, there. Sorry, I just went super geeky there on you. I think at the very beginning of the class, I said like this is the start, and you're not gonna walk out of this class and be a master at this, because you're gonna have to go try it for yourself with your gear in either hyper-sync mode or high speed sync, if you have Pro Photo, or hi-sync if you have Elinchrome or HS, you know, if you have Broncolor, 'cause Broncolor just calls it HS, and you're gonna have to figure out how it works for your system and your camera, and then adapt that to your photography, but all this stuff we're talking about still applies. It's not really that much different. For high speed sync, I will say, 'cause this brings up another good point, like the Pro Photo B-1 or B-2 is brilliant in that it does incorporate TTL, so through the lens metering technology, so you can use TTL with your Pro Photo B-1 or B- in high speed sync, and it'll automatically figure out the exposure for you, just like your Nikon or Canon flash would, and one of the beauties of the Pro Photo setup is that you can switch. Once you take a picture, it locks into those settings, and then you can switch to manual mode on the strobe and adjust it on the fly from there, which is a really cool setting. I mean, that's brilliant on their part.
Class Materials
Bonus Materials with Purchase
Ratings and Reviews
norah levine
This is a course that I could watch repeatedly and be able to learn something new each time. Michael is a truly an expert in his field and is so generous with his knowledge. This course really breaks down the process of adventure photography, but it's more than that. I don't think you need to even be an adventure sports photographer to get tons out of this course. Michael is really good at breaking down some very complicated technology. Thank you!
a Creativelive Student
Great course that combines the technical aspects of shooting with light in different situations, with the art of making a great image of athletes. Michael is a great teacher and I'm sure his lessons will continue to help guide over and over again!
Jeph DeLorme
Great class with dozens of tips, ideas and lighting strategies for tough outdoor lighting challenges. Advanced class taught in a way that allows even a beginner to get a handle on lighting tough situations. The location videos provide real life examples that make this class a definite must have for my Creative Live collection. Thank you Michael Clark and Creative Live! Jeph DeLorme