Lesson Info
9. Lighting 101: Flash Basics
Lessons
Class Introduction
03:25 2Evolution with Lighting
04:44 3Why Use Artificial Lighting?
06:43 4Pre-Production and Pre-Visualizing
07:16 5Equipment: Overview of the Gear
25:28 6Equipment: Selecting the Right Gear
24:05 7Strobes vs. Speedlights
08:01 8Lighting 101: Flash Sync Speeds
14:35Lighting 101: Flash Basics
24:46 10High-Speed Sync (HSS) vs. Hi-Sync (HS) vs. HyperSync vs. Leaf Shutter
14:50 11Gear Requirements for Hi-Sync (HS)
12:29 12Flash Exposure
21:39 13Pre-production and Location Scouting for Rock Climbing
06:02 14Gear on Location: Rock Climbing
07:04 15Rock Climbing Photography 101
11:37 16Rock Climber: Environmental Portrait
24:22 17Finding the Shot
13:48 18Capturing the Action: Rock Climbing
07:09 19Shooting at High Angle: Rock Climber
21:15 20Digital Workflow: Overview
16:09 21Editing and Post-Processing of Rock Climbing images
30:17 22Cyclocross Photography 101
11:32 23Location Scouting for Cyclocross
05:36 24Gear on Location: Cyclocross
11:42 25Intro to the Cyclocross Rider
16:29 26Capturing Action: Motion Blur
43:13 27Communication with Athletes
18:55 28Variations of the Shot
23:21 29Cyclocross & Trail Runner Portraits
40:40 30Location Scouting & Planning the Shot
09:20 31Capturing the Action: Lighting Set Up for Trail Running
37:01 32Editing and Post-Processing of Cyclocross Images
21:34 33Editing and Post-Processing of Trail Running Images
07:52 34The Business of Adventure Photography
17:42 35Image Critique with Chase Jarvis
48:41Lesson Info
Lighting 101: Flash Basics
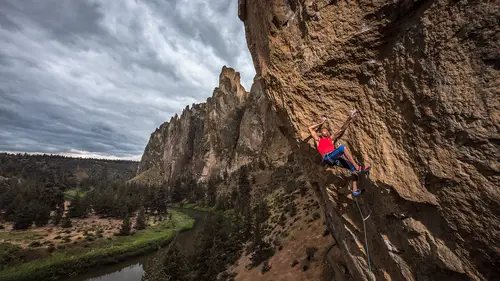
The inverse square law, I mean back in the day before all this automation, you had to do some math when you used flash. If you had an old Vivitar 283, you had to do the math in your head about what power setting depending on, you gage the distance to your subject and change the dial on the back of the flash to figure out what's the right setting, and then you're shooting film, so you couldn't see it immediately. The thing to think about here is if I move my flash, so just say I'm lighting one of you, and I put the flash let's say here, and then I move it back twice as far, I need four times as much power than if I had it half the distance to you, not twice as much. So that's part of the light falloff. Think of a point source of light. It's not just spreading longitudinally, but it's also spreading three dimensionally as it goes out, so that helps make that make sense. The other thing to think about here is light falloff. If I have a light right here, like two or three feet in front of ...
me, by the time that light hits the floor behind me it's way darker than what's hitting my face. Whereas if I have a light 20, 30 feet away, the light falloff, it's like a whole range of two or three meters or 10 feet that's gonna be the same F or very close to F4 as you see out here. And that plays into this whole putting the light far away thing 'cause you have a little bit of forgiveness because the light is so far away. Does that make sense? That's a pretty huge part of this, of lightings adventure sports because you do get a little bit of forgiveness because you're putting the light farther away. It's also great when you wanna really highlight your subject when you're shooting a portrait because the closer you put that light to your subject, A, the more soft the light is the more curvature you have over the face, but you really help them stand out from whatever background they are standing in front of which we'll see in some of the portraits that we shot on the preshoot. Just in terms of general lighting, and this is only for normal, when you're shooting at your normal sync speed. So say you're shooting at 200th of a second on your Cannon camera or a Sony or you're shooting at 250th on a Nikon, underneath your standard flash sync speeds, obviously, your aperture and your shutter both control the overall exposure, but in terms of your subject and the background, your shutter speed'll control the brightness or darkness of the background when you're using flash. Your aperture will control the brightness or darkness of your subject, and this is super basic stuff, so I'm not gonna dwell on it too much. Super basic for flash photography I should say. Not super basic if you haven't used flashes this might be news to you. This is great because it means you can control ambient versus your flash really easily with normal sync speeds. I use a light meter, as I said earlier. If I'm doing normal flash sync speeds, I definitely wanna use a light meter because it just helps me dial in the lighting that much faster. If I've got the client and maybe an assistant and maybe 20 people standing behind me, I don't wanna have to shoot 20 exposures to figure out the flash because the client is probably by the 20th exposure is saying well, I could've done that. Why did I hire you? So A, it makes me look really professional if I just pop a light meter out there and I get the first shot to look really well exposed. And B, it just helps me get there faster. But for all of this advanced lighting stuff that we're talking about, here's an example of doing that in a studio, and you can see there's G one, two, three and four which means I can actually change the power of all the four different lights I had going on this shoot with the light meter which also makes it really fast. But for this high sync stuff you can't use a light meter because they can't measure which portion of the light you're using. We'll get there in a second. Other basic stuff, if I have a speed light, that's a really small light source, that's gonna be hard no matter what you do to it unless you put a big softbox on it. The farther your light is away from your subject the more defined your shadows are going to be. Here are a few examples of that. This is two raw flash heads. These are not speed lights. These are strobes. You can see there's very defined shadows here, up here. You can see the edges of those shadows because those are essentially 40 feet away at point sources of light which is the general standard reflector. That's like seven inches, so it's very hard light. Same deal here, this is actually a big, giant softbox. This is an Octabank which is generally a really soft light source. Like the question earlier, how do you soften that light a little bit? This is one way you can do it, but you still end up with pretty harsh shadows because the softbox is like 50 feet away from the rider, and this is still at normal sync speeds. I'm doing anything fancy. I did put a gel on the light because you can see in the background this is overcast clouds that look really blue because I actually changed the white balance to make the clouds blue, and then I put gels on the light to make this glow. It's actually this color. This is New Mexico. It's red dirt, so that's why it looks so orange, but I wanted to make it look like there was some last light of the day sneaking in underneath the clouds hitting this one area which I see quite often actually when I'm shooting ambient light. So I'm trying to replicate something that I've seen before. A large source of light, the closer you put it to your subject it's gonna be a soft source. The Octabank is famous for this soft source where the light is actually inside the softbox pointing at the back of the softbox, and it goes through two layers of diffusion, or however you do it. If you have a giant diffusion scrim that you're putting in front of whatever modifier you have to soften the light, you lose a lot of power going through those softboxes, so you typically need more light output, more watt-seconds to use that but it gives you a really soft source. Here's an image, an example of that, but it's also got some hard lights thrown in from the back, but you can see the shadows on his face are much softer. These aren't like ultra soft unbelievable shadows like an Octabank. I think this was the deep octa, so it's a little smaller light source, but still softer than a hardshell reflector. This is a BMX rider and a three-light setup. But you can see the box in his eyes. If you ever wanted to know how something was done, look at the eyes. If they are pointing towards the camera, they're gonna reflect all the light sources that are at least in front of the camera, and then you can infer that there is some light coming from behind him, obviously, because of the rim light highlights. Light output, as I have said, is rated in joules which is the physics term for watt-seconds. All of these lights that we're using here are continuous lights on this set of CreativeLive. They are rated in watts because they're on continuously, so it's just an electric term of how much output these lights have. Watt-seconds is how much wattage is emitted in one second. When we start talking about 100 watt-seconds or 400 watt-seconds, that kind of gives you a clue as to power output. Most people have familiarity with these speed lights, and they're not all 100 watt-seconds. I mean, 100 watt-seconds is maybe a little generous. They're usually 60 to 80 watt-seconds. If you overdrive them, they might be 100 watt-seconds, depends. That's definitely the highest end Nikon and Canon speedlights I'm referencing here. 400 watt-seconds for the ELB or whatever strobe you have, it talks about that. This is an approximation. I've never tried using three 400 watt-second packs side-by-side instead of a 1200 watt-second pack, but there are some times, especially for a lot of the sports stuff, where you just need the power and there's no substitute. That gives an overview of some of the lighting basics. We're gonna go into lighting diagrams next. We're going over a lot of the basic stuff right now. We're gonna talk about lighting diagrams. In the outdoors when we're shooting with available light, there's always two lights. It doesn't matter what time of day you're shooting or night. Like that ski picture, we had the lights of the stars. There wasn't much light there, so it's a different scenario, but there's always another light source besides the one you're bringing, just to clarify that. Here's the issue with adventure sports. I think I talked earlier about the alien abduction lighting that comes out of nowhere to light up your subject in sports, and that's something we're still working out to make that more natural looking. But in the studio when I'm shooting up a portrait, I can have 10, 12 lights set up. One little tiny grid spot up above the person's head to light the top of their left ear or something or whatever. I can have all these lights being super specific 'cause that person's not moving or not moving very much. The point here is that the more lights I set up, the less the subject can move whether I'm in the studio or outside. If I'm shooting dancers here in the studio and they've gotta do, say it's a ballerina, and they've gotta do something right here in like a 10-foot space, I can't light just a two-foot little area of that. I've gotta light it fairly broadly. When you're outdoors, it's even more critical. You have a mountain biker flying by or an athlete doing something in front of your camera. They're gonna need a bit of space to pull off that trick. Unless they're like a skateboarder, and they can do a kickflip in one space, you're fairly limited. In the outdoor world, or for adventure sports, the one-light set up is kind of the go to, easiest way to get a light on your subject, and this is just a simple lighting diagram. Here's a portrait, one light. This is an ELB 400. The flash is over here. There is no light modifier on it except for the plastic little disc that comes with it. My friend John here has a great face. He looks rugged and tough, and he's had lots of hard years in the mountains, and he's an amazing skier, super cool guy, but it really represents him well. This is kind of a grungy, tough looking portrait. If I did that same lighting on a woman, they may not like me so much, so you gotta tailor your lighting to the person. Here's another one-light shot that I showed you earlier from much farther away. Here I could have set up a bunch of lights. I coulda lit up this whole cliff side if I wanted to, but that would take a lotta work to hike over there and place lights all over the place, and we obviously waited for the right time of day. In terms of other setups, basic, this is like the old Kmart portrait studio setup, two soft umbrellas. One is your main and one is your fill, and not to denigrate this lighting 'cause it's been tried and true forever, but it's not that exciting. In the outdoor world, I don't even have pictures of this 'cause I've never actually set up that scenario ever. The closest thing I have is this rock climbing picture I showed you earlier which is just two lights firing. Typically when I'm in a cave shooting with strobes, I'll use a two or three-light setup, and I'll just light up different parts of the cave, so one light's got a grid on it, and it's right at him. Then another light's over here lighting up part of the cave. Then if I had more strobes at this time, this was shot a long time ago, maybe 12 years, I might have lit up this part of this cave a little bit as well. In these scenarios, I don't necessarily wanna light the entire cave because I want some shadows. When we're creating or when we're lighting something we definitely, the shadows are just as important if not more important than the light we're putting on the subject. So we're not just looking at where the light's hitting. We're thinking about where the shadows are being created 'cause that's what's adding drama to your picture. That's what's adding contrast to your picture, so keep rollin' here. The light trap, you'll see this over and over and over in our preshoot 'cause we use this for 90% of everything. Basically a light trap is where you put two lights at whatever distance it is, you face them at each other, and then you have your subject come through that light, and it relies on your timing to get the shot right when they come between the lights. It creates dramatic images. A lot of these images I've already shown you were created with light traps. This is about the most complex lighting setup you could use for adventure sports or action sports of any kind whether it's a MotoGP rider coming through a frame or a mountain biker or whatever it is. Because once I set up a third light, maybe I set up a top light, I am refining where that person can be, constricting them to such a degree that they may or may not be able to do what it is they're actually doing. So that's the trick with adventure sports is how do you set up more lights and get more complex lighting setups than two lights? Here you can see this a good example of a light trap with the lights in the frame. I know he's jumping off this and he's landing here, so I know exactly where he's gonna be the whole time, and I've got two of those long throw reflectors on there to boost the light out because I'm using ELB 400s which is not a ton of light. And we got a little lucky that it was an overcast day to help us out. Here's another example. This was shot indoors in a studio, and I definitely didn't need that much light power. This could've been done with speed lights perhaps, but there's a big softbox on this side of him, a giant softbox actually, and a little bit smaller softbox on the other side. Because I was inside, this is a parkour athlete jumping off blocks, and I could have him do this over and over and over so I could position him on the background really helped out. You can see the drama created by this light trap because you get a stripe of shadow in the middle of your subject, and then they're lit by two on either side. The other nice thing about the light trap is you can rotate the lights. So say our subject is coming at you here, if I have the lights 90 degrees to their motion, I can rotate those lights like this and that front light will be fully lighting them a little bit more. It'll still create a shadow on this side, and I can add a rim light on the back, and so then I have my subject's face a little bit more lit than I have the rim light. So there's all kind of games we can play with this light trap in terms of modifiers that we can use to soften the light. Usually I'll soften the light on the front of the person and then use a hard light on the back. We gettin' some questions I'm guessing? Well yeah, Cosmo had asked a question about do you ever light, add lighting to fill the background? So it sounds like this is a scenario Definitely. perhaps the cave could partially be considered that, but are there other types of scenarios? This one is lit, the background, so there are three lights here, and I created a streak of light or tried to create a streak of light going through. I think it's from this side on the background. If we go back to the rock climbing image back here, we just waited 'till the perfect time of day for those clouds to light up with a little bit orange in them. I actually thought about this shot for three years before I did it. It was 98 degrees in the cave. The cave wasn't that far from the road, but it took three hours to get all the gear up there. This is Timy Fairfield who is a good friend of mine. He definitely was one of the best climbers in the world for a good chunk of the 90's and 2000's. He's still an insanely good climber. This is a 5.13c route for those of you that are climbers out there which means it's really hard and in 98 degree heat to hold onto those holds, he worked harder than I did I think to get this image. It's a testament to how you have to work with your athletes which we'll talk about that as well in this course. Let's keep goin' on. A three-light setup, we actually use this in the course for shooting some portraits of our athletes, so we'll go more into that. We have grids on the back here just to control the rim light that we're creating. You'll see that so I won't spend too much time here. You see so many pictures everywhere, in magazines, all over the place that are a three-light setup. I'm sure all of us recognize this pretty easily. Here's an example. These are some Kenyan runners, the marathoners, amazing runners. Man, when you see a professional marathoner fly by the camera it's mind-blowing how fast they're moving. I think his name is Aaron. You can just see the rim light coming in on either side, and then there's a softbox kind of somewhere up here. You can see that in his eyes right there. Here's Caroline as well, another marathon runner. She actually won the Boston marathon last year I think. It's the same setup, and it's just a matter of where you put your front light to organize that. The front light is, obviously, in these pictures not as bright as the rim lights that are hitting her. A four-light setup is something I've used quite a bit with ringflash. What this does is it just kind of fills in the shadows, and you're using the ringflash at a super low power here. These are for portraits, obviously. Here you can see it's just a kiss of light in the shadows there. If I go to the next picture, it might be a little bit more obvious. In that last picture, I took the ring light reflection out of his eyeball, so that's why you didn't see it. Sometimes I do, sometimes I don't. It just depends on how distracting 'cause sometimes it's a giant ring light, and that can be a little bit distracting in the image. Here I left it in. You might have seen this guy. He's been in a ton of movies lately. I think he was in the latest Jurassic Park. He was a ex-pro MMA fighter as well. Tait Fletcher is his name. It just gives you the Dan Winters look essentially. One of my icons Dan Winters, amazing portrait. If you don't know Dan Winters look up his work. One of the icons of the portrait world. He shoots for Wired magazine a lot. I don't really pull out the ring flash and do this four-light setup that often. I've done it a few times outside but not that often. It's tricky to pull off outside because when you start setting up so much lighting outdoors, if you just shoot a picture of somebody, cut them off at the waist, and then they're outside with a background, and you light it so complexly, it looks like you did it in a studio and then pasted it onto a background. And it's very hard to get away from that unless you show the feet of the person, so you show the entire environment. Let's keep rollin' here. What time over? Using flags, I talked about the roadrags. You can see here these are the roadrags that I have. This was on a Red Bull shoot earlier this year. This is Felix Baumgartner. He jumped out of space four or five years ago which is one of the most epic things anybody's ever done I think. That was pretty amazing, and I had the honor of photographing with him. This was a shoot earlier this year with the Red Bull Air Force who I've shot with a bunch, Jon Devore, Miles Daisher, Jeffrey Provenzano. I mean these guys are amazing. They're probably the 10 best skydivers on the planet. They've been in Transformers. They've been in a truckload of movies. I love shooting with them. It's such a blast to hang out of a plane while they jump out or hang off a cliff or do just somethin' totally insane which is not really insane just looks insane for those of us that don't jump off of things. You can see with the flags I'm blocking part of the light. This upper flag is the only one that's actually resulting in the final image. I'm blocking the light on his forehead. Often if I don't want, you know I'll have a lot of sheen. If you light me from up here, my forehead's gonna glow like a magic lantern. So what I'll do is I'll drop a flag down, and it's very precise. I mean we're talkin' millimeters and inches here to kind of block that light from hitting here, and it'll create a gradation down their forehead. This was shot at Kirby Chambliss's ranch, and this is his garage. Which is also why I'm wearing a harness here because I've got this setup, and then I shoot for 10 minutes, and then I run out the door and jump on a helicopter and shoot them doing something, and then I come back, and I shoot a few portraits while they're having somebody repack their shoots. So it's kind of an ad hoc, on-the-go thing. The day before I took the time to set this up so everything's dialed. All I have to do is have them sit on the chair, and I start shooting and interacting with them, so I'm not thinking about the lighting. The lower flag that you see here is because he has a white floor. Because this flash is pointing down, there was a lotta spill coming back at the camera, so it's not actually changing the image in any way. I'm just shooting over it to block the spill coming off of the floor, and here's what those images looked like. These are two separate shots. I just put 'em both up here. Miles had these cool sunglasses so we left 'em on. But you can tell the gradation that's coming down from that flag on his helmet, and that just helps really control your light. I think, honestly, if you're not using flags then you're not fully controlling your light for portraiture at least. It's tough to use flags for the action stuff. Here's another shot. This took two days to build the lighting for this shot. This is one of my good friends Owen. He's a great skier, a mountain biker. I have shot with him a bunch, gone on quite a few adventures. He has great hair, good-lookin' guy. We definitely had tiny amounts of light that we were using, and we really specifically used the modeling lamps, since this was in a studio, to really dial the light down to just the tiny amount of light we wanted to use for the image, and then tweaked it in Photoshop to give it this blue look. I will say for portraiture, it's hard to do really advanced portraiture on location. We're using lots of lighting. I mean to get something to this degree for me on location would have to be an incredibly patient client. The other thing is when I'm shooting portraits, you'll see later I used Erin actually as a stand-in for one of 'em, but I don't wanna have the subject be the person standing there while I'm dialing in the lighting. I want them to be off somewhere else just relaxing, and so when they come on set and they're, the set may be this location out in the outdoors or wherever it is, I want them to see that first shot and be like wow because I want them to have confidence in me. If they don't have confidence in me as a photographer, they're gonna be like well that first shot wasn't that good. I don't know about it. Am I wasting my time? Especially a portrait, we're all pretty sensitive when we get our picture taken. I know I am. It's always a good idea to have your picture taken if you've never had your picture taken before just so you get that feeling of dread. But (laughs) I want them to be fresh, and I want right off the bat for them to be pretty excited about what we're getting like those pictures of the Red Bull Air Force. Those guys are super excited about those portraits, or at least I hope all of them are. Really quickly, front curtain and rear curtain motion blur, so you've seen this image before. You see he's frozen here then there's the blur. That's what's called front curtain blur, so that means the flash went off at the beginning of the shutter cycle. So when the first curtain dropped, the flash went off immediately, and then the second curtain dropped. That means this is the width that he moved or the distance he moved in one 250th of a second, or whatever the shutter speed was. I think it was longer than 250th of a second. It was probably like a tenth of a second here. Rear curtain motion blur means the blur is behind the moving object. So you see there's no motion blur on the front here except for maybe the motion of the wheel right there. On Nikons you set rear curtain on the camera. I believe on Canons you set it on the flash, and it might be the same on Sony. I don't know for Sony and some of the other cameras. But this is a setting either on your camera or on your flash. I know the Elinchrom triggers have this option called delay mode on the trigger itself. So if your camera doesn't have that mode, you can do it on, like my Hasselblad doesn't have rear curtain sync, so you can use delay mode on the trigger itself to create the rear curtain sync look.
Class Materials
Bonus Materials with Purchase
Ratings and Reviews
norah levine
This is a course that I could watch repeatedly and be able to learn something new each time. Michael is a truly an expert in his field and is so generous with his knowledge. This course really breaks down the process of adventure photography, but it's more than that. I don't think you need to even be an adventure sports photographer to get tons out of this course. Michael is really good at breaking down some very complicated technology. Thank you!
a Creativelive Student
Great course that combines the technical aspects of shooting with light in different situations, with the art of making a great image of athletes. Michael is a great teacher and I'm sure his lessons will continue to help guide over and over again!
Jeph DeLorme
Great class with dozens of tips, ideas and lighting strategies for tough outdoor lighting challenges. Advanced class taught in a way that allows even a beginner to get a handle on lighting tough situations. The location videos provide real life examples that make this class a definite must have for my Creative Live collection. Thank you Michael Clark and Creative Live! Jeph DeLorme