Shooting at High Angle: Rock Climber
Lesson 19 from: Advanced Lighting for Adventure PhotographyMichael Clark
Shooting at High Angle: Rock Climber
Lesson 19 from: Advanced Lighting for Adventure PhotographyMichael Clark
Lessons
Class Introduction
03:25 2Evolution with Lighting
04:44 3Why Use Artificial Lighting?
06:43 4Pre-Production and Pre-Visualizing
07:16 5Equipment: Overview of the Gear
25:28 6Equipment: Selecting the Right Gear
24:05 7Strobes vs. Speedlights
08:01 8Lighting 101: Flash Sync Speeds
14:35Lighting 101: Flash Basics
24:46 10High-Speed Sync (HSS) vs. Hi-Sync (HS) vs. HyperSync vs. Leaf Shutter
14:50 11Gear Requirements for Hi-Sync (HS)
12:29 12Flash Exposure
21:39 13Pre-production and Location Scouting for Rock Climbing
06:02 14Gear on Location: Rock Climbing
07:04 15Rock Climbing Photography 101
11:37 16Rock Climber: Environmental Portrait
24:22 17Finding the Shot
13:48 18Capturing the Action: Rock Climbing
07:09 19Shooting at High Angle: Rock Climber
21:15 20Digital Workflow: Overview
16:09 21Editing and Post-Processing of Rock Climbing images
30:17 22Cyclocross Photography 101
11:32 23Location Scouting for Cyclocross
05:36 24Gear on Location: Cyclocross
11:42 25Intro to the Cyclocross Rider
16:29 26Capturing Action: Motion Blur
43:13 27Communication with Athletes
18:55 28Variations of the Shot
23:21 29Cyclocross & Trail Runner Portraits
40:40 30Location Scouting & Planning the Shot
09:20 31Capturing the Action: Lighting Set Up for Trail Running
37:01 32Editing and Post-Processing of Cyclocross Images
21:34 33Editing and Post-Processing of Trail Running Images
07:52 34The Business of Adventure Photography
17:42 35Image Critique with Chase Jarvis
48:41Lesson Info
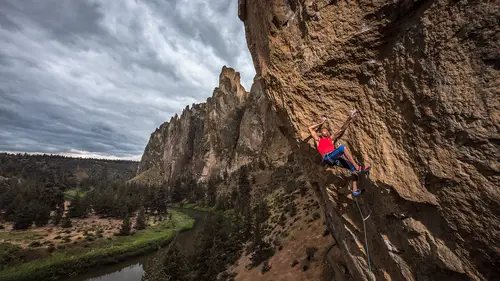
Shooting at High Angle: Rock Climber
We are now still in rock climbing mode. We're going to go to another video from our pre-shoot, where we're shooting on actually Chain Reaction, the climb you see up here on the screen, both from the ground and then I get on a rope to shoot from above. So without further ado we'll jump into that, and then I'll come back and show you how I worked up one of the images, probably this one right here. Prepare your questions, keep writing them down. If you have some during this video segment, and we can answer them after the fact. And I'll show you the finished images, but off we go. So we got epic, amazing shots over there on Rude Boys. We just came back here 'cause the wall is dried out, and I definitely want to get above the climbers and shoot with the strobes, so I'm looking down but the strobes are still in the same position. So, first Kai's gonna go up again. I'm just gonna shoot from the side really quick, and then he's gonna put a rope up for me, just because it's just easier if he do...
es it if he's going to climb the route. And then I'll ascend the rope so I can get above him, pull up my rope bag to get it out of the way, as you'll see, and then I'll have him do the route again. So the lighting's gonna stay the same the whole time. We're still using the high sync lighting. We have one light over here now. We also have a light on the other side of the route, so we're cross lighting again, but from really far away distances. And we've got kind of the same composition I was thinking last time, but as you can see, we've got the sun peeking underneath the clouds, these thing's lighting up below us. At some point, you know, we've got like 45 minutes 'til sunset. This whole sky could light up red and be just unbelievably amazing. So that's the hope, guys. But okay, go ahead and take there for a second, Kai. No worries, you're good. I'm just gonna get set up and do one more test. Good? We're good, go for it. Okay. (camera clicking) So this is the moment right here. This is, I think, the best shot from this angle. When he steps up here, he's got really good body tension. If you see all four points are off almost. He relaxes there. Oh, he did it a little differently this time. He's got great technique, because he's climbing it totally different. (muffled chatter) Yeah, cut your feet loose and hang by one arm. Don't look at us. Okay go ahead and take there for a second. Can you reach up with your left arm when you get back on? And-- Just like as far as floating in air? And just hang with one arm Okay. On that and I'm asking for the fake now I guess. That's not how you do the move though. No I know but then swing, so maybe just go up with one arm maybe with your hand on a lower hold and so your left arm and then swing your feet off and then let go with your right. Is that okay? That's cool. I know that's not how you do the move but it'll make for a spectacular picture. Let me just make sure the exposure's good. Exposure is awesome. Whenever you're ready go for it. Climbing. (camera clicking) You do it one more time? Just put the foot up, there you go, and swing as hard as you can. Ready when you are. Ready? Yup. Climbing. Go for it. (camera clicking) Yeah I got the first one. Cool Kai, go for it, just go ahead and go to the top, that's fine. Okay. And then I'll, we'll send the rope up. (camera clicking) Nice. All right. Camera's clipped in, everything's clipped in. Up we go. Oh yeah, sweet! Just so you guys know every single thing I have up here is clipped in. I don't want anything to drop any anybody, much less Kai. All right let me take a test real quick. Okay can you bring the power up on that one? Just go full power first and we'll go down from there. Thank you. (muffled chatting) Oh yeah. All right Ian, can I have you back. When you take, when you give him slack just move in this way. Let me just one more test here. Okay Tom can you turn that pack down two stops? Thank you. Perfectomundo all right. All right Kai I'm ready when you are. Oh cool! There you go. You can pull your face out just a little. There you go. Cool, yeah right there. Can I have you do that move again Kai? You can go ahead and clip if you want and just do it clipped, either way. I can't really see the rope so it doesn't matter. (muffled chatter) Just that move where you're reaching up to the horn and then pulling up. Let me check these out before you do that. Oh, oh, oh, oh. I'm ready, go for it. Okay. (camera clicking) You know what, keep going. Nice. Okay, go for it. Actually take for just a second. Take. No I know I was firing a little too quickly there. I'm just gonna adjust my foot over here so it's a little higher. There we go, nice. All right, I'm ready. (muffled chatter) No worries, you're good. Oh that's right-- There's some edges out there. You'll like that shot. Oh yeah I forgot, okay ready? Yup. (camera clicking) I'm with you. Oh. Okay go ahead and take for a second. (groans) All right, ready when you are. Ready dude? Yup. (muffled chatter) Can you sneak out there again? With your face, can you pull your face around the corner? Do just what you did. Hold on a second let me focus. Okay can you take there, are you at a bolt? Go ahead and take for a second. All right. It's more for me than for you. There is one move where you had your foot and you reached way around to the hold. Yeah. Go back to that and then you snuck your face out around there, I think that's. Yeah let's just do that shot one more. And I think we'll call it good after that, or maybe I'll have you go back down and do the route again real quick. Okay. Hey Tom, are you over here? Can we pull that pack down a stop and a half? What are we at, like five? We're at five. Let's go down to four. Kai can you just look up for me for a second? Just gonna test the light. Okay perfect Tom, thank you. All right, oh you went back down, great. All right I'm ready when you are Kai. (gasps) Go for it. (camera clicking) Can you reach up for that hold with your left hand again? There you go, right there. Go for it. All right, thank you. Can we do that move one more time where you grab that hold you had with your right? And then is there a hold there you're going for, this little edge? Whoa, a little knee bar action here, that's good. All right and when you're ready. Go ahead and pull on we'll just do that one move again where you're reaching up and then we'll be done, we'll get outa here. (camera clicking) Can you reach up for that one again? Go for it. With your other hand like you just were. Oh. Yeah. Go for it, got it. These are pretty cool. I don't think I've ever shot from above with lights on two sides of a climb like this, so we're getting something very different. We're done, thank you Kai. Thank you everyone, that's a wrap. We got some pretty cool images. (team clapping) All right so there you go. Here we're gonna start just going through a few of these images as they're worked up. And there's quite a few in here just so we can talk about the different body positions that Kai is in. I mean that's super classic just looking at those the way he's going up this steep overhanging arete with you know Gotham back there in the background all looking gnarly. So this didn't happen in the video but we did shoot earlier in the day for just about two minutes before it full on started raining and we got this picture. And this is one where I didn't ask him to do this he just jumped for it and let his feet swing, so. Even though I did ask him for a move, that's not typically how he'd do the climb later in the video. There's still some of this going on. And that's actually a pretty wild image it looks like a basketball player dunking, you know the basketball, so super cool. You know and some of these where he's not just hanging off are still interesting body position wise because we see his face, he's looking over towards us. Compositionally you see it's the rule of thirds pretty much. It's a figure on a landscape. This one's actually one of my more favorite ones just because he's grabbing a tiny little horn right here and you know he's chalking up, so he's technically resting but his body is still under tension, you can tell from the way his feet are positioned and the way that hold doesn't look that good, and it's not that good. It's what we would call a sloper in climbing because it's sloping off, it's not a positive hold. So you know I worked up pretty much all of these ones where he was hanging off one arm. And there is a reference that Ian brought up that's not in the video actually from years and years ago when this climb was first put up there's a really kind of iconic picture of a climber doing exactly what he's doing. Just hanging off one arm and chalking up. That at the time, this was one of the hardest climbs in the United States and you know, the fact that somebody could hang off one of the worst holds on the climb and chalk up just showed how strong they were. So I was trying to kind of repeat that shot. So historical precedence in knowing the history of the sport here came into play a little bit. You can also see my composition. I'm really paying attention to where this drops off over here on the edge. I'm really paying attention to where the climber is, you know with my Nikon D810 I'm focusing on him over here. I'm not using continuous focus, I'm just shooting in single point auto-focus so he's not really moving closer or farther away to me so focus is not that difficult of an issue. The other thing is when you're watching that video you're seeing that I'm at ISO800 a bunch in this. And just like when you're shooting with ambient light if you want a fast shutter speed and it's not crazy bright outside, sometimes you might have to jack up your ISO just a little bit to get to that shutter speed. So even though I'm using high sync for the lighting I'm also adjusting that shutter speed to get me up to that ISO, or up to that shutter speed. And you know ISO800 on a D810 may sound like a really high ISO but when you look at the images, I mean if I made a print you would not see the noise at all. And with a little cleanup in Lightroom which we'll do next, there's no noise or effectively no noise. That's probably the best shot, actually let's go back. Just because this when he kicked off he looks a little more natural than he does for this one. Looks a little stiffer, like it's just after he kicked off. So there are little things I'm looking at in the body positioning and I can, when I'm photographing the climber it's because I am a climber, I know exactly what it's feeling like for them in their body when they're flying off like that. And so I'm looking for that moment where I feel like it would be the height of the action, after the fact. So from above I think I said in the video this is the first time I've ever lit from above using two lights and a light trap. I'm sure somebody else has done it, I don't know if it's been done. You know honestly I'm not sure it worked incredibly well. It's a little too dramatic and if I could go back and shoot this again I think I would put my rope on the climb next to it and get a little different angle so I could take out this staircase below him. And maybe then come around and show more of the exposure to the climb. So, you know hindsight is 20, 20 here. There's still a few cool pictures like this one's pretty dramatic. And I was definitely thinking leave room for a cover of a magazine so you know climbing magazine or whatever, if they needed text in here, shooting pretty loose. Whenever I'm above a climber I'm typically shooting vertical even though we showed them horizontal in the video just so they're at full screen, you know, I'm always shooting for vertical just because it fits. So you know that's the last picture that we got I think. And that's the one where I asked him to cross his hands again just because you see from my perspective what was going on. The interesting issue with this though is that his arms are blocking parts of his face the way he's lit so I'm getting cross shadows so it was tricky with that lighting. It woulda been nicer if I had the lights a little higher, but it worked well on that climb because the climb is starts in a deep well and it goes up on either side so that I could put the lights on level with the climber on both sides which is super unique. That's not often you see that happen with a climb. So there you have it. Do we have any questions left over from the video or? We did in fact have one question from Joey as well as Fitch who were both asking about adjusting the power of the pack from the sky port of the transceiver versus calling to the assistant down below. Could you do either? That is a great question. And the answer to that question is that these are prototypes so I have three of these ELB1200's and they all have the exact same serial number. So they all show up as one pack on the sky port, but that's not gonna be the way it is. They'll have different serial numbers so that I could actually instead of calling over to Tom, just change the power on the pack normally you know, with the production versions here whenever they come out. And adjust the power. Okay, great. And you saw me I was, I basically photographed this horn when he was further down. And at first it was thermonuclear 'cause we had that other pack on full power and then I had Tom turn it down. Then I had him turn it down again. But that's the reason I'm not doing it on top of the sky port, sadly, which is a great question. Good eye for catching that.
Class Materials
Bonus Materials with Purchase
Ratings and Reviews
norah levine
This is a course that I could watch repeatedly and be able to learn something new each time. Michael is a truly an expert in his field and is so generous with his knowledge. This course really breaks down the process of adventure photography, but it's more than that. I don't think you need to even be an adventure sports photographer to get tons out of this course. Michael is really good at breaking down some very complicated technology. Thank you!
a Creativelive Student
Great course that combines the technical aspects of shooting with light in different situations, with the art of making a great image of athletes. Michael is a great teacher and I'm sure his lessons will continue to help guide over and over again!
Jeph DeLorme
Great class with dozens of tips, ideas and lighting strategies for tough outdoor lighting challenges. Advanced class taught in a way that allows even a beginner to get a handle on lighting tough situations. The location videos provide real life examples that make this class a definite must have for my Creative Live collection. Thank you Michael Clark and Creative Live! Jeph DeLorme