Local Sharpening and Local Noise Reduction
Lesson 7 from: Advanced Photo Editing in Capture OneDavid Grover
Local Sharpening and Local Noise Reduction
Lesson 7 from: Advanced Photo Editing in Capture OneDavid Grover
Lesson Info
7. Local Sharpening and Local Noise Reduction
Lessons
Class Introduction
04:58 2Local Adjustments Overview
05:47 3Drawing Local Adjustment: Masks with Brushes
08:59 4Drawing Local Adjustment Masks with Gradients
08:05 5Vital Techniques for Dodging and Burning
09:54 6Dodging and Burning Demos
14:49 7Local Sharpening and Local Noise Reduction
07:40 8Advanced Editing for an Editorial Portrait
05:51Simple Element Removal
06:09 10Multiple Local Adjustments: Product Photography
09:43 11Correcting Perspective for Accuracy
04:27 12Multiple Local Adjustments: Architecture Photography
15:13 13Correcting Perspective for Creativity
12:37 14Creating Dramatic B/W images
09:17 15Processing Black and White
22:08Lesson Info
Local Sharpening and Local Noise Reduction
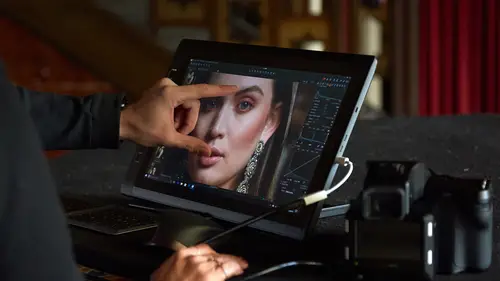
So far, we've really seen everything sort of density-related, as such. But local adjustments don't have to be all about density and exposure and shadow lifting and all these kinds of things. We can also target where we want to sharpen an image, and we're gonna have a couple of examples that we're gonna look at. The first example is purely just gonna be about noise reduction and sharpening. So if we look at this image, let's zoom into 100%, I'll go full-screen, that's F on my keyboard. You can see our plane of focus is spot on, it's right on the eye, and you can see how the focus then sits like so, goes down to, I guess there's a little guy in there, buried in there somewhere. But that plane of focus pretty much sits just around here. If we go kind of out to the edge, then you can see our focus drifts off really nicely, and then we just go into the nice, kind of creamy out of focus areas. So when we're applying sharpening, we don't really need to sharpen the entire image, especially if ...
this was at a really high ISO and we had lots of background noise, then we wouldn't really want to sharpen that noise, 'cause if we apply sharpening to noise, then it becomes much more obvious. So we really wanna put the sharpening where it's needed most on the image. So, if I just escape out of full screen, let's first on our background layer before we do anything, is put the zero, sorry, put the sharpening down to zero. So now we're not sharpening any part of the image, it has zero sharpening, whatsoever. So let's make a new layer, and we'll call this our Sharpen Layer, like so. And we're gonna invert once more, Invert Mask, and remember, that puts the mask over the whole image, so we can pre-visualize what our adjustment is gonna be. We're gonna zoom to 100%, and what we're gonna do is we're now gonna add our sharpening, whoops, to our image by dragging up our Sharpness slider. If you haven't spotted it, this new little slider snuck in on Capture One called Halo suppressant, or Halo suppression. So what this means is as you push unsharp mask you can start to see kind of ugly, black and white lines on the high contrast areas, which is typical of an unsharp masking algorithm, so as you increase that you might think, ugh, the image is looking oversharp, it's got that nasty over sharpened edge. But what you can do with Halo suppressant is actually bring that up, it will maintain the sharpness that you see on the image, but you won't get-- if I push this really hard, you'll start to see it getting oversharpened, but Halo suppressant actually takes away that kind of hard, black on white contrast edges, but still gives you that nice, sharp look. So we've now added some sharpening to this layer, but we only really wanna target it exactly in this spot. We could also add to our same layer a bit of structure, so if we add a tiny bit of structure, not much, then we're just helping to see all that fine, maybe down here, fur detail, et cetera. Let's check it down here. So, something like that. But what I don't really need is sharpening on the areas that are not in focus, you can see it now looks really good. If we turn this Sharpen layer off, you can see the additional detail and pop that we've got from the two little sharpening things that we did. But there's no point in applying that to the out of focus areas, and it's probably hard to see on the transmission, and maybe here in the studio, but the more we sharpen, the more we're gonna bring out the noise and grain that we see in the image itself. So, same as before. We're gonna invert that mask back, give ourselves a brush, which is now, technically we've got a sharpening brush. So what we can do is, we can then decide exactly, make that a bit smaller, where to put our sharpening, which is just gonna be on our plane of focus. Now this one I would probably bump up the Flow a bit more, because I know when I pre-visualized it I was pretty happy with the amount that we put in. So I'm gonna have almost the full-on sharp mask coming in as I brush back and forth. If we go up to 100%, then we can look at some of these, whoops. There are some of these nice areas as well, so that we can sharpen up. Again, if it's happening too fast, take your Flow down and then we can just add a little bit of sharpening in these spots, like so. There's nothing in the plane of focus here, we covered this area pretty nicely, and then if we look down here, we're dropping out of focus already, so we've done a pretty nice job of just getting our sharpening where it matters. So if we press M, you can pretty much see where I've brushed on that plane of focus. And now we can do a time-saving option as well, because let's say this was really high ISO, and we wanna just kill a bit more of that noise off that's in the background. We can make a new layer, call that Noise Reduction, and we already know that on the Sharpen layer, this is my plane of focus, pretty much. So I've attacked all the areas that I need to sharpen. So for the noise reduction that's gonna be the out of focus areas, which is gonna be the inverse of this. So instead of having to draw another layer, I can do two things. I can copy the mask from Sharpen Layer, so it's the same, and then I can simply say Invert, and then that gives me the opposite. So these are all the out of focus areas, so now what I can simply do is zoom in to 100%, and then take my noise reduction options here for example, and just bump up my luminance slider just to get rid of a bit more noise in the image. And what I end up with is perfect sharpening on the focused areas and more noise reduction on the out of focus areas. So if we just, let's say, we're gonna clone this image. And then what we'll do is we'll, on this one, we'll turn off what we did with local adjustments, we'll bring these two up side-by-side, shift + click our big head over here, which zooms them both to 100%, and then if we shift pan, where's our, yeah. So you can see the image on the left had our sharpening treatment and the image on the right had no sharpening treatment, but it doesn't mean we've excessively sharpened or brought out the noise in the other areas. We've done some nice extra noise reduction, so it's gonna look better when we come to Export, Print, and so on.
Class Materials
Bonus Materials with RSVP
Ratings and Reviews
Peter Hudson
This is fabulous - even though I use Capture One regularly I always learn something new from listening to David and this is one of his best - if David is the teacher then get the whole series is my advice - well worth the investment
user-940746
In this class David shows what editing can be done in CaptureOne and when it is time to use an external editor. There are lots of features in the program that David brings out to make the editing quicker and easier. The class also shows how much can be done in the program without going to an external editor, thus saving time and effort in editing. As usual, David presents the information in a manner that is easy to follow.