Multiple Local Adjustments: Product Photography
Lesson 10 from: Advanced Photo Editing in Capture OneDavid Grover
Multiple Local Adjustments: Product Photography
Lesson 10 from: Advanced Photo Editing in Capture OneDavid Grover
Lesson Info
10. Multiple Local Adjustments: Product Photography
Lessons
Class Introduction
04:58 2Local Adjustments Overview
05:47 3Drawing Local Adjustment: Masks with Brushes
08:59 4Drawing Local Adjustment Masks with Gradients
08:05 5Vital Techniques for Dodging and Burning
09:54 6Dodging and Burning Demos
14:49 7Local Sharpening and Local Noise Reduction
07:40 8Advanced Editing for an Editorial Portrait
05:51Simple Element Removal
06:09 10Multiple Local Adjustments: Product Photography
09:43 11Correcting Perspective for Accuracy
04:27 12Multiple Local Adjustments: Architecture Photography
15:13 13Correcting Perspective for Creativity
12:37 14Creating Dramatic B/W images
09:17 15Processing Black and White
22:08Lesson Info
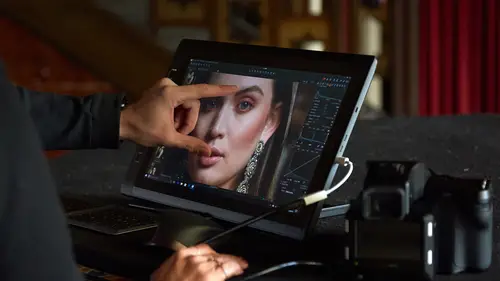
Multiple Local Adjustments: Product Photography
We're gonna do a whole bunch of local adjustments to this product shot just to show you that we can do a few different things, all sort of combined together. This is a shot, just to point out, it's one shot from a focus stack. So on the Phase One XF camera, you can set it to automatically shoot slices with different focus points. So if you have limited depth of field, you can then combine it all together. So the photographer who shot this, Vincent Lions in Canada, sorta gave me this shot, but it's good to point out it's just one of a focus stack. Normally, he'd have the focus stack, blend it all together, and then do the retouching and so on. But let's see what we can do with this one in Capture One. It was a high pressure shoot 'cause the ice is melting, it's shooting a focus stack, so you need to kind of wrap this up quickly. You might not have all the time in the world to tweak and change lighting. But we've got so much data in the RAW file that we can pull it around to the maximum.
So let's make a bunch of layers, but before we do that, let's just do some base corrections. So I'm gonna bring the exposure up a bit, and probably take down the white balance 'cause we want it to look a bit cold and icy. So let's just do a slight tweak of that. And contrast-wise, have a little touch of contrast and maybe some clarity, which is our midtone contrast. So now it's looking pretty good. I wanna open up the watch face a bit more. So I make a new layer, and this is where it becomes important to start to name your layers because we don't wanna get layer one, layer two, layer three, layer four, and not know what anything is doing. So we're gonna call this Watch Face Brighten Up like so. So let's previsualize by inverting our mask and I'm probably gonna use a curve. So this density is kind of in the three quarters, so let's just do that a little bit, just to lift it up. Luma curve again because I want the color to be as stable as possible at this point. Go back to local adjustments and invert that back. Take my brush, B for brush on the keyboard, little bit larger. I'm gonna drop my flow right down, and then we're just gonna brush that sort of brightening area in. And the nice thing about flow is if I wanna brighten this part more, I can do so. I can just spend a bit more brush time over there, like so. And I think also, on this one, I'm gonna add a bit of, bit more contrast as well. So now if we turn that layer off, always good to see what it's doing, just brightening in a bit more contrast. So let's, what should we do next? Let's add a bit more sort of pop and contrast and brightness to some of the ice. So let's call this Icey Pop. And again, we're gonna invert our mask and we're gonna, let's see, bump the exposure and contrast quite a bit. Maybe a bit more saturation so we can see the blue and like so. Now it's overcooking a bit there, but I'm only gonna sort of probably lighten the areas which got a little bit too dark compared to this. So if we turn that off, it's just bringing up these areas a bit. So let's invert our mask back again, open up, relatively low flow, and then I'm just gonna brush it into this area, so like so. Always press M on your keyboard to see how your mask is going. If we wanna feather the edges a bit more, we could then turn the flow and opacity right down, and then just kind of hug it around the edge as such, just so we get like a nice sort of bleed off. So that's giving me just a little brighter area in the middle. And then let's think. The last thing that I want to do is just do a bit of a darken. And then take my Luma curve down a bit. I'm just gonna paint in a bit of a creative sort of vignette around the edge. Did I change my curve? Yes, I did. Let's bring up my flow a bit more. It's coming in sorta nice and slow, 'cause it's quite dark in this corner, but it's a bit too bright in the upper corner here, so I think it makes sense just to darken that down a bit. And now if I want to, I can just go back to my curve and pull that a little bit more. And then last, but not least, I'm gonna say lighten. Do the opposite, lift up the curve a bit. I'm kinda guessing now. I'm not gonna previsualize and just lighten a little bit there just a tiny bit more on that watch face. Finally, if I go back to the background and we go to the Color Editor, if we just pick our blue color, then I think we could saturate that a bit more. Maybe not that much. Saturate that a bit more. And quite often, once I've done all the local adjustments, I'll go back to the background layer. So straight back to the background layer and see, okay, does the whole background need a little bit more so I can have a bit more clarity. I could probably, in this case, super sharp, have a bit more structure. Hate to be a watch photographer. So much retouching to do with all the little tiny bits and bobs that we don't see in real life. So a little bit more structure. And yeah, I think I'm happy with that. So if we remind ourselves what it looked like at the start, so that's before and after. And again, if we keep our control with our flow and opacity so that we make sure that we're not putting in our local adjustments too quickly, then it looks much more seamless, much more natural without seeing any sort of weird edges or anything like that, for example. If we wanna see, let's just go back to this one. So this was the one that we just did, and then this was the one that was done by the photographer himself, Vincent Lions. So I've been trying to create exactly what he did for a few days, but even when I come back to my same images and try and do the same local adjustments, it very rarely happens that you recreate the same image twice. But you can see, just from what I did here and then what Vincent himself did, that you've got so many different options when you're working with all that raw data. Folks were asking about different shapes of brushes, like-- Right. Like a oval brush. Is that possible? Gotcha. And then also about a round gradient. Okay, okay. Let's just go back to this one so we can draw some stuff. The answer to that is a sad face, no, I'm afraid. So you actually just have the circular, circular brush. So we can't change the shape of this brush or anything like that. Just what is worth noting is that if you wanna draw straight lines, depending how steady-handed you are, it's quite difficult to draw a perfect straight line. But if we click and hold our Shift key down and click once more, Capture One will draw a straight line for you. So that might help you drawing around sort of square objects or polygons, that sort of thing. Let's just delete that. So let's right-click and make that a bit smaller. So if you do need to draw straight lines, just Shift + Click and then you can draw around objects, and when we can also fill mask, don't forget. So if you are drawing around something and you wanna save a bit of time and whoops, fill that mask, then you can do so like so, which is good for those kinds of things. And the second question, Jim, was? About circular gradient. Oh, circular gradient, yes. So, not really coming under local adjustments, but if you want to do a vignette, then that's the Vignetting Tool, and you have a few options for the shape of that vignette, but you can't control, you can't manipulate that sort of vignette shape into something specific, which is why, when we went to a couple of wedding shots, that in this case, you can pretty much draw any vignette that you like just by doing a quick local adjustment. I agree, ideally, Jim, it would be nice if we had something like that in Capture One. And again, I shall take that back home as well.
Class Materials
Bonus Materials with RSVP
Ratings and Reviews
Peter Hudson
This is fabulous - even though I use Capture One regularly I always learn something new from listening to David and this is one of his best - if David is the teacher then get the whole series is my advice - well worth the investment
user-940746
In this class David shows what editing can be done in CaptureOne and when it is time to use an external editor. There are lots of features in the program that David brings out to make the editing quicker and easier. The class also shows how much can be done in the program without going to an external editor, thus saving time and effort in editing. As usual, David presents the information in a manner that is easy to follow.