Vital Techniques for Dodging and Burning
Lesson 5 from: Advanced Photo Editing in Capture OneDavid Grover
Vital Techniques for Dodging and Burning
Lesson 5 from: Advanced Photo Editing in Capture OneDavid Grover
Lessons
Class Introduction
04:58 2Local Adjustments Overview
05:47 3Drawing Local Adjustment: Masks with Brushes
08:59 4Drawing Local Adjustment Masks with Gradients
08:05 5Vital Techniques for Dodging and Burning
09:54 6Dodging and Burning Demos
14:49 7Local Sharpening and Local Noise Reduction
07:40 8Advanced Editing for an Editorial Portrait
05:51Simple Element Removal
06:09 10Multiple Local Adjustments: Product Photography
09:43 11Correcting Perspective for Accuracy
04:27 12Multiple Local Adjustments: Architecture Photography
15:13 13Correcting Perspective for Creativity
12:37 14Creating Dramatic B/W images
09:17 15Processing Black and White
22:08Lesson Info
Vital Techniques for Dodging and Burning
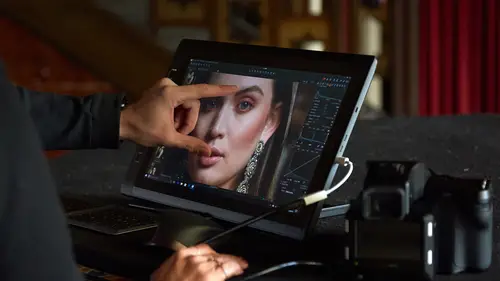
So, we know how to draw with brushes. We know how to draw with gradients, and you saw me touch on, briefly, about these adjustments, Opacity and Flow, which are vital for dodging and burning. And if you're not aware of what dodging and burning means, that's simply local density adjustments on an image, which as I said in the intro, is something we always did in the dark room, and it's just as easy to do it digitally without having to stand in the dark and inhale chemicals and all that sort of stuff. So, we need to learn some vital techniques for dodging and burning. So, let's look at this image from Martin Bailey. So, monkeys in Japan somewhere. Great shot, this is straight out of the camera, I think. Let's just hit Reset, just to check. Yep, that's straight out of the camera, no adjustments. If I was to put on some base adjustments, and that's something I always do before thinking about local adjustments. Let's just do some base corrections that we would do to this image. As I said, i...
t's pretty great out of the camera. I would probably add a bit more contrast, a little bit of clarity, and possibly as these guys have great detail in their fur and so on, and everything is in the same plane of focus, I'd add a bit of structure too. So, that's kind of step one, getting a good base correction over the image. But if you haven't noticed, there's also a little guy hiding in here somewhere, and it would be nice if he was a bit more visible and a bit brighter, and if we could do a bit more kind of local density adjustments, cause what I see in this image is that they have all these wonderful tones in their fur, and it would be nice if we would kind of just bring that up a little bit more and open up just this area here so we can see this baby sheltering in the warm fur, like so. So, the way I do it, and there's a whole bunch of different techniques that you could use to achieve this, but I'll show you the way which I've found to be the most successful pink resistor. So, step one, let's do lightening first. And I tend to call my layers Lighten. Actually, when I get lazy I just put L for short, for Lighten. And the reason why I don't use dodge and burn is that I think it's just more descriptive and easier to see Lighten and Darken, you know, exactly what each one is doing. And then we've got a whole bunch of tools that we could think about using for lightening up the image. My preferred one of late has been to use a Luma Curve, and the reason why I use a Luma Curve is that you can decide exactly along the tonal range what you want to lift, and also being a luminosity curve, luminosity curves don't edit the color at all. They only affect contrast and density. This is something that we covered in the class Quick Start to Capture One. We had quite a long intro and discussion into the benefits of Luma Curve, so it's well worth watching that if you haven't seen it, so you know some in depth data about Luma Curves. But, just remember, Luma Curve doesn't affect color, it only affects density. Cause we only want to change the density of the image here. We don't want to mess with the colors. We don't want to change the saturation. So, you've got a couple of choices. You can do a guesstimate. We can just lift up the curve, and think that's probably gonna give the effect that I want. But because I haven't drawn any mask yet at all, I can't see anything happening on the image. So, you're kind of shooting blind at this point. So, what we can do, and we can compare this to, if you like, a layer mask, in Photoshop as well, is that we can first invert the mask. So, if I choose Invert Mask up here, that then puts a mask over the entire image. So, now when I pull my curve, I'm looking at our guy hiding in the front. I just want to lift him a little bit, like so. So I'm just gonna make a curve like that, which gives a good enough lightening for this area, and maybe over here as well. Now, I don't want to totally overcook it, because then the image is gonna look fake, but I just want to give it a little lift, like so. Now, I'm happy with that adjustment, and you could combine too, we could always think, "Well, let's just bring up shadows a bit too." Now, I'm happy with that. I'm gonna invert my mask back again, boom. And now I can choose where to draw in that local adjustment. And this is where flow and opacity is super, super important because if you watch what happens if I have max opacity and max flow, and let's make my brush a bit smaller and nice and soft, I want to lighten up this area. So, if I do that, then I've basically got my whole adjustment in one hit. And see, over here, for example, I think I just lighten his face up a bit, but now that's a bit too much. I want actually less over here than I did over here. So, this is why it's really important that we need to have control with our flow. So, I'm just gonna erase this, get rid of those. So, it's E for Erase on the keyboard. Go back to Brush, and let's take our flow down to something like 10 or 15, and I'll drop the opacity a little bit. And now what it means, I can gradually go back and forth, let's turn the mask off, and just the more I brush, the more it's gonna dial in that adjustment. So, it gives me a really nice way to go from zero to max just by moving the brush back and forth without it getting, you know, ugly and horrible on the image. So, over here, he only needs a little bit, so that was enough. Over here, he's darker, so I'm just gonna spend a bit more time brushing over there, and then down here, hiding in there, we can just spend a bit more time. So now, if we turn the mask on, it's gonna vary in opacity wherever we use the brush the most by using that flow control. So, if you haven't touched flow, it really is vital. And what else would I do? I might just lift up shadows down there a bit, and maybe in the face, and call that good. And now, oh sorry. Yeah, lighten, I was right. And just do that. Now, I might want to darken a few areas as well. So, it's the same process. We make a new layer, call that Darken. Go to your tool of choice. If you like, you could try working with exposure. That works nice too, but as I said, the reason I work with Luma, it just gives me a bit more choice. So let's invert the mask. Remember, that puts a mask over the whole image, like so. Go to my curve, drop down until I think it's good. What I'm looking at is just darkening or enhancing some of the darker bits of the fur that are already there. So, just a little slight tweak of the Luma Curve. Go back, invert the mask back. Remember, in real life as such, you'd be just driving this with shortcut keys. So, it would be much faster. And now I can take the brush, low flow, low opacity, and then I can just darken in some areas that I think will just look nice and enhance the image as such around here. So, just kind of drawing inspiration from what's already in the image as such, like so. And if I want to go back, and let's say I just want to lighten his face a bit more, I can switch to Lighten, do a bit more there. Go back to Darken, it doesn't matter if my two layers are overlapping either. They will just interact nicely. They will cancel one another out. The mathematics is pure, if you like, between all the layers. So, if we had +1 on one layer, and -1 on another layer, then the result would be zero. Funnily enough, it didn't used to be. In earlier versions of Capture One, the math actually wasn't 100 percent correct. So, if you did, you know, +1 on one layer, and -1 on another layer, you might end up at .2 or something like that. But now it works absolutely perfectly. So, the various different layers can interact, no problem at all. If we want to preview what we've done, you can turn off the layers individually, so you can see the little lighten spots, like so. And you can see the darken areas, like so. If you want to preview the whole tool, we can option click the little backwards arrow, so this one here. If we option click this, or Alt on your PC, then that will reset everything. So, you see the two ticks disappear, so we can see before and after, like so. So now, we can just see into the faces a bit better, and we've enhanced the darker areas just to give it a bolder image in general. And don't forget, going back to the question earlier about can I vary the opacity, if you think, "You know what, I just like it a little bit darker." Then we can just pull our curve down a bit more, or do I want it a little bit lighter? Then we can just lift our curve up a bit more. So, it's somewhat similar to playing with the opacity as well. Otherwise, that's pretty much what you need to know for effective dodging and burning. It's really important to get a handle on using flow and opacity in combination, like so.
Class Materials
Bonus Materials with RSVP
Ratings and Reviews
Peter Hudson
This is fabulous - even though I use Capture One regularly I always learn something new from listening to David and this is one of his best - if David is the teacher then get the whole series is my advice - well worth the investment
user-940746
In this class David shows what editing can be done in CaptureOne and when it is time to use an external editor. There are lots of features in the program that David brings out to make the editing quicker and easier. The class also shows how much can be done in the program without going to an external editor, thus saving time and effort in editing. As usual, David presents the information in a manner that is easy to follow.