Lessons
Lesson Info
Building a Simple Box
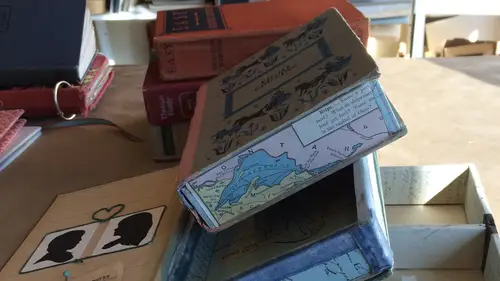
So now we're going to build the walls of our book box it's ah, the main component of what we're doing, we're going to build an entire little box out of foam core from corps is a great tool, it has a hardness to it that gets better when it's in smaller pieces and it's also really easy to cut with either your box cutter or an exacto knife. I tend to use the box cutter because it has a little bit longer of a blade, so I like to get a deeper cut on the foam core and hopefully only have to cut through once but every once in a while you have to make a few cuts to get the right thing, so the books I usually choose for this project and encourage other people to choose our about an inch thick, it just so happens I have a little old wooden ruler that it's also that same size, so the reason that's important is when you build the wall of the book, you'll see that you're covered comes down at just the right height and touches that inch with, but in order to make sure and if you're using a bigger or...
a smaller book, you're going to want to follow the inside of the book so you're going to want to follow if it has and papers you're gonna want to follow the endpaper and measure that if it doesn't have any papers that's okay as well you're just going to want to follow along the inside of the book to make sure that your walls will fit exactly inside the books so you don't want to take a ruler and measure thie top of the n paper so for this book we measure and it's five inches across for one end so I know that one of my ends is going to be five inches across to excuse me two of my ends this end and this end are both going to be five inches across and then you're going to measure the long end and it's seven and a half so I'm gonna have to make two walls that are seven and a half inches and two walls that air five inch it is long and when we put the box together I'll show you a little trick about how to fit those to end walls into your two longer walls because you're going to have to take just a smidge off so we take our foam core and our ruler and I like to use a pencil in my markings so I am not a perfectionist when it comes tio having exact straight lines and making sure everything is exactly where it fits I find you lose a lot of the fun if you don't just allow yourself some room tio make mistakes and with mistakes come a lot of great ideas so yes cutting and measuring is an important part but if I don't cut straight which I normally don't I don't let myself be bothered with it uh in the end when you collage you can cover up a lot of that so when we're getting to the actual collage part of the walls if I have a little wonky measurement in one of my walls I'm able to wrap some paper around that and move on so we're going to take our pencil and a ruler and mark at one of our walls was seven and a half and our other wall I was five so first I'm going to cut our too long walls and you just have to cut one and then you use that measurement for the second one which makes it nice and easy I'm going to use my uh inch wide ruler if you don't have an inch wide ruler and your book is a little bit different they're gonna have to measure the book itself so the width of the book you don't want to measure necessarily the spine where the glue and everything is you want to just measure the book itself don't press it down don't smush it just measure the book and so my book is an inch wide you may have a three inch wide book and then you're gonna have to cut your phone court of that wit so it's great that mine is an inch wide so I'm going to take my pencil and mark that on my phone core and I have to go all the way down to my seven and a half inches and then we're gonna cut that I use a nonslip ruler because otherwise you're dealing with a tiny piece of foam core and a rather sharp blade and it can get a little scary so if you use a nonslip ruler your little more guaranteed not to have it come flying off the board so again perfection is not everything just make sure you get a good clean cut it usually takes one or two runs and then you're going to make two of these walls so we'll do it again and they were gonna make our two shorter walls which are five inch walls so well I'm using that second wall I'm just measuring and then I'm using my nonsense nonslip ruler I think it's really important when you've got a lot of blades going as I usually dio between blades and adhesives um you can get a little careless with where things are going and end up like I did a few years ago with the top your finger missing so you want to just be careful so now I've got my two long walls and then I'm going to need to do my two short walls the great thing about foam core and balsa wood as well phone court comes in a big huge sheet the first thing I do when I get my phone core is that cut into quarters and then I cut those quarters down into halves and really to make a book box you only need about half amount of this foam core so it's it's handy you could end up using the other phone corps for when we show how you can go a little bit further with the boxes different dividers different walls and then you'll have enough from court to do those things get really creative so now I'm going to mark my five inch wall coming from the same foam core and then using my inch ruler because I know that's the exact measurement with I'm gonna mark two of those and then we'll cut that down and we'll have our four walls okay using the blade using my non slip ruler I'm going to cut these two little walls as I mentioned these are going to be a little longer than you need and so I'm going to show you a little trick with the foam core that helps you get the two ends to fit in the two long ends oops there's our measurement the end of our wall ok so we have all four walls ready to build our box now the box when it's finally finished is going to have to long walls like this and too short walls like this you'll see that I can see my my wall is too long because I took that entire measurement it didn't take into account when I first cut that I've got these two walls, but there's going to be a little trick, I'm going to show you we're going to take these two walls, put them on the end of this shorter wall and just markham a pencil mark, because this is the wit that needs to the smaller wall needs to fit into, so I have a little mark there, so when I cut it down, it'll fit inside these two walls. So again, this shorter wall needs to fit inside these two longer walls, and in order to get that exact measurement, I took my two longer walls. I put them on the end of my shorter wall, and I drew a little pencil mark for this, I just can cut off the ends, and I'm going to do the same for both end walls, which probably wasn't straight, and I don't even care, and I'm going to try that measurement again, so when they get in there, they should all fit like that. You just do that to make sure that everything's going to fit you just want a kind of check your measurements because once you start collage in and once the paper starts getting on those walls, having to cut off one end or the other is a little bit tough, especially if you spent time collage in with something you love to have to. Then cut that paper off can be difficult. So you want to make sure that everything fits in its place before we ever get to the collage ing. And it does. So we've got our four walls for our box. The next thing we're going to do is start collage in with some great old paper to match the book cover.
Ratings and Reviews
user-cea155
I learned so many things by watching this class that I always wanted to know. Molly gives great detailed instructions and fascinating suggestions for what you can do with these boxes. I got the sense that she is incredibly excited about doing this and it makes me want to do it to. It sparked a lot of ideas for me even though I doubt I will do exactly what she demonstrates.
Elizabeth Haen
This is such a fun project, can't wait to try it all out! I love Molly's calm and professional manner and upbeat approach to teaching as well.
Mia Reeves
I love the clear step by step directions. I also love the fact that she uses pretty basic tools and materials. The possibilities for creating some very unique book boxes all start here!
Student Work
Related Classes
Paper Craft Ideas