Lessons
Lesson Info
Collaging the Cover
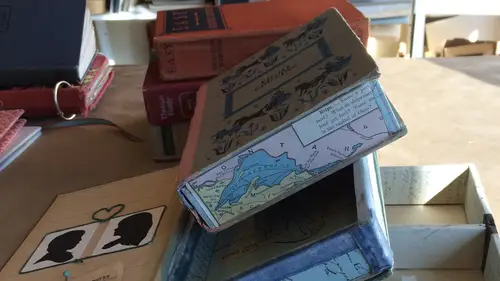
So we talked about choosing books that have really beautiful covers and probably covers that you want to keep covers and spines, but I often choose books that don't have anything on the cover, and the spine is kind of basic. So with that type of book like this, if you want to actually collage a little more, give it a little more life, you can do just that. Collision uncovers is a great way to enhance your book. In this particular case, I'm going sort of with the color scheme of the book, and I'm going to use in old letter and I mentioned before layering and collage in is a super important concept because it's those layers it's his little bits and pieces that hide behind others that give it the depth that you're looking for when you're collage. Ng so using this old letter all the same tools that we already have out for a projects the rulers, the pencils, the cutters, those air, all tools that were going to use again, the on ly two things we're going to add in at this point are a pair of...
scissors and a softer adhesive, and this adhesive is in the same family is this double stick tape runner, but it's actually dot runner and dot runner. You can get these at any art supply store or your dollar store it's, a very common tape dispenser nowadays, and the reason we use a dot runner is because the paper on using this really delicate vintage paper can easily be ripped to shreds by a double stick tape, and because we're going on the cover and they'll be a little more wear on the cover of the book, then on the inside of the book, using this adhesive of a glue stick just isn't strong enough, the glue stick content to pop off, so we're going to use what's called a dot runner, and we're going to put that paper. I want to cut that paper down so it's just a square behind other squares, so that's going to be my first layer, and eventually my top layer is going to be this photograph, so I want to bring it out a little bit wider than the photograph, probably an inch an inch wider than the photograph. And then did I mention I am not a straight cutter and straight cuts don't do a lot for me, but, um, when you're trying to show a basic of something, I think it's a good idea to try to get a straight as you can, and then there's, not there's, a lot less frustration when you're and hearing things my next layer is going to be a little patterned piece of paper and again my top layer is going to be that photograph and I want each one of those layers to be seen so I'm just going to measure by I measure a little bit around that photograph so I know that I just want that to be like a tiny almost like a matt behind a photo in a frame whereas the frame is the vintage piece of paper the next layer is this pattern and then our photo so those air going br three things and then we're gonna add one more layer I'm actually gonna cut that letter down a little bit because it's the very end I'm gonna add washi tape while she takes a really really fun fun collage item to use it's not in adhesive although it's called tape it's not something that you want to and here paper to paper with or paper two books with it doesn't stick at that level so I'm going to use the dot runner on my vintage paper it works the same way is the tape liner that same sort of round about system on the inside I'm gonna put down that layer first on my book so there's my base layer and then my next layer is this printed piece of paper on this I can use the double stick tape because it's a little bit stiffer and newer paper again. Oh, but you noticed that it did it did pull it up a little bit, so you just want to be careful, maybe don't want to go in too deep with your adhesives until you've tested a little corner of your paper that's my next layer and then my final layer is this photograph, and I'm going back to the dot runner on that in case the age of the photo takes up the paper from the photo itself and that's my third layer, and then I'm going to take my washi tape that super fun tape to play with it isn't in a p sive and finished the edges of the book with that just gives it a little more pop and frames out the imagery so you can still see parts of the book as well. Underneath the cover, the original cover, which I love, but just a just a peak, and then the rest of it is your own personal collage, and that is what you might want to d'oh if you have a plane book cover and you want to give it a little more life, and now you still have the spine, but now you have your very own cover.
Ratings and Reviews
user-cea155
I learned so many things by watching this class that I always wanted to know. Molly gives great detailed instructions and fascinating suggestions for what you can do with these boxes. I got the sense that she is incredibly excited about doing this and it makes me want to do it to. It sparked a lot of ideas for me even though I doubt I will do exactly what she demonstrates.
Elizabeth Haen
This is such a fun project, can't wait to try it all out! I love Molly's calm and professional manner and upbeat approach to teaching as well.
Mia Reeves
I love the clear step by step directions. I also love the fact that she uses pretty basic tools and materials. The possibilities for creating some very unique book boxes all start here!
Student Work
Related Classes
Paper Craft Ideas