Lessons
Day 1
1Class Introduction
05:10 2Direction of Light: Setting The Mood
07:57 3Metering
34:21 4Understanding Dynamic Range
13:46 5Understanding Histograms
22:37 6Effective Size: Hard vs Soft Light
09:29 7Understanding the Inverse Square Law
19:41Light Modifiers and the Shape of Light
34:14 9Controlling Light with Grids
22:28 10Watt Seconds and Other Important things
14:15 11Color Theory Part 1
19:55 12Color Theory Part 2
35:23 13Calibrating your Monitor and Printer
27:38 14Mark's Lightroom Workflow
22:07 15Exercise: Purpose Worksheet
34:03 16Failing with Purpose
13:22 17Example: Prep Shoot for Testing
40:37 18Special Request: Pricing
58:05 19Creativity: from Idea to Product
41:26 20Sharing your Ideas: Making the Plan
05:58 21Working with a Team (Snapfactory)
28:40 22Working with Models
27:30 23Commercial Shoot Workflow
10:36 24Q&A
07:12 25Set Up Studio Environment
13:46 26Planning The Live Shoot
21:29 27Dialing In The Lighting
18:13 28Q&A
15:49 29QuickTestShot
08:52 30Photoshoot Foil Dress With Carly
34:17 31Lightroom Workflow
26:23 32Q&A
14:21 33Preparing for the Second Shoot
16:30 34Photoshoot: Deep V Dress With Michelle
40:12 35Photoshoot: Closeup With Michelle
14:24 36Photoshoot: Tether Tools Table
09:29 37BONUS VIDEO: Lunchtime Q&A
11:21 38BONUS VIDEO: Quick Ad Mockup
01:18Day 2
Day 3
Lesson Info
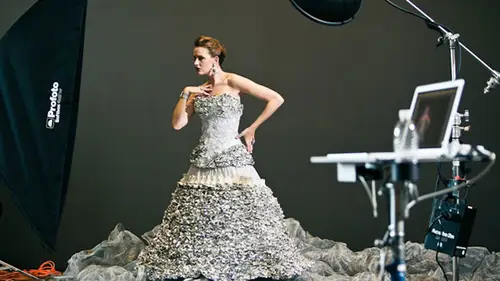
Example: Prep Shoot for Testing
We're going to start planning for for day three. We have a product that we have to shoot and we don't really know. I don't know how to shoot it. I don't know we haven't tried this out. It is definitely in the area of unknown and so kelsey's gonna come up here really fast. John's gonna come out, john, if you can move that out of there the big screen. Okay, if you can move that big screen out of there what we're gonna do here, I'm gonna move this guy out of here way. We're now going to try something. I'm going to fail. Maybe we don't know. You guys were gonna help with this as well we're going to do is, um our our product is this table right here. This is the product. This is what we're shooting tomorrow thie concept for this shoot is too have on the screen, some kind of amazing image that we've shot some kind of fashion image and we're going to shoot carly and we have another model also that's coming tomorrow, her name is michelle, we're gonna be shooting all that silver and all those m...
etallics are going to use monochromatic stuff, and we're probably going to use hard light quite planted out, yet we're going to that end of the day, um but what we don't know and we intentionally didn't figure this out is how exactly we're going to include this in the image and so what I would like to do is have a close up of this showing this hard drive here showing the screen probably with light room and in the background somewhere back here and out of focus model and so it would show, like here's the actual image but in the background here's the studio set up right? So when people see this table, they understand oh, this is how this is used this is used in a studio for serious photographers and the other thing that we're trying to communicate so one of the purposes tether tool, lt's, thes tools and all the cables and everything that they've created, one of the things that they originally did was specifically for people that shot tethered uh, tethered in the studio. Well, what happened? And they didn't anticipate this is that photographers like me, we love these tables so much that we actually started using them in ways they didn't anticipate and so they've started like this little thing here for the hard drives the owner of tether tools they happened to be in phoenix, so he asked if he could come by and just sort of see how we use stuff every once in a while and he saw that we had hard drive's stacked up he's like, oh, that won't do let's do this then he came back and he saw that we had cokes and light meters stacked up he's like, oh, I need thio add this and they started making all these different things so what's happened is this product has evolved into something that photographers use, but not for tethering, and so what they're trying to do now is try to help people understand that tether tools. Yes, they used for tethering, but they're really they're studio tools, their tools for photographers to use in many, many different ways. I don't know if you saw the little stand that I had with the ipad on it that was rolling around. We used those in the studio all the time, also made from tether tools, so those aren't tethered to anything. So one of the purposes of this is to demonstrate that this is a tool that can be used in a studio for tethering or not. And so we want to show this with light room model back here, maybe something incredible, but we also want to figure out a light this where we can have, like, light meters and stuff like that all over and then have maybe model back here and some stuff. So I don't know what lindsay is going to work if we could actually get this in if it's going to work in this space so we're gonna do right now is we're going to try so carly come on out we're trying to see if we can separate this and carly were trying to see if we can get her illuminated but not too much and we want to see if we can make this work okay so we're gonna do is we're going to make this a live session we're going to do this until break and then after break uh we're gonna come back and we're going to continue so we'll just do this and you guys online can follow along with what exactly we're doing and this is just a real life exercises totally unscripted and we don't know if this is gonna work or not we have no idea this is in our area of uh I don't know so here's the thinking so carly back here I'm gonna move this out of the way, please got that. So I think there's my thinking I think I'm gonna use harder light on the computer and I know that I have some issues on this do you want to do this in one shot or two shots? We're doing this? We're gonna try to do it one shot that's the exercise right now convenient one should you know you're telling the story of trying to sell this thing yeah, but right now that's not we're trying to do we're just trying to figure out if we can isolate this in her that's what we're trying to do but the point behind whole biz right is to sell this thing yes okay, so then you would you want to show how wonderful it is used to or how it how you use it yes and that's what we're trying to do is to see if we can make this looks spectacular with carly in the background sort of obscured so it's really? So come on out and kelsey if you can be here is well is john to help out with this? We need a light meter in a camera. Okay, so what I'm doing here is I've put grids on all of these things and the grids as we saw yesterday we're going to sort of constrained like you guys are gonna have to move your chairs over. I know you do that really fast. Start kicking these on and then also if we can kill the ambient light in here a little bit good I'm gonna kick this guy on here yeah, so there you go okay. Yes that's good. We have a pocket wizard can you fire the pack? Yeah so let me explain what's going on here got it yes so we have the same thing that we did yesterday somebody turn off the photo turned back on pushing hold all right now we have both guys firing here yours is not firing there goes yeah he's good yeah. So first let's meet her this is a twenty degree first listen meter this and I think kelsey based on first I'm gonna try my lens figure out exactly if I can fit this in so I can so carly I move stage left there you go right there. That's good that's twenty two at two hundred okay, that's good. I think we have the compression this we're gonna have teo get a boom arm to get it out of the way so let's, grab that. So I'm doing first is I just checked to see if I can compress everything so got a seventy two two hundred millimeter lens so that's, my first concern is eight can I compose this the way? I think so I'm using a long lens what that long lens is going to do is it's going to actually physically make carly look closer to this than she actually is and so that allows me to separate her from this in the first shot you see where my live you is the first shot failure first shot was failure I'll show you exactly what it looked like here and uh nico, I'm gonna have to see that on the big screen too. In its life, the first shot was failure. There you go. So, you see, we have just not enough energy on on that table. It looks sort of lifeless. Anything we haven't done is we haven't. The screen itself totally blacked out. It's not bright enough to see anything and that's. Okay, because what michael's gonna have to know is are we gonna have to put that in in postproduction and probably we are so that's. What we're learning right now is is how do we do that also, john, if you can get a tripod for me, mark does the table tilt? It does not tilt. It does not tell what it be fine to put something under the actual stand to raise it. We can raise the table. Yes, just to give it a more appearance of the actual table itself. Yep. It's the other seventy general ins so let's, try it one more time. We're going to see we had a twenty two on this meter reading. So if you could meet her that one more time, kelsey and then can I get my other seventy two hundred? Just doesn't have the tripod played sixteen point two and then also can you turn off the back light? The back uh yeah so I'm really trying to see if I can get that table to be illuminated without carly so there we go just like that card good okay still it's not spectacular enough I'm changing lenses because this one doesn't have a tripod plate same exact lands it's a nikon seventy two hundred two point eight that allows me to put this on a tripod and then I can keep my camera position the same and then just dialling the lights as I go so I like this composition like this other thing I want to do here we have um besides the fact of like carly beck you're to be you know, we can light her however we want now we've separated this we need to make this more spectacular but the problem here with carly is she's too and focus too much info okay, right, we need to drop down our aperture value to something that's much wider because we just wanted to sort of be shapes back there, right? And so to your point, paul, we might have to do this in two different shots. We might have to composite this that's what we're trying to figure out is is it best to composite or is it best to get it in one shot? We don't know yet we're trying to figure it out so right now let's drop this too that's it nine. Okay, it still needs to be less than that. It's a separate quarter down all the way. All right, so let's, change the illumination. So we have a d one five hundred watt seconds. So this is a ttle lowest. We can get it right here. It's just still too bright. So we're doing is we're going to change this out for a totally different, uh, head. We're going to a five hundred watt second head. So it's a much less powerful light you got that has popped out ofthe got it. Thank you. And I need a pocket with her to throw on this guy. So the other thing is this even though this is a different head pro photo heads air all compatible, so I can still put the same modifier on there that I had before. It still gonna work just fine just the same. This is a model light, so it doesn't need any pack. So you're solving this. So to look at this composition, you're solving one problem at a time. Yes, first you're going to do probably the monitor the table itself. Right? Then you're probably going to go maybe after her or go after trying to get some sort of picture on the screen. Exactly. So we're going one then what about this then? Also, maybe than after that you would go after telling a story of why or how this thing is used that's, right? Yeah. First it's, just figure out the light. So we also need to sandbag. And so chris could go right behind that wall. There's a sandbag. Just grab a couple of those guys. What is the sandbag? So this this is heavier this right here. And so, kelsey, can you duck just for second? This is a little bit heavier than we had before. It has a chance to tip over and fall. And so we need to do is we need to put a weight on the bottom of this to keep that from flying over. And so that's what a sandbag is it's a bag full of sand and so here we go, the less bringing some sandbags look atyou. All mostly. Yeah. So we got sandbags here. Let that one there. And when you put sandbags on, by the way, uh, make sure you put him at the at the top right there. Don't put sandbags down like this. The reason for that is if you want to roll the stand and your sandbags or at the end, you will roll so just one of those practical things just put it toward the top that's gonna work just fine with those bags those air what ten pound bags like that? Maybe twenty right? So we've waited this so it's not going to fall over is very stable it's all good take this put it back up mark could you rotate the the actual computer my agrees this direction to capture a little more light as well we could first I'm just gonna get the separation set once we have that then we'll go get that although so okay, everything I'm doing this is one of the there's a big difference between a pack and head and model light but the fact that had the packs down here and you're making all the adjustments to ahead that's way up here with a model light I'm trying to do this and I can't see really so I have to go like this make sure I'm trying to turn on my modeling light there we go I got it now I can dial this in all right, so kelsey we need another meter reading police pocket was your first here we go got my pocket with your all blood been area turn on okay, well it's been about another ten or fifteen minutes on this and then we'll be done so I'll just let that hang right now normally will get that okay, good four point five and I'll let you do that little velcro there for me. Okay, so now we're gonna try this at four point five the problem with four point five and more most likely we're gonna have to shoot this with a d three x because four point five is going to start letting in some ambient light is gonna start letting it creep in so we'll see if we have any issues here. So again, I just want to see that everything's out of focus in the back. All right? We're still we're getting there. We're starting to get there, you can see that some of the issues are the underside of this isn't lit it's not illuminated. We've got to figure out how to get some stuff underneath here to illuminate that. Um, so we've got to start adding some specials to this this table, but for now, we're going to let that go. I think we've seen how we can separate that we know that tomorrow we're gonna have to figure out how to get some light underneath here. Tio illuminate that so probably will put a light on the floor down here we'll defuse it will do some stuff we'll get creative with with that, so I like that, you know, we're going to fill this in, would you have some hard drives here? So, kelsey, can we, uh, have a hard drive? Enormes driver something can flop in their deck of cards, anything to fifty? Yeah, so for the record, we're shooting it. I s o two hundred, two hundred fiftieth of a second way have our aperture at four point five. And we're shooting with a nikon d three s with a seventy two, two hundred millimeter lens. That is, I s but we're not using the and we're shooting at about one hundred ten millimeters on the land. Okay, so this guy just threw this in here because in this original image, you can see that there's a shadow see this shadow falling in anything? I want to see how that shadow is going to affect the hard drives to see how much light we need to pump in there. We'll probably have to pump in a special so everything's already lined up. I don't have to look through the lens, so yeah, I think we're gonna be okay. That shadow's gonna fall off a little bit. Kelsey, can you come hold this up just like this or john? Just hold it like that. Is that because of the reflection of the orange, well, the shadows falling too deep inside there, so we're just seeing how that shadow is gonna be affected. So there it is yeah, so we're not gonna need a special like we're going to fill that with hard drives so we want to worry about that but we do have to worry about the shadow underneath here and this is uh you know, you might think this is crazy to get in this kind of detail about the exact shadows and all that stuff but trust me product and commercial but it's all about that kind of stuff nothing I'm looking at is this isn't his metallica's I'd like it to be I want to be more metallics we've got the metallic laptop got this one of the great things about these now they have these and I slipped, but you know what? Aesthetically, I think I like this better without it, I think it will reflect more light, so I'll take another shot here, take a look, it does more like looks better now one of the things that's going to happen when we shoot that is our client is going to either say yes that's okay? Or you need to put the anti slip thing back on there. We spent a lot of money on it, so we're actually gonna be talking to the tether tools marketing director and owner during the shoot tomorrow we're gonna be sending them sample photos and they're telling it's just, you know so they're going to give us feedback to say you've gotta have the black pad in there or not I hope they say no but we'll see how the other thing is this laptop I think it needs a kicker light I think it needs a little light teo bring it to life so let's get another five hundred won carly get in this case could you also use a back reflector like you did yesterday in this case I don't think the reflectors gonna be punching enough okay and the other guy was fine and then the other question I have is why this particular angle for light why not higher or lower what were you looking at this particular angle I just sort of said let's start somewhere so we just started there there's no way we could probably put it through the shadow right here where we could probably eliminate that by lowering this but I think if we lowered that we're gonna lose a lot of the reflection here which I want now this this next lights set up so I need another boom arm please um please um by the way so as I'm calling out these uh these directions to kelsey and john were unlike please get me a boom arm please give me a d one do this do that um that's pretty we're cranking along and so later we'll talk about your team members and what you need from them and if you have somebody, we get a question all the time, which is I will work for you for free just let me learn, I will come to your studio and that's all I need is for you to let me learn from you, and the answer that we always give is no, sorry, we can't, because if we're in the middle of a shoot and you're the client and we're trying to do something and we're charging them, you know, several hundred dollars an hour, maybe more than that, the last thing they want is for I'm gonna pretend like, you don't know anything for a second is for me to have to come over and say, ok, john, this is how this works. No, not like this is I'm wasting time, they're going to say, what the heck, you're not experts. So, um, what we've done is for people that want to learn we've created workshops, that's what we have for those people that want to learn, come to a workshop by dvd, and once you know something and are competent, then we will be ableto hire you, but not right now, because our staff is full, mark doesn't have an optical slave, yes, it does, ok, ok, good point we'll talk to that to, um so what I'm doing here is this is a kicker light so fashion photographers you guys you know exactly what this is like um this is just going to add a light from behind to give it sort of that glow and what we're doing is again direction of light we want to add some silver glowing to this that's going would be a silhouette if we didn't have this so we're using two different directions to make a specific effect I think we're probably gonna need another grid on this so let's get a reflector and then bring a couple of grids and there's probably a chance we're gonna need also a, um a flag with the flash duration time is it uh hundred of a second or what? The flash duration on these is uh it's thousand okay, so it's a lot faster than the actual exposure for the curtain's being opened oh yeah much faster so the reason I'm putting this low there's a reason for that I'm trying to eliminate these shadows right here and so, uh this looks like it's not gonna work because of the angle. Yeah, so we'll try that there yeah, I think we're gonna have to have several lights let's try this just for the kicker though to start with so I'm just looking to see where the light's falling there we give so kelsey won't let you do that let's meet her right to there what is that it's not firing can you turn the sleeve on you don't let me get it really fast and it's on this that we need to turn on an optical slave so let me throw it on there it is on so what we need to change the pocket wizard yeah yes oh the issue we're having here is this this strobe is fired by this pocket and the other d one head does not have a pocket wizard on it and it's triggered by the light from this flash but I can't see the light from that flash so we're going to switch these we're gonna put a light on this flash I mean a population this flash here I'll take that on if you wanna make sure the slaves that one didn't flash okay let me make sure the slaves and this is also stuff that you don't never uh you know rarely anticipate do we have a uh apple box one right there john all right, here are awesome apple boxes for the shorty and me all right here we go fire that one please still no okay well we might have to revert to uh it's the wrong size wrong size uh can we take that um take that grin off that let stephen do this see if we can get this to fire it's always fun stuff like this that you don't anticipate like why is this not how about a reflector right back here sure let's get that john can I get the standing reflector this is the kind of stuff let's say we had a client here if they witnessed this again they'd be like what the heck it's being filmed yeah right well it was being filmed for a purpose of learning but the reason that we're doing this is we would be embarrassed if a client showed up and we just spent ten minutes trying to figure out how to make our pocket wizard's work so what easier just to use the cables instead if you didn't have to use this it would not be because it's a non standard cable size and plus we would have to be tethered all the way back to that other question is why wouldn't you leave the camera on video all the time so we could actually yuk unless you monitor what the output would look because the aspect ratios are different and the exposures are not consistent so what you see is not what you get very good all right so we use the reflector and bounce a light into the flash so that it could see the other flash firing so what's happening is this pocket wizard is triggering this light that light is coming back here it's bouncing off this reflector and there's a sensor on the back of this flash that is picking up this this light and then that's making that flash normally if we were shooting with d one heads pro photo has the air of remote system so they're all wireless trigger on we just be using area modes we decided we even mix so we have different types right let's keep going with friends for five back metered six three okay let's see if we get a nice kicker kapali okay, so we have an issue that is that this is in the light okay? And the light isn't the shot to the corner okay, I'll look through the lens and you can adjust that police market he just short on pocket wizards is that what you did? Wasn't that bringing a little bit there? Ugo we're short on cables short on cables okay, now we're getting there we're getting there want to work out exactly the placement of how to make this trigger probably what we'll do is we'll run down to the local camera store, get a little cable and, uh plug that in and so what? We'll fix that by tomorrow but it had we not done this on the on the live day we would've been host so we'll get rid of this with a little cable we just don't have it right now, but chelsea now has a note that says we need a eighth inch plug to eighth inch plug for second pocket wizard so we don't have this issue okay, so I don't have to see that back there but now we're starting to get a glowing uh, table um it looks pretty good we might need a little work here. I think probably what we'll do is we'll do some compositing we might pop a third light in there, but I like that how it's getting how it's starting to look like that how it's getting how it's starting to look michael's looking at this now and he says so what will probably do is take that we'll get an entirely green screen with some exes on there so that we can composite in the actual image instead of relying on the screen which I almost never do you do that in fact any ad even a tv or a cell phone wherever they always have that little teeny linus is images simulated that's why? Because it just doesn't really work plus you want to be under control the color and all kinds of stuff but I like how that is now going to figure out how to get carly in here. Um we've done this before we're gonna kick this on turn this on where this is at minimum power right now so if you can meet her that kelsey police john keep it just barely missed uh make sure the slave is turned on you mate okay, please stand by she's gonna be much too bright when we do this we do it's gonna come from a second uno momento there it is. Yeah. So she's out of focus but she's overexposed right in the back way don't like that. So what we'll do here is we can't take this any lower but that's okay, right there is a way to take the king alert. Okay, further let's try it one more time. We have another tool in our arsenal in that pack. Six three. Okay, she's still gonna be overexposed to do that. So yeah. So she's still over exposed. Now we have another tool that we can use. Let me explain on the pro photo packs remember, it has to, uh, two capacitors right now we're only using one of them so that one capacitors twelve hundred watt seconds. Now we can actually take that one capacitor and slice it in half by plugging two lights into the b channel and that's what we're gonna do now when I throw this one from a to b and then I need one more head way to stick that on the stand this is why stands you'll see that we'll run out of stands very quickly like children, so why did you do it this way so just pulling the whole business back about four feet we could but I don't want to change the quality of light when I pull it back four feet it's gonna happen is remember inverse square things start falling off if I was at best a point isn't it no I wanted to be dramatic light fall off that need to be close okay, now it's at four now it's a four you want you want the sharp edges right now it's it's one third stop lower so watch out there we go click we're getting closer now we're probably at the point where we're gonna start pulling stuff back but the reason that the reason you want that is you wanted the actual hard edges or the sharp edges on her back like on her shoulder right there in the address so you're looking at or looking to remember on this you mean you don't see it now yeah we're gonna have the actual picture I don't know probably just working on her so where you have her edges why you could make that blurry would you want to make it more sharp in this and then a composite later on and make her blurry we might be crystal clear this is gonna be out of florida right? Right. Not blurry but out of focus out of focus yes, but so you would you keep a sharper image on here on her shadows or would you want to soften that and why? Either way right now we don't care right now we just want to control this there's two light sources you're just trying to get the lights just right we just want to see if we can control that so what we'll do now is take your suggestion so let's let's do exactly what paul said let's move that back about four feet we won't even meet her at this point we're going to do that tomorrow, levine methodology of meeting, which is shooting see outlooks and if it's good, then go for it so we're all good looking at it and take a peek. Yeah, so, you know, we see that we're starting to get there we might do is is take this guy feather the light a little bit so there's a little less light on currently a little bit more light on that table there's all kinds of things we could do, but we're the point where we've taken something. We're not quite sure exactly what we're gonna be getting and we dial it into a place for right there, you can see that that table is crystal clear, right? It's sharp, it's, predominant and in the background we have carly another thing we're gonna have back here is we want to make this look like it's the actual photo shoot, so I'm gonna bring in fake nonuse delights that's what? We have a bunch of lights back here because some of them need to be props so we'll cheat in light that will sort of up few skate some of this light right here we'll have lights back here we're gonna have stuff over here and we're gonna cheat that in so we have to actually get the actual shoot that looks good now once we get that, then we need to bring this out light it just like we did before and then cheat all the lights in so it looks like it's a real production even though it's not if they were that close that would be not so good then take another shot and michael will take all that stuff composited together and then give a final proof to tether tools and we'll call him on the phone and say, what do you think they'll say? This needs to change this need to change this to change and then we'll do that. So at the end of the day we're going to do more planning on this one of the things we have to do right now. Uh, well, I have to do that during the break, but we need thio make notes make notes how far away was this one of the ways you can do this I used the mark's arm reach method this is six feet I know that's exactly six feet at six feet away. How far is this? I don't know this is a body length away in an arm not very accurate. We actually take measure so we'll do that. The best way to do that, though, is time spike tape. So, uh, chelsea's gonna throw me a roll of bike? Just throw it over. Okay? So this is spike tape it's uh, a little roll of gaffer tape gaffer's tape. Um, so what we'll do is we'll take these old things here and, well, peel him off will make little notes fact, if one of your cameras can go down, you can see that there is already marks on the floor here, and so none of you guys can see this. There are marks on the floor and these are creative live marks that were made for camera position for yesterday when we did rehearsals, and so we'll use a different color of tape so that our marks don't confuse their marks. And usually we have I think we have three different colors we have red, blue, yellow, green, something like that and we color code all those marks on the tape, so we'll do this by the wheels and we'll say, this is how high that is, and we'll say all the lighting here is yellow then we'll take maybe a blue tape and then we'll actually put a mark where carly is well, plan that out so we know that that's exactly right this is where the table is well marked that out um and so you can see that we have to redo all this work we have a starting point that's going to work from when you have a boot do you actually mark were not just the wheels but the head itself where the head was placed yeah, we usually measure at least approximate height because this is tomorrow oh, the angle yeah, yeah, we try to do that and that's where lighting diagrams coming to practice practice throwing the ambient light so we get a real good sense of what all this stuff is the lighting diagrams just a note I make lots of lighting diagrams I've got books can you grab my mole skin? I'll trade you the mole skin for this. Okay, so, um this is a moleskin notebook. Best thing ever invented better than a mac book pro. Um I haven't here and you tell me if you can see this. I don't know if this is so my little scribbling diagrams all through this thing and what I have is is as I'm setting up for any kind of photo shoot you can see I've got these little scribble diagrams for pages and pages and pages and so I use this tio figure out exactly those blank pages they're um check this out. This is the original outline of this workshop that we're in right now creative live there it is that is it that this workshop came from this page to check it out it's a frog anyway? Um yeah, but it's all the stuff that we're doing it's like how do I know I figured that out how do I light this stuff? Exactly where is that gonna be? And so normally what I would do is either me or kelsey we would come out here and we would do it quick diagram then the other thing that we do is we grab a camera usually it's an iphone and we take pictures of all angles and a ce high as we possibly can. And so six months from now, when we have to do the follow up shoot for the new tether tables deluxe or whatever product they create and they say make it look exactly like the first one you did, we have to have some kind of frame of restaurant reference because we've probably done in that six months another sixty shoots or so and we won't remember that it was this way and so we actually one of the light room catalogs I forgot to tell you about yesterday is uh, pictures of lighting, setups and shoots and so we do all that someone threw that we also will make notes of the power output the watt seconds that we used the grids that we used exactly how far they resumed on the reflector all that stuff we write all that stuff down, okay, um, questions before we go to break, I think we have time for one question or so I'm not sure yes, so we're a little bit over time, but let's do three minutes of questions, okay? Question from sam cox is I noticed that carly is in a full dress. Is it important during these experiments for everything to be as close to final is possible? Yes. Oh, no, not not at all. A lot of times you would have a model in, you know, kelsi will be the model or we have, um, best, but I don't know how to say this in a the best way we have models that are that are on a list and models that are developing models how's that and so a lot of times when we have a name expensive high budget shoot will call the developing models the ones that are brand new, so we know we can pay them a different rate and so we can bring them in for a day and they're in place and then a different model comes in later and so when we're doing that usually they're not wearing the actual outfit way asked I asked erin to make sure that we had this dress on carly specifically because there's another issue here that I'm trying to solve that we didn't have time to talk about but this is the screen back here in this wall it's very very dark and this dress is very, very dark and this is very metallic and so what I'm trying to do is figure out if we have enough light to separate the model from the background and we did and so we didn't even worry about if he was blending into the background what we would've done is we would have put another light and maybe with a grid and we'd have to spill some light either here or on the back of carly so in this scenario specifically having her in a similar outfit she's gonna be wearing that one but a similar outfit is really important uh it's not always important but this time it was mark one prieta would like to know if you always do appreciate set up uh prior to the actual shoot for troubleshooting know we don't always do appreciate set up so if it's a shoot that we're very comfortable with model portfolio a basic fashion shoots something without a set normal product photography like a light table kind of thing or white background we don't do appreciate for things that are that are difficult extremely high key photography something like this were trying to separate things new products or any new clients where we're not exactly sure what we're getting ourselves into we always do a pre shoot way include that in our estimate, by the way, it's a hidden costs that we include in our day rate and so what happens is when the client walks in, they walk into a room that's preset and, uh, is a it's a big thing for them to walk in and see that we're ready to go within existing client? Some of that we shot with million times, they know the process by then and it's a little bit different, so usually we wait it's about fifty fifty and see what do you think else? About fifty, fifty one more follow up question on using the fill in models is when using filling models for any shoot don't they have to be the same height, fullness, skin tone they absolutely dio and so, uh, we have, um, a very specific casting call process, and so in fact for creative live, we didn't wait actually were here so I can end season here when we did the casting call, so we brought in models they had to be a very specific height and usually I'm doing workshops and videos, and if you'll notice, carly is almost the same height as me, so we're very similar that is not an accident. The reason that we do that is because video is horizontal, and if carly is really short so pretty like really short and squat down, then the video has to zoom way out or else it looks like a floating head and so that's a consideration, we've learned over time that we have to get models that are at least five foot seven five seven to five ten is usually what we have, but when we have the standing models we have, our process is height with no shoes on, we make sure they have no shoes on, we actually measured them, we actually do all the measurements because models are going to give you their best measurement, which might not be accurate, and then we always shoot polaroid's they're not real polaroids, but they are model front model side model back hair up if so. In fact, before we high hard, carly the first time a year ago, eight months, whatever it was, um she had to send me iphone I think shot iphone pictures, right? Like, you have to send the iphone pictures because, uh, polaroids, what normally, if you're looking at a portfolio of a model, you get retouched images, images that looked wonderful, things have been fixed and changed, and we need to know, like the big pores, small pores, any scars that were to think about. Some clients have issues with tattoos in different areas. We have to know that, and so we normally do polaroids of they're like mug shots on. We wanted to be totally no hair and makeup done. Just this is what we're working with, so make up artists and wardrobe stylist knew exactly what to do. So, yeah, all that stuff really, really does matter.
Class Materials
bonus material with purchase
bonus material with enrollment
Ratings and Reviews
Brian Geoghegan
Mark Wallace, Brilliant at what he does, so clear to understand, he is amazing, well done Mark great workshop, I learned so much. Thank you, kind Regards, Brian from Ireland
Sean
Mark really knows his stuff. He was very well prepared and Mark did a great job teaching this course. Mark went through all the steps from beginning to end in great detail. He also answered questions from the audience an online viewers which helped fill in any blanks. Great course.
a Creativelive Student
I loved this workshop! Many things I struggled to understand about exposure and many other things became so clear! Just wow!
Student Work
Related Classes
Portrait Photography