Lessons
Day 1
1Intro to Apple Aperture Part 1
25:50 2Intro to Apple Aperture Part 2
28:39 3Library Setup
23:48 4Single and Multi Library Setups
17:58 5Apple Aperture Layout Part 1
21:04 6Apple Aperture Layout Part 2
23:45 7File Import Setup
16:12Managed and Referenced Files
17:23 9Importing Workflow Part 1
24:29 10Importing Workflow Part 2
19:34 11Organization and Culling
31:01 12File Relocation
25:29Day 2
13Baseline Adjustments Part 1
27:12 14Baseline Adjustments Part 2
32:09 15Baseline Adjustments Part 3
26:05 16Color Monochrome
31:55 17Chromatic Aberration and Color Tools
19:40 18Crop Tool and Curves
20:37 19Additional Add Adjustment Tools
27:45 20Keyboard Shortcuts
19:55 21Lift and Stamp Tool
07:26 22Quick Brushes
31:16 23Presets and Stacks
24:10 24Slideshows
20:28 25Exporting and Sharing Images
25:21Day 3
26Intro to Apple Aperture Book Design
31:00 27Layout Tour
41:51 28Layout Tour Part 2
20:00 29Editing Engagement Album
33:42 30Exporting and Printing Engagement Album
19:30 31Editing Wedding Album
29:38 32Exporting and Printing Wedding Album
17:57 33Overview Q&A
09:44 34Apple Aperture Workflow Start to Finish
25:21 35Start to Finish Q&A Part 1
34:14 36Start to Finish Q&A Part 2
18:07Lesson Info
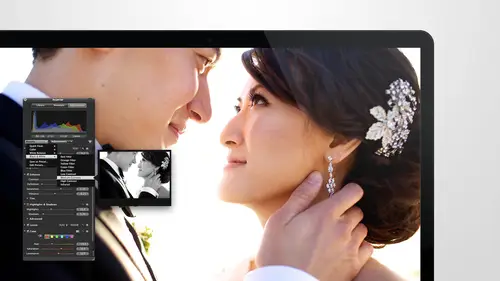
Apple Aperture Layout Part 1
Next I'm going to give you a tour of the aperture site and we'll get a little bit more in depth of all of those things that after khun dio you know I'm just going to start in the upper left and we're going to kind of talk about some of these buttons that you may be familiar with and you may have no idea what they d'oh on the first one is the inspector it's pretty simple to figure out what that does because when you hit it, your inspector goes away it's similar no all other apple apple programs if you've noticed they almost all if not all have an inspector in them so that's a very familiar thing if you're used to using apple products there apple software's the inspector will have three windows in it and there's a few ways to access the inspector inspector hood so I'll show you those in a second but just to give you a little tour of what those three things are there's the library which we've been working in which has the project's your albums, you're smart albums all this good stuff you ...
can also by the way hide this stuff so if you feel like, oh my gosh, this is so overwhelming I don't want to see all of this you can hide all these and really I'm just keep it very, very simple I have it's pretty. I like it. We'll leave it like that, and I like things simplified down and just I love seeing just what you're working on and not having all the clutter. Life is cluttered enough as it is these days, with all the distractions. Nice to kind of simplify things down, right next to that is your info. Um, and just so you know, because I love short cookies, if you hit w, it will filter through these windows, so if you want to go from library to info to adjustments, just hit w info is going to show you all of your exit and bow here, and this gives you all of your camera info is well, so you can see if you have her over, you'll be able to see where the focus point wass a little bit off price should have been on him. Oh, I'm sure I focused on him and then reposition my camera. I do that a ten, um, pattern and all this good stuff, so you'll also be able to change ratings here if you wanted to like, if I want wanted to make this a five star here, I could, uh, it's, not as quick is hitting your five keys, so I never do it, but this is a great place to just see the information on your camera about your camera, about the shot to see what it is also, if any of you are working for another photographer or if you are an intern shooting for another retire for and you're going through and processing their images for them this is an m amazing way to learn because if you leave this on is you're going through the images you're like oh yeah, she'll love that boom you've got all the information what lens they shot it on what their settings were, um if they had a flash or not all that great stuff and then all right next to that is your adjustments window and we will go through and check out all the difference adjustments in the adjustment section, but I wanted you guys to know that that is there is well, so that's what your inspector is the only time we really hide the inspector is when we're doing calling or when we're doing album design no, they're going to two times and the shortcut key for hiding the inspector is I and if you hover over it here, you can see the shortcut keys as well, eh? So we can hit I to hide that I'm right about that are right next to that is port that's what you're going to hit tio import images into your capture library and we'll go over the import would know a little bit later as well. I just want to kind of give you a tour of where everything is right next to that is new, so I'm gonna run click import because we don't want to do that right now. This is where you can go for all of the different types of structures that we were talking about. This is also I'll tell you a little bit about each. This is the project we talked about that a little bit second ago, but basically your project is just it's like a box of images is where all of your images they're going to go per event that you that you want to sort. So if you've got multiple things within an event that you want to split into two projects, you can totally do that all it is is telling you that that's going to meet your box of images I don't suggest typically I'm taking doing two projects for one event unless you're shooting like anthony is, and he literally has two completely different shoots on at the same town pretty much, but for most people, you would want one project per event that you're working on, and then your folder is your folders for organization that's what we had the the wedding's engagements, portrait's commercial sorting and organizing albums the album's basically the difference between albums and smart albums we talked about a little bit and we'll work on those two more later, but both of those options air there smart albums basically are based around parameters, so they say I just want to see the one stars that have a red label on them on and any time you red label on one start something and automatically populate into that albums, on the other hand, are manual so you you basically decide what images go in and what images come out and that's it and they're sorting that's all they're doing your images air still in the project unless you told them to delete out of the project completely right below that is book that's day three I'm so excited I'm not sure if you noticed on so we're going to use the book told ton and day three the items down below this, to be honest there's I had don't use them attend a light table actually allows you to just throw images onto a light table we'll just show you one really quick because we're not going to show it later table so you could actually take images from here throw them onto how we take him out of highlights instead of rejects I was selective view of the room on the light table I think I have heard over the wrong thing there perfect and then you can grab the images and kind of go oh, I have every once in a while like I've used this to do wall designs so if I wanted to show a design to a client and say, oh, it it kind of looks like this I'll do a layout oh um and here really quick because it does have cem if you noticed it's lining up the bottom there so it's giving you some grids and lines like album designs dio and you can do a few designs leif you out and say, oh, that would make a really great while collage looking out pretty it is and just screen shot and send it over s o that might just be a good way to kind of lay out images together, which is great so that is light table and then slide shows is a great place to make. Such is if you want to make photo slide shows we may get into that a little bit later if you guys are interested in finding out about side shows, let me know I can always add that into a segment and show you how to do that and then also web journals web journals allow you to do proofing and create create basically they call them web journals, but they're basically like pages. Pdf so things like that for a quick and easy proofing and then you can choose a theme I believe you can even print them through apple but I've never tried it and then the other one is what pages. So this allows you to create a web page the same kind of stuff proofing that kind of thing and you can export it and save it onto your own website or save it on to one of their thing dot me sites again not something I typically use but I wanted to show you that they're there and then just going along the top some more just making sure we kind of cover what these things are this is your key word so if you if you click on that this will give you all the key words that you have there's a ton in here any time you create a keyword ever like christine and grand apparently I have a key word in there for them or marines so when I was sorting at one point I created keywords and they always will populate into here. So if you ever created keyword it automatically crease it in here if you get a keyword set and you want to import it even hit import there or you can export it key word said if you get one that you really like on one computer and want to send it over to the other one or if you want to share with a friend share the wealth and then this is your share button let me click on an image so it'll activate and we'll go to share and this is where you'll be able to share tio email if you had icloud selected flicker facebook, smugmug these air the different options that on ly option I really used from this is email, but you can always like I said, if you're doing a single lay out like or a year like both of you are probably going to dio you can do two thousand fourteen, keep all of your connections and there, and you might want to share images to facebook or to flicker or smugmug straight from apter okay, moving right along. We're gonna go over to the top right? Um and you can get around me any time. By the way, if you have any questions, you let me know. Thank you on the top. Right over here. These air your thes air your view, moz. You khun cycle through view by hitting the that's a shortcut key for it. So this is basically the browser right next to it is going to be a split view, and then here will be your viewer and let me just back out you can see what they fully look like split view and again what's the short cookie good job so proud on so this is your viewer this is your browser and then this is split view the majority of time I am in split view it's my favorite because you can see what you're where you're going I'm hitting the right arrow on kitchen is that on my shortcut keys so you could mass through images you can also I'm go down and scroll through images to see what which image you want to click on. It makes things really easy. You can also make your viewer smaller so you could make it nice and small just bite pulling this down or you can go bigger. That might be a little much, but you really have complete control over this and I just love the viewer mode. I think I'll take a second while we're in v ramon and I'm getting a tour of um full view are yeah, so pretty I love being in this mode because it really allows you just they like her saying like distractions air gone. All I see is what I need to see and I like as well sometimes to turn this off and just see the images and be able to click through if you are doing calling this is a really great view, but I prefer this view for calling because you want to be able to see the images a little bit better and then you can also make these images bigger to make him bigger it's on the bottom left here and you can make the image is bigger this you still have a lot of saying functionalities as well so these are all the sorting if you want to start by rating, you can do that if you want to survey labels version name, file name orientation pixels so basically a few these just to give you an idea dates obviously obvious it's going to be chronological rating is going to be based on what five stars will be first if you have a sending the's with descending, you'll have your unrated first and then your five stars at the end label would be sorting color so all your reds would be together on your grace would be together that's a great way to do sorting if you want to grab you know all of your black and whites and do those adjustments all at once right under that is version name version names a great way to sort if you're trying to find the two different cameras and they label differently. So if you want to see all sarah's images first and then all of jessica's second you consort by version name and it will put him in order um ver name and file name are very similar the only difference is that file name is the original file name version name might be something that you changed it to an aperture we don't change our are naming that much until we do export so typically those air the same for us key words you consort make he words you can see if you key worded because we key word when we categorize but if you've key worded brides and grooms and bridesmaids all together you can sort by those and it'll show you those in order as well. File size this is a great thing to use if you are looking for a small file size image that snuck in and your import are or big file size of men same thing soared by file size go to this go to the smallest and you should be good another great way to look for that skipping down is pixel size back and sometimes even better because file size conclude dependent on colors and all of the information that's in the file pixel size will definitely tell you if you've got a resized facebook image in there that you that somehow it got in this election and then orientation we use orientation a ton when we're doing album design because you like I mean horizontal imagery got to find it then I can go ahead and hit orientation it's going to give me all the horizontal so I can sort through those and find a good horizontal for the layout so all of them really functional there is one other thing in this view that well to other things that have a really cool one is if you hit the h key your hud shows up you so now you have all the capabilities to do adjusting in this view you can do your exposure recovery your black point all of the same adjustments that you have in your main view you haven't in the full view here and then um you have your library so if you need tio do you want to go over your highlight images you could do that um all of the same capabilities that you have here and then you're kind of like well what if this is locked by the way if you want this floating so let's just go to a single image so if I've got this vertical image and I just want to work on this but I want to keep it floating I can also if I want tio see if I remember had do this quickly if I want tio keep it on love yeah if I want to keep it on the left side then I can lock it in on left side if you're used to having it there I really like it on the right side so I love to keep it locked there I also like to keep the images down to probably about that size and they've got a good size image you're working on especially when you're in a horizontal it's just like a beautiful option for for doing editing and also for doing calling so you can quickly go through if I was doing calling though and less of course, I was an intern wanting to see the information I would hit the h key and my head goes away and they have a little more space so pretty I'm one other thing that you don't know is here is there is a hidden menu here on dh you can also walk this one same kind of thing this has all of these other buttons that we're going to talk about in a second, but basically you can access your loop from here. Um, you can access supervisor sharp, you can also use me till the key perfect, you can do all of these other functions brushes, red eye cropping, straightening, rotating all that kind of stuff, so you really have all the functionality that you need in this view, you just have to be really invested in actually getting a project done in order to go into this fiend said everything I get ready, get ready to go, so I'm this one I keep turned off when I'm doing because I don't need that one as much I can always go up and grab the loop, I can also hit shortcut keys that till the key is the shortcut key for the loop that tells a key in case you didn't know where that wass is right under the escape key it's this it's this button right here under this gatekeeper then I'll hit that one and you can see it brings up the loop on dh I'll show you some more loop uh in the main view all right we're back in maine view the other options appear our faces if you have that enabled you can see faces right there places if you have that enabled as well place this is so fun especially if you if you went on vacation and kept like one after library just for that family so amazing just like see all the different places you were and the photos you took there it's a really something I'm glad they brought in after even though it is more of like an I photo iphone we like the fun stuff tio can't be really, really functional for travel for tire first as well right next to that is the loop so I'm going to tell you a little bit about the loop here we can zoom into images let's pick a him into our eyes nice and bright pretty morgan's beautiful in case you didn't notice so there's a few loop options I don't know a few guys like me but I don't like this kind of loop so I want to use um this kind of loop this, like, feels more familiar to me. I don't I think the whole like click in and then it zooms in I love that I could just move around the image check focus really get in, get into all the details there meat and you can always go in and change that and go into the centre loop. So your loop options if you right, click on the loop, you'll have the options available here, so this is the use center loop you'll see a shortcut key shift command and I think that's tell them it's so it's shift command tilda um is is the shortcut key for for changing the low back and forth and we'll go back to this one, you can see it on dh, then I'm going to show you a couple more options that you have here. The loop also has the option to go and really tight see if we can check out the inner section of her eyeball here. There you go, I'm stephen going really tight, you consume make it more of like a fifty percent, you've got zooming options. You can focus on the cursor on the loop, so this is really cool if you want to keep the loop over here and then tell it that you want to focus on the cursor and it always kind of move with you, so that way, the loops always out of the way, you can even keep it over in that area. So it's not destructing the image. That's. A really great way to use the lupas well, and then one other thing on the loop is you have the option. Teo teo, have it show a color value. The color value can come in really handy when you're trying to match your color on dh. When will do when we're doing, adjustments will play with that some more, and I'll show you that on, and then that's it. So the only other option is hide the loop getting out of here.
Class Materials
bonus material with purchase
Ratings and Reviews
cricutDIVA
I have been working through the videos and I am so happy I purchased this course. Sara has taught me sooooo much. I have been using Aperture for some time to organize my photos, but even now, two thirds of the way through the course, I just learned something that is going to make things so much easier. It is actually super obvious, but I never realized it was there!!! (the ability to create a new export preset). Thank you so much for this great course. Thank you so much Sara!!!
Eric Sanchez
THANK YOU SARA FRANCE AND CreativeLive!!!! This course is exactly what I needed to fully understand this program. I have been using it for about a year now with now instruction. Really, I have just been fumbling through it. Now I can set it up to work for me and understand how Aperture works. Sara France has a way of explaining this product that makes everything easy to understand. I am completely happy that I purchased this course. I know I will watch it several times over to make sure I am using Aperture to its fullest potential. CreativeLive, please bring Sara France back often as Aperture grows and gets better. I absolutely loved learning from her and hope she becomes a regular on CL! Thank you so much. Eric Sanchez
a Creativelive Student
Since I first purchased this software in early 2008 I have been seeking a comprehensive look at Aperture. And I have now found it in Sara France's course. She gives us not only a detailed instruction in the finer points of a workflow using Aperture but discusses in detail each of its features. I can't express how much I appreciate this course. I've used Aperture extensively since I first purchased it, but what I suspected before is clear now - I only knew about half of it. In the past 3 days my education has proceeded at a good clip. Thank you, Sara France.