Lessons
Chapter 1: Introduction
1Class Project
00:55 2Equipment
05:44 3Chapter 1: Quiz
Chapter 2: The Basics
4Camera and Phone Settings
06:07 5Anatomy Of a Good Photo Of Art
10:41 6Example Images - A Breakdown
08:18Inspiration
03:28 8Chapter 2: Quiz
Chapter 3: Shooting
9Shooting in Studio
15:24 10Shooting Outside
05:13 11Chapter 3: Quiz
Chapter 4: Editing
12Basic Edits and Making Mockups in Photoshop
20:04 13Smartphone Editing
04:45 14Chapter 4: Quiz
Chapter 5: Conclusion
15Conclusion
01:57Final Quiz
16Final Quiz
Lesson Info
Shooting in Studio
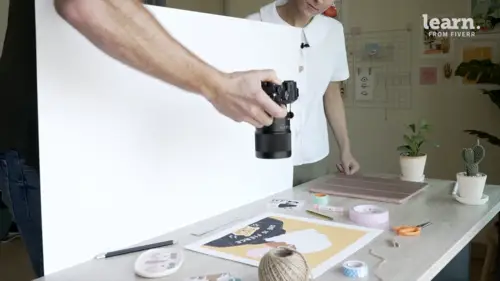
Alright guys, we've talked about a lot of different stuff in this course and now it's finally time to shoot. I'm here with the lovely charlie Clemens, my very good friend. So today we're gonna be shooting some of her work. We have both digital work and some of her printed work, charlie is a digital artist. So we are going to be shooting her ipad and we're gonna be shooting her ipad some of the, some of her work displayed on the ipad as well as just some plain shots of our ipad that we can superimpose photos on later in Photoshop and I'll show you guys how to do that. It's super simple. So we're shooting in charlie's studio today which is this lovely room here in Chiang mai Thailand, I'm sure you can already see the natural light is amazing and that's one of the reasons why we chose it. Obviously. This is where charlie's creative spaces and it's very authentic to her work. So we wanted to shoot in a place that kind of meant something to her and we had access to a lot of the things she u...
ses when she goes through her creative process as well as the light. The light is very nice. We have this massive window here with natural light pouring into the scene and it just looks really, really good and as you very well know lighting is one of the three components to capturing a beautiful photo of artwork or just a beautiful photo in general. So because we have good light, we're definitely gonna get some good photos today. And once again, we're gonna be capturing three different compositions today, The flat lay the straight up still life shot and some detailed shots as well, which we're going to work in throughout the process. But we're gonna start things off on the top with the flat lay. We have a lovely set up here with awesome light. I'm gonna show you guys how we set it up and then we're gonna take you through the styling process before we capture some really cool shots. So let's get after it and let's take some cool photos. Okay guys, so this is the set up for the flat lay here as you can see we took the table which was where I shot the rest of the course in the corner back there and we moved it right next to the window here. Well actually it's a door and that's why we're shooting through the door here. But the reason why we did that is because the natural light is coming in and it's really nice. It's about 10 30 in the morning right now. So the sun is kind of on the other side and it just looks really nice. The light is nice and soft. If it was later in the day, the sun would be facing us and it would be way too bright and it would not look good. So, one thing to reiterate when you're, when you're putting the table next to the window. It's very helpful if you have some type of diffuser. So if you have some white curtains, those are gonna look really good in your scene because it's gonna help soften that light even more and make sure you have nice even light. The other thing we're using today is a white poster board, I pick this up for like a dollar at the local art store and it's awesome because it allows us to take the light that's entering this room and reflect it back onto the work to make sure we have nice even lighting and we're gonna be positioning it on a chair because it's just a lot easier. So charlie doesn't have to hold it so we can just push this chair up right here and have the board right like that. So that's essentially our lighting setup for the flat lay here and once again, that's one of the most important pieces of the puzzle. But of course styling is the second piece of the puzzle. And with these flat lay shots, we really need to make sure we're styling it correctly and in a way that complements the artwork and complements the colors and everything else. Um so I did say that I wanted to shoot some white background shots and that's very, very simple to do if you just want an unbiased photograph of your work basically like a photo, that's gonna look like a photo scan, you can do that by just placing a white poster board below your art and capturing a few photos that way. Um and then cropping it later, that's gonna give you the most even light and it's gonna look the best. So let's do that real quick. Then we'll style everything and make some really cool style, flat light shots. So we actually have another poster board here, a white poster board and I'm going to place this one on the bottom of the scene here. Thank you charlie. These poster boards are amazing because they are nice and white and they allow the light to reflect even better, No shadows. So you can see we're putting one of charlie's artworks here on the table and then we're just gonna reflect light back onto it. So in order to get the flat like shot, I need to make sure I'm high and I'm gonna have a little stool here and I'm gonna step on the stool and that's just gonna position me right above the artwork. And that's the best angle for these unless you want to put it on the floor, but you need to be getting up high for these. And then I'm just going to line up the shot. Once again, I have the grid lines on and that's really gonna help, I'm gonna set my aperture to around 5.6 and then I'm gonna adjust the rest of my settings to make sure that they look good and then I will just line it up and capture the shot. I'm shooting on daylight white balance right here. Um And I'm shooting, I'm doing that because it'll just be easy for me to correct the white balance later in editing. So that looks pretty good. And now I'm also gonna shoot some with the iphone because iphones are crazy. Nowadays they look amazing. So and once again, I'm using the grid lines to make sure everything is nice and balanced. So now that we've got the white background, we're gonna do some style shots. And this is where the beauty of the flat light really comes together. So we're gonna get rid of the white. And we're gonna use this nice faux wooden table. I don't know what you call it, but it looks really nice, it's got a nice texture and um it really complements charlie's work well, because it's pretty simple. Right? So we have a bunch of different stuff here. We have yarn, all the stuff that you guys saw that was like kind of arranged on the bed. We can just kind of start putting it around the photo and around the artwork here and just kind of experimenting. And when it comes to styling, you know, there's no right or wrong. And when I'm shooting the composition here, I'm just gonna have the photo, the artwork in the middle of the frame and I'm gonna align it with the grid lines because that is just gonna make sure it's the best representation of the art as possible if you're hitting it from an angle, it's not gonna look good, you want to hit it from straight on top. So anything you wanna, you wanna really display in this shot, charlie. Um so my favorite color is pink, as you can see my artwork. So I have a lot of pink objects that maybe I could try and balance out or bring out the pink a bit more. So I'm quite big with color. Um so obviously there's pink on this side, so I could bring out a bit more pink here, awesome and play around with that. So yeah, if you have any colors in your artwork that you want to bring out, maybe you could try and find objects similar colors. Color is very, very important. I know you guys can't see me when I'm, when I'm shooting here, I'm up above and I'm shooting both horizontally and vertically. And one of the things with shooting for social media, we're just gonna style as we talk here. One of the things when shooting with social media is you want to shoot vertically because you're gonna be taking up more real estate on your viewers. Smartphone. And a lot of content is digested via smartphone nowadays. So for shooting vertically, it's going to take up more real estate on their page. So square is also really good, horizontal, not so great for social media, but very good for websites. So if you want to improve your portfolio shooting horizontally is good as well. So I'm gonna be shooting both horizontally and vertically today. So as you're shooting these flat lies to you can also shoot some detail and you can just get really close to the work and move your camera a little bit closer. And one thing to just consider is the minimum focusing distance of your camera. Some cameras, some lenses will let you get really, really close, some lenses won't and the iphone it lets you get pretty close so you can get pretty close and then you can even crop it more later to make sure you're really focusing on focusing in on some of those little details that you really like. Okay, but now let's let's try to experience with some different colors. We have some different colors here. So let's let's try this blue. Nice. I love that. Yeah, so the blue and the yellow, they're obviously complementary colors. So they look really, really nice together. Maybe the orange scissors are a little bit too much for this. I'm gonna take those out there, awesome. Let's try, let's try some different work here. Let's take this out and we have some other work that I think would look really nice with the blue, some pink and these are smaller photos, but I think they look really cool. If we can just like put them next to each other or something like that and you go do a closer crop awesome do with the iphone here. So now we're gonna shoot the ipad here, we're gonna keep it on the blue and maybe one of your, your works will kind of complement that. So with the ipads it's kind of tough because it's an L. C. D. Screen, right? And cameras, they don't always do well with LCD screens, some of the newer ipads, they get brighter, They look, they might look a little bit better. This is an older one but it still looks really good and even if it doesn't look great in the end, maybe the colors are off or something. We're gonna superimpose a photo onto the screen which is so easy in Photoshop. So I'll show you guys how to do that as well so we can just kind of follow our same process here. Just style, put different things in the frame. I like how there's a cactus in the in the work. So we have a cactus we can put in there as well. Love these. This will be easy to crop into a square later as well. Now we have a different work here and it's vertical and we're gonna orient the ipad vertically and that's good for social media right because we want to take vertical photos so it's kind of mix up the styling here and once again it looks dark and it's tough to get these ipads, the brightness on point. So I think it's gonna look a lot better when we superimpose the photo on in Photoshop later. And the most important thing when we're shooting a mock up is to make sure that we're using our grid lines to make sure we have a really nice balanced composition. And if the camera is slightly tilted, it's going to create um discrepancies in the size and it's going to be difficult to make the mock up. Perfect, Perfect. So make sure you're using those grid lines and make sure it's it's all lined up nicely. Alright guys, so we've shot our flatly and now it's time to move on to the straight on still life type of shot that we talked about earlier, the second composition and we've charlie and I have been kind of, we've taken a little bit of time, we've put together a little bit of a scene here. And as you can see, we have probably my favorite piece of charlie's work here on the wall. Um and then we kind of built a scene around it. So this is the focal point here and you can tell by the colors, this is like some really nice bright yellow and there's not a lot of other yellow in the scene, but there are some complimentary colors. The green looks really nice, It really complements the, this shade of yellow here and then everything else is kind of neutral, which is nice. So we built the scene around it and I just really love how this looks the art in a situation like this, it's gonna look a lot more natural than a flat, like it's going to be in a situation that is just more realistic. And as charlie was telling me earlier, if you're trying to sell your work, it's better to photograph it in a setting like this, because this is how people are gonna be displaying it if they buy your work, they're gonna be putting it in their room on the wall or on a shelf or something like that. So, this is definitely a realistic um and natural way of displaying your art and it's awesome because you can show a space, you know, you're kind of highlighting a space and the artwork is the focal point of that. So, I'm gonna step around and I'm just gonna take a bunch of different shots, both straight on, I'm gonna back up, I'm gonna come up close and I'm just gonna really mix up the different compositions here. But always remembering that this is the focal point here, the artwork is the focal point. So I'm trying to make sure that I'm highlighting that. So in terms of lighting, we have this big window here on the side and it's pouring in a lot of natural light and while it is a little bit dark in this corner, because this room isn't white, and if it was pure white, it's actually an off white color. If it was pure white, it would reflect light a little bit better as well as if the sun was in a slightly different position, it would spill in and just create better light. But what we have here is still very nice and I think it's important to note that the lighting is not always going to be perfect in every scenario that you're in and that's totally okay. You can still get amazing photos like you'll see in in situations where the lighting isn't 100% perfect, but it's still really good. We have all the lights turned off in here, so we only have natural light spilling in one shade of light, one color and it looks pretty good. So charlie brought up a really good point in terms of styling is when you're styling a scene like this, it's important to have a variation of objects in your scene. So we have tall objects, short objects, big objects, little objects as well as a variety of different colors and that is really going to add a lot of visual interest in the scene. It's gonna allow your eyes to naturally navigate throughout the scene and it's just aesthetic. It just looks good and our brains can really comprehend what's going on. And it creates a nice balanced scene as well. So enough talking, I'm gonna do some shooting here, I'm gonna shoot it at a variety of different angles. Starting first up close and capturing it kind of with everything around the scene, I'm just gonna keep stepping back and taking more and more photos and then I can also kind of step around the room and take it from different angles as well with these, there's there's kind of no right or wrong, you know, you can get, you can experiment with it. I'm also shooting a mix of horizontal and vertical photos here and we'll just get some iphone shots as well. So I think that's it guys, we took a ton of awesome photos today, we got some flat lays, we got some straight up still life shots and we got, we mix some detailed shots in there as well. And those detailed shots would be good for maybe the second or third photos in an album on something like instagram where it's just kind of focusing on some of the things that you really like in a piece of art, but charlie. What do you think? Do you think? We've got some good photos? Yeah, we did. And I just want to say that not everyone's artwork is the same. So just because we've styled it the way I like to style it, everyone is different. So just take the tips that we've talked about today and use it in your own work. Maybe you have more moody work or dark styles. So so just kind of switch it up like that. But for me, I love color, I love bright light. So yeah, it's perfect. That's a really good point. Yeah, everyone's different, everyone has different inspiration, everyone has different goals. So whatever that looks like for you, you know, whatever your creative process looks like it's gonna be awesome. I'm excited to see it, but with that said guys, we've got a lot of awesome photos, so now it's time to start editing, so I'm gonna head back to my studio and we're gonna sit down, we're gonna edit the photos on both my computer and on my iphone. So let's go do that now.