How to Shoot Moonlight and Star Trails for ALP
Lesson 11 from: Astro Landscape PhotographyLance Keimig
How to Shoot Moonlight and Star Trails for ALP
Lesson 11 from: Astro Landscape PhotographyLance Keimig
Lesson Info
11. How to Shoot Moonlight and Star Trails for ALP
Lessons
Introduction to Astro Landscape Photography (ALP)
25:29 2On-Location Demo: Composing, Focusing, Exposing & Mobius Arch ALP
27:44 3Post Processing: Mobius Arch
16:23 4Gear for ALP
28:09 5How to Use an Intervalometer for ALP
07:51 6Camera Settings for ALP
20:24 7On-location Demo Focusing Demo for ALP + SharpStar 2
33:06 8Determining Exposure for ALP
17:00On-Location Demo Lathe Arch Light Painting & ALP
17:02 10Post Processing: Lathe Arch
17:41 11How to Shoot Moonlight and Star Trails for ALP
16:17 12On-Location Demo Star Trails Stacking
07:09 13Post Processing: Star Trails Stacking
29:44 14On-Location Demo Panorama for ALP
10:19 15Post Processing: Panorama
23:56 16Close-out for ALP
01:23Lesson Info
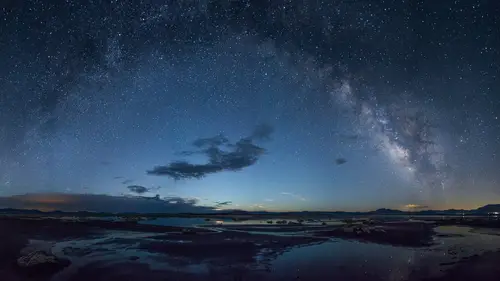
How to Shoot Moonlight and Star Trails for ALP
So in moonlight conditions, we're gonna set our white balance somewhere between about 3600 and 4600 degrees Kelvin, moonlight itself has a color temperature of 4100 degrees Kelvin, you can use auto and adjust it in post-processing, but I think it's nice to be able to set your white balance in camera and know exactly what it's gonna look like and especially if you are doing image stacking or doing panoramas, it's really important in that case to set your white balance in camera, because over the course of your multiple exposures or during the course of adding light, the auto white balance may change the appearance from one image to the next or over the course of a longer exposure, due to variations in lighting. Overcast skies are going to make for images with dark foregrounds and very bright skies, so if you're photographing in a moonlit environment, when it's cloudy out, again your foreground, the ground level's gonna be really dark and the sky's gonna be really bright, because basical...
ly the sky is, the cloud cover is acting as a diffuser, all that light is gonna be kind of reflected off the clouds and it's not really gonna reach down to the ground level. So on cloudy nights or overcast nights, in that case, you might wanna consider going and photographing in an urban environment, where you've got a lot of light level at the, light at the ground level and the cloud cover in that case will reflect lights from the city back down and in a way, actually reduce the scene dynamic range and balance out the light levels between sky and ground. In natural light situations, you're gonna have the opposite problem, where the sky's gonna be bright, the ground level's gonna be dark. Clear skies are gonna be best for star trails, but that doesn't mean 100% clear, a little bit of cloud cover is not a problem and in fact oftentimes adds drama to your images, so broken, moving cloud cover can be really dramatic and add a lot of visual interest to your images, so if your clouds are moving across the scene, parallel to your camera's sensor, that's not so good, because the clouds just tend to wash out and become like a solid white mess, but if the clouds are moving perpendicular or at a 45 degree angle to your sensor, it can be very dramatic and the clouds just have this amazing ability to add so much visual interest and drama to the sky. So cloudy, partially cloudy night, especially if those clouds are moving, orient your camera either perpendicular or 45 degrees to the movement of the clouds and also consider how quickly they're moving will determine the length of exposure that you might wanna use, so if the clouds are streaming really quickly, you're gonna cut your exposure down shorter, just for the appearance of the clouds in the image, if the clouds are relatively stationary, in that case you can get away with a longer exposure, before they start to blur and blend into each other, right, so again, orient the camera diagonally or perpendicular to cloud movement for the most dramatic images. Alright, star trails, the direction that you point your camera is going to affect the length of your star trail and I talked about this briefly before, if you are, when we were talking about stellar movement and the longest user shutter speed, in this case, now we're talking about actual desiring, wanting to have star trails, so again, point your camera to the north, the star trails are gonna be shorter, point them to the south, they're gonna be much longer at the same exposure length, alright. So longer lenses will also generate longer star trails, so the same exposure length with a 50 millimeter lens is going to give you a longer star trail, than a 14 or a 20 or a 24 millimeter lens at the same exposure time, the reason for that is the angle of view, so the star trail is actually the same length, but if you have a wide angle of view, that short star trail is gonna seem smaller relative to the narrow angle of view on a telephoto or a longer focal length lens. Additionally wider apertures are going to show more stars than smaller apertures, so dimmer stars are not gonna show up, if you've stopped down to F8 or 11 or 16, those weak, dimmer stars will only be rendered at wider apertures and that's something to consider, you may not necessarily want to see every single star in the sky, because in a really dark environment, you can have so many stars, that it really distracts from everything else in the image, so you can use aperture as a way to control how many or how dense the star trails are in the sky. So point your camera towards the north and you'll get the circular star pattern and point your camera to the south, you'll get relatively flat star trails, that are kind of bowed, to the east, they'll be angled like a forward slash and to the west, you'll get a backslash and it's a good idea to think about this, when you're designing your image, because remember, diagonal lines have a really strong visual movement and can profoundly impact your composition, diagonal lines make for really powerful, visual cues to lead your eye in or out of an image, so think about that when you are composing your image, which way the stars are going to move. Alright, so for very long star trails, you can combine multiple, sequential exposures, using a process called stacking, stacking is a technique of combining exposures into a layered Photoshop file, that will create star trails longer than you can do in a single exposure, now why longer than a single exposure? You may be limited by, you know, actually exposure level, you know, at a certain point, you're going to become overexposed, also or more likely, you might be limited by the noise created in a single, long exposure. Okay, there are many different ways to stack or combine images for long star trails, my preferred method is a Photoshop script created by Scott Martin and Russell Brown called Stack-a-Matic and the advantage to Stack-a-Matic over other methods is that you end up with a layered Photoshop file, that you can adjust or manipulate individual layers and say mask out oopsies or errors, such as car headlights or planes going through a scene, any other stacking method, you end up with a flattened file and it makes it a little bit more difficult to correct for those kind of errors in your image. Alright, another method is StarStaX and there's a Windows-only program called Startrails.exe and a astrophotographer's program called Keith's Image Stacker designed for deep space images through a telescope, but it also works pretty well for star trail stacking. Alright, so let's talk about the nature of star trails, the further away from the north star your camera's pointed, the longer your star trails are gonna be, if you're pointing towards due north, you're gonna have very short star trails at the same relative exposure to pointing in any other direction. The longer the focal length of your lens, the longer the star trails, the wider the aperture, or the higher the ISO, the more stars you'll see in your image, if you shoot at a lower ISO or a smaller aperture, you'll see fewer and fewer stars and longer focal length lenses will yield brighter star trails, than shorter lenses at equivalent apertures, that's a strange one, but it's true. The less ambient illumination you have at ground level, the more stars will register in the image, so if you've got a lot of light pollution or a lot of ground level illumination, you will probably see fewer stars in your star trail images, you will not see many stars or star trails at all on a full moon night, the light from the moon in the sky will obscure all but the brightest stars and the planets, also of course, in the city, you're not going to see nearly as many stars as you will out here in the wilderness. Broken cloud cover will cause star trails, that appear as dotted lines and a lot of people kind of don't like that effect, but I don't really mind it so much, the thing is that you have irregular star trail patterns with variations in the stars in different parts of the image, because the clouds will kind of be moving through in different parts of the image over different times during the exposure length, so chances are if you don't see the stars, your camera's not gonna see them either, so that'll give you kind of a rough idea of what to expect in camera. Another kind of strange curiosity is that star trails will have a different color, many stars will appear as warmer or cooler colors, depending on the age or the type of the star, how hot is it burning, so for example, Antares in the Scorpius constellation is a red giant and it actually appears as a orangey-red color, just like Mars in star trails and the lights of airplanes reflected off of satellites or even the International Space Station will be recorded in your star trail images and depending on where you are, if you are directly under a flight path, you'll see many, many planes going through your images and that's another reason why using Stack-a-Matic is helpful, because it's easier to clone out those undesirable plane trails from your images, if you've got a layered file, rather just one than flattened file. Okay, so if you want to have star trails or time to light paint in your images, then lower your ISO and that's gonna buy you a little bit more time to work with. So single exposures of say, 10 to 40 minutes give you nice, long star trail images and they leave plenty of time for light painting, but it really stinks to wait 20 minutes or 30 minutes for exposure and then find out that you've underexposed the image by a couple of stops and you have to start all over again, so for that reason, we're gonna use a technique called high ISO testing, the way this works, well, high ISO testing is useful for figuring out your composition, the edges, the corners of your frame, that you can't necessarily see through the viewfinder, it's also good for determining exposure and confirming your focus, so you can convert seconds at high ISO testing to minutes in your actual exposure, because there are six stops of exposure difference between one second and one minute, so we're gonna use a high ISO test, that is six stops higher in ISO, than you're shooting, for example, if you are going to be testing at 6400 ISO, that's six stops more than 100, so say 10 seconds at 6400 is gonna equal 10 minutes at 100, it's a really useful tool or if you are testing at 12,800, that's six stops more than 200, so five seconds at 12,800 equals five minutes at or three seconds at 12,800 equals three minutes at 200, you're just changing the same number of stops between seconds and minutes in your ISO, really useful tool. So native ISO exposure cameras, 100 ISO cameras, use that 64 for tests, 6400 for testing and 200 ISO native cameras use 12,800 for testing. If you need to, you may need to enable ISO Expansion in your Custom Menu settings, so some cameras, particularly older cameras may not have those high ISO settings in your regular ISO range, you may need to actually turn on the Expanded ISO range, right, so, if you have a really old camera, that doesn't have access to 6400 or 12,800 at all, in that case, you're going to have to compensate by additionally adjusting the aperture to make up for those missing stops, fortunately most cameras made in the last six or seven years have access to those higher ISO settings and you won't have to do that. Alright, so the problem is forgetting to turn back your ISO setting to your shooting setting, 'cause it's really a drag to go ahead and do an exposure of say, 10 or 15 minutes at ISO 12,800, don't forget to change it back, but you know, you're going to do it at some point and you're probably gonna do it more than once, I still do it, that said, high ISO testing really is a useful tool. So to summarize, high ISO testing allows you to quickly determine exposures in very low light levels by shooting a high ISO test shot, that is six stops more than your shooting exposure, it gives you a direct conversion from seconds to minutes, it also enables you to confirm your focus and find the corners and edges of your frames, so for example, you may find a tree branch, that's kind of sticking into one corner of the frame, that you can't really visually see, unless you do that high ISO test or you may find, you know, a piece of trash or a beer can on the ground, that you couldn't see in the dark, but it shows up in your high ISO test, so it's a good time saver basically is the main reason to do this, so again, seconds at your testing exposure equals minutes at your shooting exposure.
Class Materials
Bonus Materials with Purchase
Ratings and Reviews
user-1ff946
The classes are full of extremely important technical information that is delivered in a concise, clear manner. It is very difficult to grasp it all in one sitting. I have taken classes before in photography and I love the learning model with Creative Live .I can go back and review the information at my own pace and take notes as I go- I can even rewind and review if I miss something. This is a great collection of material and I would highly recommend purchasing the entire bundle - great job on the selection of fantastic teachers and putting together such a fabulous package on night photography.
Zorka
A tremendous amount of information crammed into one single course - it can be only done by CreativeLive! Along with having such a profound knowledge and skills in a particular field, Lance Keimig has an amazing teaching style as well - he is very clear, concise and thorough. I strongly recommend this set of classes to anyone who is interested to acquire some general (or expand their existing!) knowledge of astrophotography and night sky shooting. Last but not the least, I want to congratulate the CreativeLive for teaming up with an excellent instructor to create and deliver this STELLAR and production-wise very demanding course!