Lessons
Lesson Info
Setup Grid Structure
So with this in mind, we want to be able to go in and design our own dieline from scratch. So, if we go through and we have a concept that we'd like to begin to create, it's always good to sketch out what you want first. Draw it all out, get your measurements, and figure out how this is going to work. When I do something like this, I'm going to give a quick sketch and then I will build it really quick, I'll fold it all up, make sure everything works, and if I'm going to be sending this off to the printer, I'm gonna send my sketch to the printer, or the box maker to see how this is going to work. It's best to go through and label everything, what's gonna be your top, your inside flap, your side flaps, and get a really good sense of how this goes together because not everybody thinks well in three dimensions and what may look pretty simple to you gets kind of complex when you begin to think in your mind how this comes together and how this folds, so definitely go through and do a sketch ...
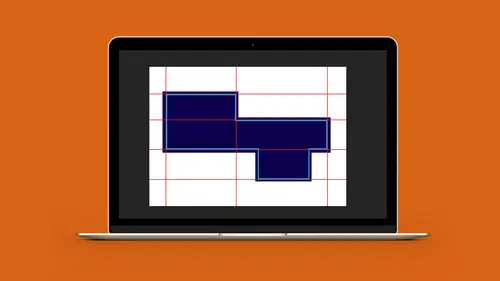
on what this is going to look like first. Fold it all out, it's amazing the things that when you look at and in the physical form you start to see it, what works in your mind may not work in 3D, or it may work perfectly. So, I wanted to do a nice little box right here, and I've got this square box that I was going to put some donuts in. So I had sketched it out, and I brought this into Illustrator to kind of give an idea of what we wanna do with this dieline. So I built it really quick, but one of the things that we're gonna show you is how we actually go in from the start and get a sense of how we're actually gonna build this file. So when you go in and you build the file, first of all you wanna make sure when you create a new file you wanna make sure that you're building it in the measurement system that you want. I like millimeters because everything's divided by 10, but not all measurements are given to you in millimeters, so if we start off with something, I'm gonna start off in inches, which is what we generally work with here, and when we create a new file, we go in, create our new file, and we're gonna set this up with multiple layers as we begin to build the content and the dieline here. Now, I wanna create a grid structure, and the grid structure is going to be set up so that I can very quickly and easily measure any shape that I need for any side or flap or fold on the box. And I'm going to go under my preferences and under the preferences, I'm gonna go and choose grids and guides and what I'd like to do is I would like to set up an underlying grid structure that I can build all my shapes to and have them snap into this. Now because we're using inches, what we have is, we're gonna have to go in, and we want to have a grid line every inch. And this can be a little bit confusing here, because so I want all my grid to be in one inch increments, but what I'd like to do is I'd like to have 16 subdivisions, because normally what we do with inches is we break them down into 16th of an inch increments. This is why I like millimeters and centimeters better because everything's divisible by and it makes life so much easier. But now we have inches. So what I'm going to have is I'm going to have a main grid line every inch, and then broken out into 16th of an inch measurements, so that anything that I build is going to snap right to that 16th of an inch measurement. I don't want to be kind of close, there is no kind of close when you're doing packaging, it either is the right size or it isn't the right size. 'Cause when you go and have your dieline made, dielines, the actual die cut itself, it's very expensive. And you don't wanna be tweaking after that, so this has to be done absolutely dead on. So, you can set up your guides, which you pull from your rulers, you can have any color that you want, you can also go in and you can create your grid structure and have any color that you want for your grid structure. So, grid lines every inch with 16 small subdivisions, and I click okay, and now we need to turn our grid structure on. So under the view menu, we're gonna go down and we're gonna show the grid. And this is the grid structure as we see it. I'm gonna zoom in here really close and you can see that each one of these squares is one inch and then subdivisions of 16th of an inch. So just to give you an idea of how this works, when I go in and I draw a shape here, and I put it into my grid structure, I can very easily go in and have it so that it's going to be one inch. Now you'll notice this is not quite exactly one inch, it's like .99, so once you set up your grid structure, the other thing that you absolutely wanna do is go under your view menu and you want to snap everything to the grid. And you want to snap everything to the grid so that you don't get this one inch square be dangerously close to one inch. It either is one inch or it isn't. By snapping to the grid, this will make absolutely sure that you snap to those increments without any issue whatsoever. Now, snapping to the grid, if I go in, and you can see how it snaps right to the grid, and when I draw that you can see that that box is exactly one inch by one inch. I didn't even have to think about it. If I want something that's gonna be three quarters of an inch, I can snap that down and it's three quarters of an inch right there. The only drawback with snapping to the grid is once you start putting your type or your logo and you wanna move it a little bit, that will always snap to the grid. So we can turn that on and turn that off, but for actually building the dieline itself, I am definitely gonna leave the snap to grid on, that way I know that it's gonna snap to the size that I want very quickly and no fussing around. Also when I move things around, and I want panels coming right up to each other, they are gonna snap right to each other, period. So that's a really good thing to have on there. I also have my transform panel up, which under the window menu you can call it up under transform. And we're gonna need this for a couple purposes, one of them is if we do scale things we want to make sure that if we do wanna scale our stroke around our object we can, if we wanna scale our corners we can as well, or we can turn this off. So my transform panel, for all my measurements and transform is definitely something that I want to have up there. Now, as you're working, sometimes this grid can be a little bit of an annoyance coming up, so you have your shortcut here which is Command ' and Command ' is going to turn on and turn off your grid. Even though the grid is turned off, whatever you do will still snap to the grid whether you see the grid or not. So, the turn on and turn off the grid is one function, and the other one is snap to the grid. I turn off the snap to point, because the snap to point is going to wanna go ahead and snap to the corners or the midsections of my objects, and I'm more concerned about it snapping to the grid rather than having a certain point meet another certain point in the middle of or at the edge of something. So the grid is going to dictate that as well. No snap to pixel because I'm not using the pixel based grid, I just want to snap to the grid that I've created. So Command ' or Shift Command ' Command ' turns on and turns off the grid, Shift Command ' turns on or turns off the snap to grid. So that's just a quick overview on how you would go in and set up the grid structure. If you're not gonna be using 16ths of an inch and everything's gonna be down to 8ths of an inch that's super simple to change, go into your preferences, go into your guides and grid, change it so that there's eight subdivisions instead of 16, everything comes out and when you're done, now everything snaps to an 8th of an inch, which is probably what you're going to use, but either way, very simple and very easy to make that change and dial it in exactly the way you want to. That way there is zero guesswork whatsoever. You size something and it always goes and snaps to the grid. Always, which makes it nice and handy.
Ratings and Reviews
Tomas Verver
Although I do not any Packging Design at the moment it's still a nice basic introduction course. As i love the teacher teachingstyle and a part of the subscruption it's a nice course. Atleast for beginners in this niche.
Kathleen Kamiya
This was my first technical class of how to create dielines in Illustrator. It was easy to understand and really helpful. The teacher is great! Thank you!
Pieter H
Great class!! Great teacher.
Student Work
Related Classes
Adobe Illustrator