Lessons
Lesson Info
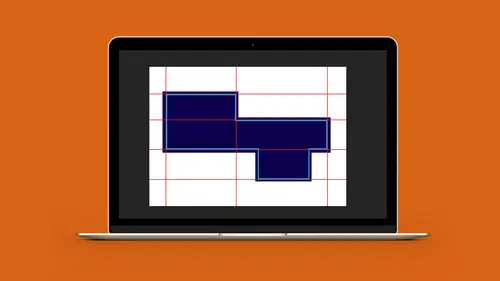
Working with Dielines
This is the dye line that I had created for this class and we're going to recreate it over here quite quickly. So under the view menu, I want to make sure that my show grid is turned on and in this case I've got my grid lines in red. And how I've set this up, cause I've set this up and I'm going to be making a six inch box and with this six inch box I've got some edges that are going to fold up here and these are one and an eighth inch high, and the box is basically a six inch square box. So as I go through and I build this, I've already got my mock-up that I've done and I'm going to go through and build this and you an see how quickly it is, how quickly you can actually go through and build this. So what I'm going to do is I'm going to start over here and I'm just going to create a new art board right there, and we're going to rebuild this file over here using this as my reference right here. So as I start over here, I always put my items on a layer, so this is going to be my new dye ...
line, and the reason why I do this is because I want to be able to isolate items so once I build my dye line I don't want to worry about anything else moving or getting touched once I'm done. I create the dye line on the layer and I'm finished. So as I go in, I'm going to start with my basic six inch box and you have two choices when you go in and draw. You could go in and use your transform panel and you could go in and snap to your guide right here. You have to get a little bit close so that you snap right to it. And you go to zoom in and zoom out when you do this. And then you can go and snap right to it using your tool hint, and there's one of my six inch panels, or what makes it quite easy is just simply take your tool and click. And when you click you can just call up the size that you want, use your tab key to bounce through the fields, and then click okay, and you're able to go in and get your boxes just like you want them to be, so either way. Once I go in and I create a shape and I need to use that shape, I copy and paste that shape or duplicate it all the time. And the reason why is because the more you draw the more you run the risk of having something off. Draw it the first time, confirm that it's the right size, duplicate, duplicate, duplicate. It's all good. Now, when it comes to actually indicating the dye line itself, what you want to do is you want to go in and you want to create an isolated color that is different from everything else that you're using in your dye line. I don't want this color to be any color that I'm using for printing. And the reason why is because when it comes to the processing of this file, we want to be able to just exclude this color from the output. So if I go in and I go into my swatch panel up here, and I select any of my shapes here, I want to go in and I want to be able to create a new color for my dye line. So I can create a new color swatch, and usually what I do for my dye line is I usually create a solid magenta, 100%. But what I do whenever I turn this into a spot color and I specifically name it what it is that I want it to be. So that when I go in here and I look at my spot colors, and I look at my swatches and it goes to the final process and these colors get separated out, we can very easily turn off this color and therefore turn off every occurrence of the place where this color is used. So I've called it a spot color here, and when I do that it comes up as this little dot right here, cause this is my spot color and there's my spot color for my dye line. The reason why I use a spot color is because then I can set this dye line to print on top or overprint over the top of things; if it knocks out, it will leave a white area where this color sits and then it's going to go ahead and leave a white area where I print this. Now here's something that happens, too. And the reason why I call it my transform panel is specifically to solve this problem. When I drew my container, my six inch panel that I was using for the top of my box, I had a stroke of one inch. But then I scaled it up to six inches cause the box that I drew was slightly smaller and it scaled up my stroke to be slightly over one point. I don't want to be dealing with odd units of measurement. I want everything to be exact, and what happened was in the transform panel, you have the ability to scale your strokes when you scale your box. This isn't something that I want in this case. I want to make sure every single thing is identical and clean, so I'm going to select my containers and I'm going to set this back to one point stroke and in the transform I'm going to turn off the scale stroke and effects because if I do resize my containers here, I do not want the stroke to get larger as the containers do and smaller as they get smaller. One other thing, when we apply a stroke to an object, and I'm going to zoom in really close here, you'll notice that the actual stroke of the object is going to be directly in the center of the object. Meaning that when I put the one point stroke on here I get a half a point of line on the outside and on the inside of that stroke. If I put a two point stroke, one point's on the outside, one point's on the inside. This actual edge of my stroke is what snaps to the grid, not the actual outside perimeter of the line itself, which is really important because if you have it this way, then your dye line's going to be exactly in the middle of that stroke, so we want to keep a nice thin stroke here, enough that we can see, nice and simple. So there are my two containers, my top and bottom flap, and I have a space in between, which is going to be one and an eighth inches. And you can go in and I can copy my box and I can actually put one in here. I can draw another one. I'm just going to go here to my rectangle. I'm going to simply click and I want the panel to be six inches wide and one and an eighth high. And then I click okay. Now you'll notice when I do this because the last measurement that I used was one point, that's what I get and I've moved this down and it snaps right into position, nice and easy. Beautiful, simple, everything's looking good. Now, if I want to confirm this, I can click on my panel, I can confirm the measurements right here. Up in the control bar, they don't give you the width and the height, especially with the size of my screen, if you're working at a laptop. You don't see the width and the height. It's actually farther over here, but in some screens you don't see that. Having the transform panel up there, really quite useful. So once I get my rectangle, I'm going to go through and I'm not going to draw this rectangle again. I've got exactly what I need, so I'm going to duplicate my content. So I'm going to hold down the option key, option click and drag, and I'm going to snap everything right to it. Now, when you're looking at the position here if you're zoomed way out, you have the ability to kind of jump in the sixteenth range cause it's gonna snap to everything. So here's a quick little trick. If you want to copy something and you want to copy something perfectly horizontal or vertical you hold down your option key and click and drag, but while you're dragging you have the ability to drag it left or right or up and down, but if you hold down your shift key, shift is going to constrain it and snap it right into position so that it's really difficult to get it out of line. The other thing is, because we're using a grid structure and we're using numbers, whole numbers here, I can look at my X and my Y measurements right here and I can actually see the positions of the center of my object here. And I'm not getting any of these weird numbers so I know that things aren't positioned in a weird area because I'm using my grid structure. I'm paying attention to all those measurements. And sure enough, six inches wide, one and an eighth inch high. So this is looking pretty good. Now I want to do my side flaps, so again I'm going to hold down my option key and click and drag. I want to rotate so when I rotate here I have the ability to rotate it anywhere. Again, hold down your shift key. If you don't hold down your shift key, you can get all these weird percentages. It does snap right to the grid once you get it there but just out of quick efficient steps, hold down your shift key and that way it's going to constrain zero, 45, or 90 degrees and you've got your side panel, which is awesome. You can also use your transform, right here. Use your quick rotate, done and good. I'm going to snap that to this and I'm going to zoom in just to make absolutely sure those are lining up, which they certainly are, and I'm going to option click and drag and duplicate the other panel as well, zoom in here and just to make absolutely sure I haven't overlapped it too far, I pull them apart and I snap it right back to it like so. Once I confirm that that is the right size I'm going to copy both of these. Select them both, and I'm going to drag them over here, snap those, and I'm going to zoom in as well and just make sure that I haven't overlapped those at all. And in place they go, so this coming together quite quickly, and you can see that there's my original that I had kind of sketched out. And I'm going to go in, I'm gonna put a flap on here. And in this case I can go in, and I'm going to use my existing rectangle right there and this flap is going to be three quarters of an inch high, so I can go right in my transform, and I can scale this. Now, one tricky thing. I don't know if you've ever paid attention to this little Rubik's cube right here which is your reference point. I'd like to very quickly go in here and just make this three quarter's of an inch. Sure I could go in and drag this, but if I go in and just make this .75, one thing that's going to happen is it's not going to keep it in place here. It's going to scale it based on my reference point. So the center of my object is going to be the middle and then it's going to go ahead and scale it from there. So if I say .75, you'll see that it scales it all down and it moves it up. So what I'm going to do is I'm going to unlink these so I can scale this separately. But in the reference point, I'm going to click on the bottom-most point, and I think of this as the anchor point. This is the point at which it scales, rotates, and transforms, so if I lock that bottom anchor point in and I change my height, and I unlink it from my width here so that only my height's going to change, and I type in the amount, it's going to anchor it on the bottom there and supposed to anchor it on the bottom there, that's where it's supposed to go. Supposed to anchor it on the bottom, so we can do it this way instead. There we go and we do it down here. Let's do it up here. There we go. So there's the width and the height, anchor it, did it in the wrong place of course, there we go. Now it works, yes. So, that's your anchor point. Makes it so much easier, as you go through, you can use these little tips and tricks. Now, I'd like to go in and angle the edge of the flaps right here, and I could go in and use my free transform tool, and with my free transform tool, I could use my free transform and use these little perspective and pull them in, but it gets a little tricky, so I'm just going to show you a great little trick on how you get angles exactly the same. I'm going to use my direct selection tool, and I'm going to select just this point which allows me to go in and move this point in or out. What I do is I grab that point and I'm just going to use my right arrow and the great thing is every time I click once, it snaps it in to the grid and I can go in and do one, two, three, four, five, so I move it in five points on the grid. I can then go over here, use the direct selection tool, select the corner, use my left arrow one, two, three, four, five, brings it in. Now I have perfect symmetry. If you can count, you can zoom in. This makes it so much easier. I've seen many dye lines where it's slightly off, and with using the grid structure it's really hard to, you know, not be able to snap it right to it, but then again, it sounds so easy, which is why you're watching this video. So there's my upper flap right there. And the the last little bits right here are these little flaps right here. Now, how do you know how to build these flaps? Well, this comes from experience. And when you put the box together, and you know how this works when you fold things up, the rounded corners help it slide against the substrate, and then this little point right in here allows it to come in and allows the secondary flap to kind of tuck in, okay. So we won't get into those logistics, but I'm going to show you how we build these little flaps here, pretty easy. So these little flaps are going to end up being right here and they're going to be the width of this, so I'm going to take my rectangle and this is going to be the area of the flap right there, and I just jump over here and I make sure that the width and the height are the same, and it's like yep, there it is. So I'm going to select this corner with my direct selection tool, and I'm going to use my corner widget to kind of draw this in and down to get a rounded angle. And when I do that, it rounds it very nicely. But you'll notice over here that this doesn't have quite, it's got kind of the angle and then the round, so not a problem. We're going to go back over here and what I'm going to do is I'm going to bring this down and I'm just going to use my down arrow key and it's going to snap to each unit of the grid and then when I do that, then I'm going to go round that. Now, when I do the radius here, I don't just drag it into some, you know, random radius here. I'm going to use my tool hand by my cursor and I round that. Now if you do get that and it's not quite exactly right when you're pulling it in there because sometimes it's hard to do that, this corner radius does not snap to the grid. That's one of the one weird things when you do this, it doesn't snap to the grid. So, when you're dealing with your corners, up here in the control bar, you can go and set that corner if you can't get that corner perfect just by dragging. So, nice to have. It would be nice to have those corners over here in the transform panel. Sometimes they are, sometimes they aren't, depending on how you use the corner widget. So, in this case we're just doing one corner. It's not a rectangle cause we've kind of tweaked it. So that's what happens, okay? But these measurements are there. You may have to dig for them a little bit. Next what I want to do is I want to come in and I need to just create a little bit of an area here for my flap to go ahead and have a little bit of capacity as this comes over and down, so I can just use my direct selection tool, pull that flap in there as well, and that's going to be enough that when it comes down, it's going to be able to have the width of these two fitting over there. A bit technical, but that's what we have. Once we know that this is all good, I'm going to zoom out and I'm going to select this shape. Hold down the option key, drag it over here, and I can always right click on my object, choose transform, and I want to reflect this object. And I'm going to reflect this object vertically. And I click okay, and it's going to flip it over right there. Then once I have both of these, again I'm not going to draw these again. I'm going to grab these, option click and drag, I'm holding down my shift key so that they stay perfectly in line, and with them together I'm going to right click again, choose transform, reflect, and I want to reflect them over the horizontal axis so they'll flip up to down. I click okay, and then I make sure that they snap into place, which is going to be here. There we go. And there's my basic dye line. And I also have a cutout in the middle here. And I'm going to have a rounded rectangle, so what I want to do is I want to find the center of my object. So I want to go in and I definitely want to have my smart guides on, so I can find the center of my object, and for some reason my smart guides are not working. But I'm going to draw from the center here and we're going to snap to this. So I'm going to draw my shape and I put my content in there, and I've drawn this shape, and I want to make sure that this is directly in the center of my object and my smart guides are supposed to show up here but for some reason they aren't, some uncommon thing where they work and sometimes or not. I want to make sure that this box is right in the center of my other box. While I can find the center of my lid by clicking on the lid, and go into my transform and if I use my reference point, I know that my center point is exactly here. That's my center point. If I click on this, and I put in that exact measurement here, based on the reference point, then I know that now this is exactly in the center of my shape. Using the measurements always work. I'm going to go in and corner widget these corners, too, and if I can't get it exactly right on there, you'll see if I'm doing the entire rectangle or square, this is where your corner widgets will show up. If you're doing just one in an odd shape, you don't see these corner widgets. So in my tool head, it said .51, but it's 5131 and I want to make sure my corner radius is exactly .5 on there. So there's my corner radius, and that's essentially my container, my box, right there, so it's looking good. Now we need to set this up for our live, our trim, our bleed and so on, and our fold lines here, so that was just part of it.
Ratings and Reviews
Tomas Verver
Although I do not any Packging Design at the moment it's still a nice basic introduction course. As i love the teacher teachingstyle and a part of the subscruption it's a nice course. Atleast for beginners in this niche.
Kathleen Kamiya
This was my first technical class of how to create dielines in Illustrator. It was easy to understand and really helpful. The teacher is great! Thank you!
Pieter H
Great class!! Great teacher.
Student Work
Related Classes
Adobe Illustrator