Lesson Info
19. Post Processing for Drone Photography
Lessons
Class Introduction
05:31 2How Dirk Got Started With Drones
19:43 3What is a Drone?
21:50 4Registering Your Drone
08:53 5Drone Terminology
05:03 6DJI Go App
04:22 7FAA Drone Rules
07:40 8Apps for Flying Drones
03:02Pre-flight: Drone Flight Checklist
07:05 10How to Fly Overview: Take off, Hover & Land
14:36 11Straight Line & The Simple Box
04:34 12The 180 & The Box With Yaw
05:17 13Drawing Shapes
12:50 14Q&A
11:40 15DJI Intelligent Flight Modes
15:32 16DJI Go App: Photo Settings
29:02 17Tips for Capturing Drone Photos
28:40 18Creating Panoramas
09:58 19Post Processing for Drone Photography
29:10 20DJI Go App: Video Settings
13:41 21Accessories
19:10 22Tips for Capturing Drone Video
06:01 23Camera Moves
10:23 24Post Processing For Videography
07:02 25Simple Color Correction For Footage
07:48 26Adding Music & SFX
09:48Lesson Info
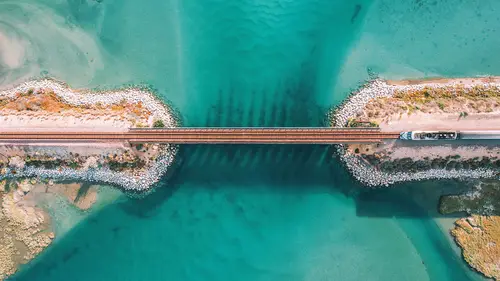
Post Processing for Drone Photography
Thought maybe what would be cool now is for us to maybe edit some photos. I'll just kind of walk you through some various scenes. I'll show you the couple things here. You see I'm playing with my leading lines, right? (laughing) Taking the viewer from the beginning, the foreground, all the way through to the sun where it's blowing out, and what I want to highlight here is, at certain angles, if you don't have a sun hood on your drone, you may get all those artifacts. Do you see all those like magenta artifacts? What I have to do in that case is, I just have to move over a little bit and change my angle. Something to be mindful of, if that's something that you, you know, you deal with a lot, you might want to get a little sun hood cover, like a hood for your lens. You can look that up, it's a third party, but you see here, this angle's changed. I no longer get those artifacts. And then here, this is me looking at the sun, and then this is me looking off to the side, so I'm just kind of ...
showing you, I'm looking at different angles. I'm twisting the drone around. This is the backside, so the sun is lighting this so I know that there's probably gonna be some good light here because the sun is lighting it, completely, and then this is kind of the shot that I liked, I like that second one, but I like this one too, because it leads your eyes through the photo, starting at the beginning and taking you all the way back to the image, so it's kind of how I approach it with, like, getting different angles. I'll show you how I might approach this, this shot I took, so this is the RAW. I tend to shoot my images just a little darker, just because I want to always just be careful that I'm not blowing out my highlights, if I'm not doing an AEB, right? So, I'm gonna switch over to my develop tab right here and what I'm going to do is, I'm just gonna brighten up the image first, and I usually walk in order through all these panels. That's kind of how I do my edit, so I'm gonna collapse all of these so we can just kind of focus, and my screen is a little bit more compressed so you guys can actually see the details of it, so I'm working in a little bit more cramped space, but it's not bad. Okay, so I've brung my exposure up a little bit cause I want to see what I'm working with, and because my personal style, and this may not be relevant to you, is to be a little bit warmer with my images, I always try to throw it into a cloudy setting to just get a little bit more warmth, and I'll see what that looks like. If I think it's too warm, I will cool it down a little bit with my temperature slider right here, but at this point, I'm really now going for getting a decent adjustment and then styling it as well. I want to have a little bit of a style to it. I will check my lens correction, to make sure that I don't have any crazy distortion, so I go to Lens Corrections, Profile, and Enable Profile Corrections, and in this dropdown, we select what our camera is, so mine's a DJI, and I'm using the model, the Phantom 4. So you can kind of see that it changed a little bit of the perspective, so my edges changed a little bit as well as the center. It's not so bulgy, if you will. So I'll leave that, if you don't, if you have another drone that's not DJI, you can always play with the distortions on your own by going into these settings. You can remove the vignette, or add a white vignette, and you can also go into the manual and you can play with your distortions here, so just a little side note. To reset any of these settings, I always double-click on the notch and it resets. So I'm happy with that. The next thing I might do is, I personally, because I love to play and explore, I don't pretend that I know exactly what this image is gonna look like. I have an idea of like, kind of the colors I want, but I like to play, and that's something I want to maybe encourage you to do, so I will literally, I like to go through and I like to play with my sliders, and I want to bring a little bit more contrast in. I want to see what happens if I play with my highlight. I'll bring my highlights down a little bit so I get some more detail over here in the yellow. I'll play with this shadow, and I want to pull the shadows down, because I want this area in here and here, all these dark areas, to look mysterious, like how tall are these trees? So I want to kind of remove the ground, if possible. My whites, again, this always just depends, do I want to pop my whites? Do I want to crush some of my blacks? If I do a quick before and after with my backslash, I can get a little bit of an idea of where I'm headed. I know in here, because of this first slider, Clarity is gonna give me some nice pop in these midtones, that I can play with this, and this really crisp it up, so this is always, it depends what your subject matter is. With a drone, you might want to play with clarity when you're shooting trees, because the camera doesn't always capture the detail of the tree great. There's a lot of detail in there. Think of all, like, the pine needles and all that stuff. So I tend to use the clarity to help me when I'm shooting trees. Vibrance, this helps me bring up areas that need a little bit of color, so right now, I'm looking in this area. This doesn't have a lot of yellow. This has a lot of yellow, but not these areas in here, so I'm gonna see what the vibrance does, and I can see my other yellows are getting a little too yellow, so I might then pull back the overall saturation just a little bit. Again, this varies from image to image. Next, I might play with my point curve. I can do this manually, by just moving these sliders. If I create something really weird like this, you can just click and double-click on it, and it deletes, or you can right-click and do flatten, but sometimes I come to this point curve and go to like medium contrast, and just see if there's a little bit of a pop. I think that's too dark, so I'll just undo that. And I think I'll save these next ones for another photo, so, let's go to my library and I'll go to maybe Crowsnest. So here you guys see the 16 by nine. It's a really skinny image cause I rotated it, so I shot it like that, and then I rotated it. I like to do a lot of verticals on Instagram because the screen's vertical, I love how it like takes up the frame of my phone. So I'll tend to shoot these vertical, and what I'm looking for in a shot like this is, how can I pop the water, and how can I contrast it with my trees over there on the green? So I want to create a nice contrast, so, I'm gonna go to Develop, and I'm gonna go to Cloudy, cause that's my personal preference. Do you guys already see the trees just changed in tone, and so did my water, that's an effect I personally like. You may not like that, but this is an effect I personally like. I'm gonna give myself a little bit more of exposure and already, you can see that that water's looking, you know, pretty interesting, right? So I might again just play real quick with my highlights, I kind of like this area in here, a little hotter, so I'm gonna kick that up a little bit. I'm gonna crush my shadows a little bit to make them a little darker. Maybe give it a little pop on the white, maybe crush it a little bit on the blacks. Clarity, I have some trees, so I might kick that up just a notch, I don't always use clarity. I definitely have colors, so I don't think I really need to play with my vibrance and saturation. I'm gonna skip the tonal curve, and I want to show you guys the HSL. It stands for hue, saturation, and luminance. This is where I tend to have fun trying to fine tweak my colors, so I have blue and green, obviously, but sometimes, like, I just like to see, is there anything that pops through with my red? Is there anything that pops through with my orange? Of course there's nothing in this scene. Is there anything that pops through with my yellow? I guess I have a little bit of yellow here, on this edge, so I'm gonna kick that all the way over to the orange. I have green for sure, so I'm looking at the green trees and if I go all the way to the right, I get all green, I want contrast. I want, I want some variety, so I'm gonna kick this over to this side and now I got some dark green, some light green, right, so I think that's kind of interesting. I'll then play with my aqua. That feels kind of flat to me. If I go to the left, though, that starts to feel like I'm like, I got some clear water, some really clear, like almost Hawaii water. I'm liking that, so I'm gonna leave that. I'll go to my blue, and then just see if I can kind of push this a little bit more to just get a real clear water look, so it looks interesting. I don't think I have any purple, so double-click on that, and I don't have any really magenta. So, that's looking pretty interesting to me. If I do the before and after, you can see that that water's changed quite significantly. Before, and after. So, that's how I start to walk through. I'm exploring, I'm playing, I kind of feel like, a little bit like a painter. I'm having fun with my colors. I'm trying to produce a style and a tone. Let me next show you how I'd approach this photo. Why, because I have some blown-out pixel here. I might be like, man, I totally messed up. I should have moved the drone over, or I should have exposed a little darker, so I'm gonna try to figure out what I would do for this situation. I would go to Cloudy, cause I want to warm it up, and already you can tell that I'm getting some interesting variety, I love colors, so I love that there's blue, green, I love these yellow things, and then green, so I already know that this is gonna have some nice color variation, and I'm just gonna kind of get my image right by getting the exposure right. I want to create some contrast. I'm gonna pull this highlight slider all the way over to see if I can recover some detail in here, and I can. Can you guys see that? So I was able to recover some detail, so I'm gonna leave that all the way over. I'll crush my shadows a little bit. I want to be careful not to really touch my whites because of this blown-out region in here, and then I'm gonna start to move down, and I showed you this setting, but let me show you another setting I like to play with. Under Camera Calibration, I like to come over here to the blue primary, and I generally like to mess with this and see what happens, so I'm just kicking it to the left, and do you guys see that I'm getting some orange now in here and this water's getting really blue? So that might be a little too much. Now it's purple, so I'm gonna kick it maybe like halfway between zero and where it's getting orangy. I'm liking that so far. I'm not gonna post an image this tall because Instagram needs to be a five by seven crop, so I'm gonna go up to my crop. I'm gonna change it from Original to a five by seven, cause I want to post it vertically, and now I'm gonna start figuring out what my crop is. I'll hold Shift, and this is a little to blown out for me so I'll include just a little bit here. I'll stretch it out, maybe a little bit. I don't want to draw your eye to it, but I'm not gonna shy away from including it. I might position it right there, hit Return, and now I'm starting to get somewhere. I'm gonna try warming up my image even more, and I love the blue and I love the orange, and that comes from my background in being a designer, the complimentary colors on the color wheel, so I'm really drawn to this color palette right there. The green up here, though, I think could use a little bit more green, so I could try playing with the sliders, or I could get this little notch, (laughing) this little tool right here, and I could go find a green, hover over it, and I could try pulling my greens back to the left or to the right, and try to get them to be a little bit more green so I'm just clicking, let go, and I might need a little boost for brightness, and I might roll with something like this. Is this interesting, is this helpful to you guys? Do you have any questions about any of the settings I've done so far? I have a few more images I can do. Yeah, great. Less of a question about the settings, Dirk, but more so as you're capturing these images with your drone, how focused are you squaring them up while you're flying, versus how comfortable do you feel fixing that perfectly square in post? Yeah, so I already know that I, I try to frame it up exactly how I want it, but I realize that, like, to be honest with you, in this situation, if I just reset all the settings, I knew that I wanted this part to be in the center, so I could have totally scooted over but visually, it feels like there's a hole there. I wanted that to be in the center, so me having the blown-out highlights is because the sun was cresting over the mountain, and I had no choice, so I already knew, I was like, well, I could reposition in post, so I kind of just rolled with it in that scenario, but I'm always trying to get it right, because I want to have the most amount of pixels I can, especially when I go to print. For Instagram, doesn't matter. For social media, these images are gonna be perfectly fine but when someone wants a print, you know, I might be in trouble cause it's not gonna be high res enough, so. Let me show you another image. Here's two images of a person, or two people in a kayak. I feel like this one's a little too high, like you can tell what it is, but I feel like I needed to be just a little bit closer, and I could have maybe even gone a little more close, but what I would do is I would select this one, because I feel like I need to have a little bit more detail in there, and I'm gonna go to my Develop tab up here, and the first thing I'm gonna do that I'm seeing that's off is I'm gonna go to my straighten tool, and I'll click on this ruler, and I'll just draw a line following the top of that canoe to the bottom, and it automatically adjusts it for me. I'll hit Return, should be a little more straight if I did it right. (laughs) My screen's super tiny, so forgive me. Maybe that, looks a little better. Again, I like to try Cloudy, see what that looks like. In this situation, it doesn't look that great. I don't want green water personally, so I might check Daylight, Auto, As Shot. I think my As Shot doesn't look too bad. So, in that scenario, I will leave it. I'm gonna darken my image just a tad. I don't want it too blown out. I feel like I'm pretty happy with all these, so I'm gonna go down to, my Camera Calibration, and I'm just gonna play with this, hue, and try to shift it over, I'll exaggerate this. Might be too much, but like right in here is getting interesting to me, and I'll tell you why, because this is orange, and now this has a greenish bluish tint to it, I know that's an interesting color combo, so I'm gonna maybe try to run with that a little bit more. I'm gonna take my little tool here and select whatever color this water is, and then just try to cool it up a little bit. It's still gonna be a greenish color, but I want to give it like a bluish tint, like that, and now I have a blue-orange combo, and to me, this feels like a really interesting color scheme, so I might leave it like this. I want to post it vertically. Again, if this is just for social, it won't matter too much, but if I was really thinking like I want to sell my prints, I should have then turned my drone sideways, to get it long this way if that makes sense to you guys, or if you have the Mavic, just switch it, the camera goes like that. Just something to be mindful of. For social, though, I'll be fine. I'm gonna switch my, I'm gonna switch this aspect to five-seven, and I'll scooch it in and it snaps to the five-seven longways, and then I'm gonna center this. Looks like I need to angle it to here, and then I have that image. That's how I approach something like that. This is kind of a processing question. So I was just wondering what your max setting is for your shutter speed if you're trying to do a long exposure, when you pull it up in post, let's say, some camera shake is introduced, so what's kind of your go-to if you have one? So, like, is the question how slow can I make that shutter? Yep, yes. So, I'm not a hundred percent sure, because I rarely will go past like, six seconds or something in there. The drone can be pretty stable, but if there's any wind, that's gonna mess up your long exposure pretty quick, so like a one second, you're probably fine. You start getting to three, now you're like, please let there be no wind up there, and there could be a little bit more wind up there that you're not feeling down here, so I've never really pushed it super long for that very reason. If I did have an issue, I would try playing a little bit with the sharpen or the clarity, but I'm gonna guess that I'm not gonna be too lucky with that. (laughs) Let me just show you, I went to the beach and I was snapping the pier before the sun came up, and I just want to show you some of the shots I captured just to show you the variety of how I fly around, so here, what I'm doing in this shot is, I'm looking to frame up that pier in the rule of thirds, so that's why I have that grid on, so I want this part of the pier to be like right close to that intersection. I'm not always, it's not like I have to perfectly line it up, I'm just it using as a reference, but if I was really specific, I could go to my crop tool, I could hold Shift, and I could like nail that right on there, like that. But I was flying around, trying to find a good angle. The sun came up, so I went a little higher cause it was like, oh, I think there's gonna be shadows. You guys see the shadow starting to come through? But then I was like, ah, that might be too high, so I came back down. (laughs) And then I thought it was really interesting here, I thought like how the light is hitting the whitewash right here, was pretty interesting, and then I thought, oh man, the sun's gonna be poking through and they'll get some interesting light here, so I'm just moving around, and I'm now profile with the pier almost, I was high, I got up higher, I could see more of the shadows, or the light beaming through, right, so I'm just exploring the scene. I'm, like, trying to find something that tells an interesting story, and here it might be like, oh, leading lines, right? This might be part of what's interesting to me, but then it's also, too, like, well, what does it look like without the sun, right? And using the pier just as a leading line, and you see here I cropped the horizon, so I tilted my camera to not show the horizon. My angle's a little more oblique, right? Opposed to just looking straight out, and then here I'm like, okay, what if I really barely show any of the pier, but I show a little more of the sky, right, now I got, I get a bit sense of vastness, right, so totally different feeling, and then it's like, well, what if I look down, (laughing) right, what if I just look down on this? It's like, what's in the middle of the water, right? Or what if I look down at the end of the pier? So all these have something interesting about it. To me, I, besides like these rays, I think these are pretty cool, I'll just do an edit on this to show you how I might approach this. I would probably clean up some of the junk in here, so like there's like a post here, so I'd either do that in Photoshop, or I'd try to do it by hitting Q and the left bracket to shrink down my brush, and like do a quick paint, and let it clone that part of the image, hit Q again to see if it blended well, looks pretty good. If I have to, if I can save a step of going over to Photoshop, and stay in Lightroom as much as possible, I love that, because I'd rather top something off in Photoshop than do like the main stuff, back and forth, saving multiple files. Keeping track of all that's frustrating. So I'd clean up the beach a little bit, and then what I would do is I would check out, what's my frame cloudy look like? It's like, ooh, that sand is orange. That water now is starting to contrast with the sand, I know I have something a little more interesting in my opinion, so I might play with my exposure a little bit. I might actually come straight down here to my blue and just see what I get, and now my sand is getting a little more red, a little orange, so I know that if I start to warm this up, that sand's gonna get even warmer, you guys see that? And then, you know, this water is a little green, so I might try to see if I can bring some blue in. Now I got some blue, and I'm getting to my color palette. Again, everyone's different. This is like my style, this is what I, I love this color combo. So I might roll with this, and again, I'm just playing with these sliders here. I can try to pull some more orange or yellow in. I think that, let me show you this, like right in here, there's some orange between the water and the sand, so I might try to exaggerate that a little bit more, I'm just trying to create contrast. And what's neat is, there's a bird here so I might try to incorporate how to, how this fits into the story, so I'll go to my five by seven cause I love posting vertical right now. It defaults to a horizontal five by seven. I want a vertical, so all I have to do is keep squishing it in. Well, I should have been able to, let's see. Oh, by the corner, and then you see it flipped, and then now I might see like, okay, symmetry, how does that look? Probably need to straighten this a little bit. Looks like I need to do a little bit of a lens correction, because that center, did you see the center was a little bulgy? I'm gonna show you guys that again. So I'm fixing that distortion, and what's interesting to me is, I still have the bird. I would then probably play with like, do I have the pier on one line, one rule of third and the bird on another? Hit Return, hit F, and like look at it big. Hit Escape. It's like, (groans) I'm losing the shadows though over here, so I might try this, it's like these shadows are cool. What I might do in Photoshop is go burn in those shadows even more to make them a little more pronounced, but then it's like, ah, I'm losing the bird, so then I might be like, can I get the best of both? I get a little shadow, I get the bird, and then I can make a comment about the bird. Now there's something for people to look for in my image, right, it's like, see if you find the bird, right? So I might approach this photo with this and if I like this edit, I'll do Shift + Command + C. I'll copy everything except the crop, so you can check all or you can check none, or you can go through and just check the things you want. I'll select all except these two, and I'll go over here and then hit Shift + Command + V and paste it, and then see if I like that. And also kind of roll through these and see if these are good edits for these photos. Then ply it that way. All right. Hey, Kenna. (laughs) Hey, Dirk. How're we looking? Good, let me check in and see if there's any more questions here, sure. I was hoping you could talk, Dirk, a little bit about kind of every time you get your drone out, it seems like now at this point in your career, in my imagination, you may get your drone up, and no matter what the subject is, have a pretty similar routine. Yeah. I was hoping you could maybe speak as how that developed and just kind of talk on that a little bit as to what you do, like, each and every time, or if that's something you do. No, that's great. I think this could be a good thing, and I think it could be a bad thing, so a good thing is, I love leading lines. I love symmetry, I love looking down, I call it the top down. I love cropping off the horizon, because a lot of people keep it, so, in those regards, like I'm trying to be different, but then if that's all I'm doing, then that can be, it can kind of get robotic, so I have to kind of watch that, but those are definitely things I love, the things that I talked to you guys about today, the leading lines, the playing with scale, those are all things I'm immediately drawn to, so when I take my drone up, I'm always, my first thing is, I think about the light, and then I think about, what's my subject, is it a car, a boat, a road, a person, a tree, right? Find that, get some shots, then it's like, okay, is there any interesting leading lines? Leading to a subject, just a cool road, the way we came in, something like that, and then I'm kind of looking for, all right, are there any possible stories I can construct? Oh, that kayaker, he's alone. If I wait til he gets a little bit more into the center of the lake, I could totally crop it so you don't see the coast. Now it looks like he's in the middle of nowhere, so I start kind of running through those things, so I definitely have my checklist, but I'm also open to like, what's the scene? What's gonna unfold? And that's one of the things that I think is like really interesting about being open to, these are all just starting points. It's have a starting point, but like see what's gonna happen because there may be something that comes in the frame and you might have missed it, like we were filming for the Photo Week class, we heard a train, and I remember my producer, Sarah, is like, there's a train, right, and so I was like, stop what we're filming, sport mode, and just jet over there and it's like, I have no idea where it's coming from, how fast it's going, but there's a cool subject, right? Mix it up, and we're open, right? So, yeah, great question. Just backing up a little technical question. When you have on the drone the AEB setting and you're shooting three or five, what is the exposure value difference in each of those shots, is it one stop each, or? It might be two, yeah, I should know that, but I don't know off the top of my head, but it's one or two, I'm not sure. I do know that people wish it was, you could adjust it even higher, so it feels like it's not enough. I think that's why I default to the five, so it may be the one. (laughs) Yeah. All right, oh, we have one more in the back. Are you shooting photos and videos at the same time? Yeah. (laughs) Man, the bounce back, the back and forth. That's where I really have to figure out, what is my, what am I trying to do? Do I want a still image, do I want video? Believe it or not, I default to still images and I know most people are defaulting to video. My background's in video, so I got really into photography so I tend to default to stills, but I know a lot of people, their background's photography and they're getting to video, so it might be different for you, but whatever it is, I try to get both, so if I'm focusing on photos, I get my shots and then I'm like, oh, get footage, I might need it later, stock, a demo reel, something. Get footage, and I'll go do some moves, and try to see if I can tell some of those stories through movement, as well, yeah. It's great, but I'm always bouncing back and forth because there's been so many locations, like in Iceland, I didn't shoot enough video, and it's like, how often do I go to Iceland, you know? And then now, Iceland's getting locked down, with no drone zones, it's like, (groans) right? So, you can't have it both ways exactly, but I try to balance it.
Ratings and Reviews
MARGARET NICOSIA
Dirk really did a nice job taking new students thru exercises to gain confidence. The work in Lightroom and Photoshop was helpful, but I wish more time could have been focused on flying or tips. Dirk has presets that he offers. It would have been helpful to see the results using those presets. Looking forward to the free which Drone to buy class and the advanced class
JBPhotoDesign
I definitely recommend this course if you are thinking about getting into drone photography looking for the fundamentals. I now feel pretty confident I can get started and that my learning curve will be greatly shortened thanks to the technology available today and a great roadmap of getting started. If you are already started... follow up with his advanced topics... I know I will.
MikeD
Super class. As a beginner I had little idea what to expect and never got started because of all the talk of people crashing drones right and left and losing a fortune. Dallas made it seem simple. So I bought a Tello beginners drone (great starter by the way), got hooked and am now flying a DJI Mavic Pro 2 and studying for a commercial license. Not sure, this is a great class to start with.