Lessons
Class Introduction
01:02 2Understanding the Night Sky
08:18 3Planning Your Shoot
03:05 4Scouting Your Location
08:47 5Gear Essentials
08:44 6Camera Settings
08:51 7Astro Landscape Composition
08:50 8Light Painting
01:28Time Lapse
13:25 10Photographing the Moon
05:30 11Photographing the Aurora
04:05 12Photographing Meteor Showers
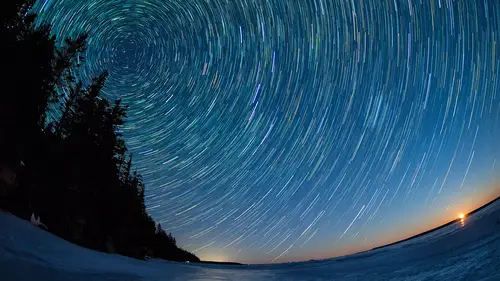
04:08 13Star Trails
07:04 14Capturing Panoramas
03:50 15Shooting Multiple Images for Stacking
05:36 16Getting Creative
04:56 17Post-Processing - Astro Landscape
06:23 18Post-Processing - Stacking
10:22 19Post-Processing - Light Painting
06:22 20Post-Processing - Cloudy Skies
11:59Lesson Info
Camera Settings
Now let's look at some of the basic camera settings involved in astro landscape photography. First thing is you've gotta be shooting in fully manual. If it's got a prefix auto on it, turn that off, so there's no auto-focusing, no auto-exposure, no automatic modes, none of that. Next thing, make sure that you're shooting in RAW. Some people like to shoot RAW and JPEG. I don't, I want, you know, the full latitude from my processing later that I can possibly get. And the only way to do that is by shooting a RAW image. Next thing I'll look at is white balance. Now if you're shooting in RAW, of course you can adjust your white balance in post, but you also wanna make sure that the image that you see on the viewfinder is as close to what that night sky's actually gonna look like as possible. And so the easiest way to change the white balance is to choose something like Tungsten or incandescent. That would be one of those standard white balance settings that you can choose. I don't use those,...
I choose a custom white balance. On the EM1X, it's really easy to select a custom white balance, and I usually aim for between 3400 to 3800 Kelvin. That gives me enough of a blue sky without overdoing the blues in space. I still want space to look black, and I also don't wanna start clipping some of the colors. If you choose auto white balance, you may end up clipping some of the red spectrum because your image is going to turn quite an orange-y color, it'll be overly warm if you choose auto. So I set a custom white balance. Probably one of the hardest things to do out in the field at night is to focus, and you can't use auto-focusing, so you have to be shooting manually, and you should be setting it to infinity, which can be a challenge to do at night because it's difficult to see anything through the viewfinder once we're past the astronomical twilight. Coupla tools that are built into this camera that are quite useful, once I've set it to manual, I've got some manual focus assist features that really help out. The instant I turn the manual focusing ring, it'll magnify the image on my viewfinder wherever I put that focus point, that section of the sky will be enlarged. So, you know, Jupiter that's beginning to show over my shoulder, I might focus on that. It's nice and bright, I'll see that clearly. But to really nail the focus, I also turn on focus peaking. What this does is it creates a colored halo around all of the areas of contrast that you can see, and when that halo gets really sharp, it'll start off being fairly blurry and then it'll sharpen and get very well-defined edges. When you see those nice defined edges and those pinpoints of light are as small as you can make them, that's when you're nice and sharply focused. Some people might focus during the day, that's another technique that you can use. Come out while it's still daylight, choose a spot that's way off into the distance, a mountaintop, for example, and focus manually and then to ensure that you don't move that focusing ring, add some gaffer's tape on it so that that focusing ring is locked. All right? I don't do that because focusing is fairly easy with this camera, but that's a technique that a lot of people use. All right? The other thing is, don't trust the infinity symbol on your camera lens. Sometimes they're right, and sometimes they're not. With lenses that do a lot of auto-focusing, that infinity marker can actually shift and you may find that, when it's set at infinity it's actually not perfectly focused. The other thing that you might wanna do, especially if you're just starting with astro photography, is make sure your noise reduction is set to on. What that does is it creates a second exposure, called a dark frame, after your initial exposure. So if you've got a 20 second exposure, camera is finished with that, the shutter is closed, it will actually run a second exposure but you won't see anything. And after that exposure time is over, it will subtract any of the noise that has been created over that longer exposure from your original one and you'll get a much cleaner image. So leaving noise reduction on is a good strategy. Now let's have look at the actual exposure triangle. Let's start with shutter speed. You can go as fast as you want, but of course, if it's too fast, you're not gonna gather enough light. But if you go too slowly, you're gonna start getting star trails, you're gonna start getting blurry stars. There's a lot of things we can control in our lives as a photographer with regards to a shot, but the one thing you cannot control is the rotation of the Earth, none of us have that super power. And so you wanna make sure that your shutter is open just long enough to capture the stars but not so long that they begin to move. It's actually us that's doing the moving. 'Cause if it's open too long, you'll get these star trails. There's a fairly simple formula that you can use to calculate it. It's called the 500 Rule. But it basically works like this. Take the true focal length of whatever lens you've got on, all right, and divide it into 500, and whatever number you get, that's the maximum shutter speed you can use in order to make sure that those stars are pinpoints of light. All right? By true focal length, I mean relative to the old 35mm film, right, or full frame cameras. I'm shooting with a micro four third sensor. It's got a two times crop factor. This is a 12mm lens on the camera. So I take that 12, multiply it by the two times crop factor, that's 24, divide 24 into 500, and you get 20 point eight. I know that because I've done it before, I'm not a super computer. But now I know that 20 seconds, I'll round it down, 20 seconds is the maximum shutter speed that I can use in order to make sure that those star trails, or the star points are sharp. If you zoom right into your image afterwards and you find that there are a few little blurs, you can try the 400 factor and with this lens then I'd get around and I will sometimes use 15 as well. It often depends on what the final purpose is of your image. If you're just going to put it on Instagram on a tiny little screen, you could have a much longer shutter speed because people wouldn't notice that, but if your end goal is to print them, you wanna have those stars as sharp as possible. With regards to aperture, generally speaking, as wide as you can make it. I have two point eight. If that's the widest, in this lens it's F/2.0, I've got a lens that'll go to F/1.2, if I had that 17mm lens on here, that's what I would be shooting. If you need to stop down to make them sharper, a few test shots should be able to show you that. But generally speaking, the rule is, wide open. So with those two points covered, once you know what they are, you don't change those, but keep in mind that with the shutter speed it very much is about what lens that you've got on there. If I change lenses, then I might have to recalculate. So shutter speed isn't gonna change with this lens combo, aperture's not gonna change, there's only one thing left to change and that's your ISO. And in order to create a good exposure, we're definitely in the realm of higher ISOs. Probably the minimum you would ever use for a night like tonight would be 1600. Even that might be too dark with some lenses or in some settings. 3200 is perhaps a little bit more reasonable. With this camera, that's usually where I start. I'll start at 3200 ISO but I regularly go up to 6400 ISO with very good results, right? So those are the basic camera settings that you would use, and once I've got those, I don't even program them in every time I go out. I've already recorded them as one of my custom sets, one of my custom presets, so I know that when I wanna shoot astro, all I do is turn it to C four, and those settings are already plugged in for this lens 'cause this is the lens that I use the most. If I wanted to switch lenses, I would have to make couple of adjustments. So there you have it. Those are the basic settings that you can use with any camera to get you started shooting the night sky.
Ratings and Reviews
Lana Froemming
I purchased the Creative Live + Olympus Step Outside Conference Bundle some time ago, and it has taken me this long (too long) to view the astrophotography class. Although not a beginner, I have been using Olympus gear (EPL5 & EM1) for about 7 years now, I have only dabbled in astrophotography – and as a result, blown my fair share of what should have been killer shots. When I did give it a go, I obtained most of my settings’ tips by combing through Peter’s blog posts and then racing out the door. Although I feel that I know my camera pretty well I still learned so much from this course. I appreciate that he walked the viewer through multiple night time photography events including shooting the milky way, the moon, aurora, meteor showers & star trails as well as talked about the different camera features including night sky panoramas, in-camera multiple exposures, live comp & time lapse and presented a variety of lens choices and why (plus so much more). What I love about Creative Live is that once you purchase a “class” you own it and can return to your classroom over, and over again. I also appreciate that they work with experts who are also amazing teachers. Peter is one of those.
Doug Marshall
Some classes are just fantastic and this is one of them! Peter Baumgarten is a wonderful presenter of his extensive knowledge, experience and passion for the subject. This is a course I will return to watch again and again. Highly recommended if you are like me and are interested in getting into astrophotography and landscape.
elizabeth chambers
To my way of thinking this was the best photographic genre instructor featured during the Olympus Step Outside series. He may be a more seasoned instructor than the photographers demonstrating landscape and bird photography. Whatever the reason, I thought he seemed to understand his audience particularly well. Great advice and the post processing was interesting. Likely because of my familiarity with Lightroom, I found the post production done by the bird and landscape photographers rather mundane whereas the astro photography post production was new and interesting to me.