Shooting Multiple Images for Stacking
Lesson 15 from: Beginner's Guide to Astro Landscape PhotographyPeter Baumgarten
Shooting Multiple Images for Stacking
Lesson 15 from: Beginner's Guide to Astro Landscape PhotographyPeter Baumgarten
Lessons
Class Introduction
01:02 2Understanding the Night Sky
08:18 3Planning Your Shoot
03:05 4Scouting Your Location
08:47 5Gear Essentials
08:44 6Camera Settings
08:51 7Astro Landscape Composition
08:50 8Light Painting
01:28Time Lapse
13:25 10Photographing the Moon
05:30 11Photographing the Aurora
04:05 12Photographing Meteor Showers
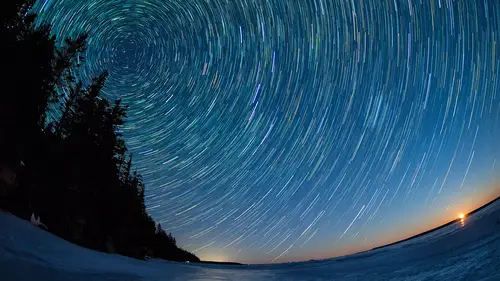
04:08 13Star Trails
07:04 14Capturing Panoramas
03:50 15Shooting Multiple Images for Stacking
05:36 16Getting Creative
04:56 17Post-Processing - Astro Landscape
06:23 18Post-Processing - Stacking
10:22 19Post-Processing - Light Painting
06:22 20Post-Processing - Cloudy Skies
11:59Lesson Info
Shooting Multiple Images for Stacking
Night has hit, it's still fairly early, so I've adjusted my composition from previously, and I've moved the camera a little over to the right. The Milky Way is definitely up, we can see it quite clearly and I'm ready to start delving into some astro-landscape shooting. So I've got the camera set up here. Just very quickly wanna go over the settings that I've got. So I've got an ISO 2000, still got my custom white balance of 3600, shooting in manual, raw, got my cable release ready to go and let's take that first shot. So, we're gonna have to kill the video light. All right, let's have a look. There's the Milky Way, comin' right down in between those two rocks. What you might notice is that we've got a fair amount of glow on the horizon and that's because we're in a class 4 Bortle. What the heck is that? Well, it's a rating system created by a guy whose last name was Bortle where it goes from one to nine, nine being the brightest urban setting that you can imagine. So let's say you're i...
n Downtown Los Angeles, that would be a class nine. If you were in wilderness with no lights anywhere around, that would be class 1. Rural areas are class two and three and, because we do have some city lights off in the distance, this is considered a class four. So you should definitely be aware of that rating system. So I'm happy with that shot. What I'd like to do now is keep this composition but begin actually taking a number of shots, and I'm gonna stack these later. One of the reasons for doing that is so that I can reduce the amount of noise. I can take ten or fifteen different shots and, in post, stack those on top of each other. You can do it in Photoshop or in third party software such as Starry Landscape Stacker or Sequator for Windows and that will help to reduce any kind of digital noise. It doesn't matter what camera you're shooting with, doesn't matter how large your sensor is, you're going to get some fixed pattern noise, it's just the nature of the beast when you're doing long-exposures and we can eliminate some of that, actually a fair amount of that, by stacking our images. And so, we'll run through a sequence of those. Now, rather than just take one shot after the other, I can actually create a custom time-delay here in the menu. So I'm gonna go to the super control panel. I'm shooting in a single shot mode right now, and I'm gonna go to the custom timer and I'm gonna press the info button so that I can create a set of times. It's kind of like a mini time-lapse and I'm gonna move over to the number of frames, I'm gonna go up to ten, whoops, there we go. I'm gonna have ten shots, all right. There's going to be a half a second between each one and now, when I press the shutter release, it's going to take ten shots in a row and I can just sorta stand back and watch it and that's a really convenient way of doing stacking. And then afterwards, I get those ten raw images and I can post-process those. So, we're gonna have to kill those video lights again and do a sequence of ten shots. So, just finished shooting that sequence of shots. We started with a single shot, and iF you're starting into astro-landscape photography, then that is a great place to start. Rely on the camera's noise reduction to get rid of that noise. If you feel so inclined and you wanna, you know, bump it up a little bit, you can stack a variety of images. So in this case, I've taken ten shots of the same scene and, of course, during that sequence, the Milky Way was moving. Well, in post, which we'll talk about later, all of those will be put together, the computer will shift the sky so that all of those stars are on top of each other and all that extra noise is gone. So we'll talk about that later in post. There are other ways of dealing with noise. So I've left the noise reduction on here, in between my shots, so I've got a fairly short shutter speed, so I'm not worried about that. But you can turn off your noise reduction, shoot all ten of those shots one after the other, without that gap in between. But then you have to make sure that you shoot a dark frame. And so the final shot, you put your lens cap back on your lens, you don't change any of the settings, and you take one image of, basically nothing, and what the camera is doing is it's taking a photograph of darkness but also creating the same digital noise that was in all of your other shots. And then, in Photoshop, you can take that, add it as a layer to your stack of images and subtract that noise from each image. You can do it with just one or you can do it with a stack of them. And that's another way of dealing with noise that will shorten the amount of time you're actually shooting. All right, so we'll look at that in post, later.
Ratings and Reviews
Lana Froemming
I purchased the Creative Live + Olympus Step Outside Conference Bundle some time ago, and it has taken me this long (too long) to view the astrophotography class. Although not a beginner, I have been using Olympus gear (EPL5 & EM1) for about 7 years now, I have only dabbled in astrophotography – and as a result, blown my fair share of what should have been killer shots. When I did give it a go, I obtained most of my settings’ tips by combing through Peter’s blog posts and then racing out the door. Although I feel that I know my camera pretty well I still learned so much from this course. I appreciate that he walked the viewer through multiple night time photography events including shooting the milky way, the moon, aurora, meteor showers & star trails as well as talked about the different camera features including night sky panoramas, in-camera multiple exposures, live comp & time lapse and presented a variety of lens choices and why (plus so much more). What I love about Creative Live is that once you purchase a “class” you own it and can return to your classroom over, and over again. I also appreciate that they work with experts who are also amazing teachers. Peter is one of those.
Doug Marshall
Some classes are just fantastic and this is one of them! Peter Baumgarten is a wonderful presenter of his extensive knowledge, experience and passion for the subject. This is a course I will return to watch again and again. Highly recommended if you are like me and are interested in getting into astrophotography and landscape.
elizabeth chambers
To my way of thinking this was the best photographic genre instructor featured during the Olympus Step Outside series. He may be a more seasoned instructor than the photographers demonstrating landscape and bird photography. Whatever the reason, I thought he seemed to understand his audience particularly well. Great advice and the post processing was interesting. Likely because of my familiarity with Lightroom, I found the post production done by the bird and landscape photographers rather mundane whereas the astro photography post production was new and interesting to me.