Lessons
Lesson Info
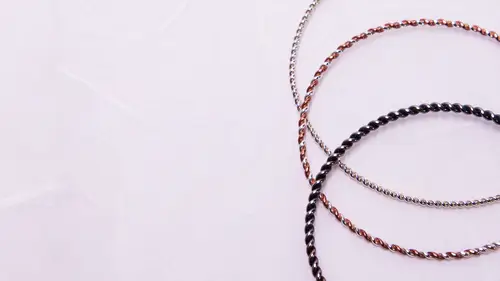
Shaping the Bangles
We are going to do the bangles so the bangles I like tio you can do large or small, you know there's a general range of what you're going to work with here and about nineteen and a half centimeters makes a bangle that is, um a small on the smaller side but will work when a measure that out from this twisted wire that I've got here nineteen and a half so fifteen and so I've got my length and then start to just use my hands and fold it bend it together. So what I'm going to show is how to melt I like to melt these together sometimes make this moment where it comes together just by melting the metal together, refusing it together so I'm twisting I'm bending it around that worrying about the shape of it until it comes together and overlaps a tiny bit like this and then I'm going to come over here and melt this together, prop it up so I make sure they're touching that the tension is so that they're touching and they're not there's no space in between them, a little bit of an overlap and a f...
igure flame I'll just even this flame there's a range with the each within each torch tip that works I'm getting a bit of a bigger flame that I used for hey, um flux it up a little bit bigger torch that I use flame than a use for the year wires and I would start heating up away from where I'm going to be melting this together the flux starts the bubble off all the water and the flock starts to dry up when the stars to get hot enough I'm on purpose whose melting it together so let's see okay I'm gonna turn this off and go so it started melting and they were not close enough together so I'm just gonna I have two of these so the best thing I could do at this point is to quench it a little bit and then start reworking it with my hands you're trying to put together how closely do they need to touch your overlap or you just they definitely have to touch otherwise it kind of does is it just you know they're touching and they want overlap a little bit so it can melt down together so there's no there's no real precision in this technique it's just an overlap like an x like this little bit those pieces that overlap then melt down together there's no can't really give you the kid needs to be three millimeters of overlap or anything like that is just it's just a an estimation no loving sense ok someone heat up again focus and there and the other thing to know here is that copper doesn't like to melt the same as silver silver melts beautifully so if you do this with all silver it just wants to melt down like that really nice copper is a little bit more stubborn ana let that sit for a little while it has a little sharp spot you can always file that off in the end if need be if it doesn't just melt down to like a moment that um you know it's all soft so let that be for a second then quench it and put it into the pickle too clean as well so clean up that flux that will take the flux off and clean up the oxidation and then you're left with a piece like this was a strange shape it's an odd shape but it's altogether so from this place we're gonna hammer it into shape and you take a bracelet mandrell now I like the oval because that's the natural shape of the hand I mean you can have a smaller bangle and still fit it over your hand so it's you know it's up to you in the preference that you want where you want to wear it if you like a big bangle and you wanted to be down lower up high but I like the oval mandrell toe work with an oval shape in a place that intothe okay because that device get a good grip on the vice this make sure it's all really tight don't take these off so I would say if you're setting up your home studio, you might want to have your vice so it's not more on the edge, and you can move this a little bit more freer, getting it tight. You can always use a mallet to help get it tighter, too, all right? And so then I'm going to take the bangle and I want to place it over the mandrell and I'm going to use first, just a rawhide mallet it's not going to mar up the medal in, smash it in any kind of way, but it's going to help shape it. So the thing about the that this kind of mandrell is that you it's not round, you can't just keep rotating it once you start to shape that, you can flip it upside down and side to side. Do you want to keep it in the same place? Thiss going here too? Okay, giving it a gentle tab until it's starting to get into shape you can see is kicking up a little bit here. So that's the place where I would focus next writers you gordon done some hand shaping. So why were there now using the tool as well? Say that again it seemed that you'd already done some hand shaped oh yeah you do the hand shaping so the ends of the mellow can come together but you're not focusing on making a nice shape you're just bringing ends together you're not worrying about if it's round or if it's kinked or not you're just getting the ends together so that they meet and you can go in soller refuse and melt the ends together and becomes one is much easier to shape once the pieces continuous thank you and if it's kinked too this way can lay it on a bench block like this and give it a gentle tap so that it's flat in this plane as well, okay? And then you can just flip it up all right, ok iisten to any kneeling for this particular culture I didn't now you'll find that when you start heating it up, it softens and it's nice to then hammer it a little bit more afterwards and it work hardens it again. But you know if you're finding that the medals too stiff and you can't bend it together comfortably or something like that, you can go over and you can heat up the metal till it sort of relaxes and you can watch, especially with wire the metal relax if it's got a kink in is a pie, it will relax and soften and then you can start reworking with it again. And essentially, the materials are going from being really tight, like, on a molecular structure. They're going really tight and just like all in different directions and taking balled up to just like an easy wave and soft kind of molecular structure when your heating it up. Okay, we've got a lot more to do in a short period of time. So I'm going to move on. But that's, the basic for a bangle. You can do that with twisted wire of different materials and all that.
Class Materials
bonus material with purchase
Ratings and Reviews
Beth Soll
Raissa's work and explanations here are wonderful. 5 Star quality! I am a beginning jewelry student but I have many of the items on her list because I decided to go further with this. She also tells you how to use other tools if you don't have them (i.e. Dremel or even hand-held to twist instead of a flex shaft for twisting the wire)! The dude that wrote that beginners don't have the tools must be joking. There are things you can do ahead of time to prepare yourself if you want to get serious. For example, I previewed this class so I would be ready and got a few things. I will eventually own everything on her list. I'm so glad you included her as a teacher. More please!!
Luminary Organics
This is a fantastic class for a beginning jewelry maker. Raissa is a wonderful teacher. She explains what she is doing as she does it and takes her time to make sure the student understands why she is doing each step. I have watched this class twice so far. The first time I made three different twisted wire pieces for bracelets. The second time through, I made two bracelets and three rings! Thank you CreativeLive for bringing Raissa Bump to your platform!
Nadja Meyer
Good starting point if you have never done any Jewelry at all before