Assembling the Bouquet
Lesson 6 from: Boutonnieres & Attendant BouquetsFullosophie, Christina Stembel, Rhiannon Smith
Assembling the Bouquet
Lesson 6 from: Boutonnieres & Attendant BouquetsFullosophie, Christina Stembel, Rhiannon Smith
Lesson Info
6. Assembling the Bouquet
Lessons
Lesson Info
Assembling the Bouquet
So I'm just putting some of my flowers together to show you how to make an attendant bouquet um, but before we start putting it together, I just want to show you some key hand positions that you have to get familiar with when you're making a bouquet um, all of the flowers that you used to have to insert them at a angle in your hand and then you're going to be twisting and turning your hand kind of like you're opening a jar so that's really important to get comfortable with those hand motions, so inserting an angle and then twisting and turning the flowers like you're opening a jar um and it's not going to be easy at first, the great thing about this is that you don't have to cut the flowers until you're happy with how the bouquet looks, so you, khun, set them all down and start over and practice with your flowers a little bit until you're really comfortable with it, so the they're all still prepared by you've stripped him of the green and everything. First, all the flowers had to be pr...
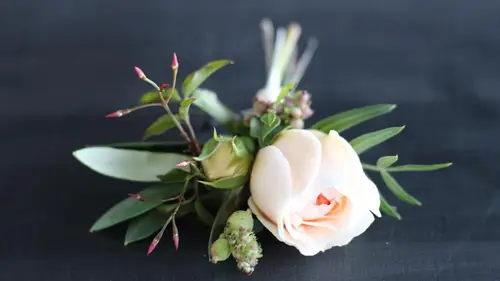
ocessed before you even get started, so make sure you do that first process all of your flowers, so we've done that ahead of time to make things go a little faster for us on dh we have some great stuff that we're using for this and so this okay we're going to make a little wild eyes the same techniques for whether you want a really round prim and proper type of bouquet or whether you want to really loose lush bouquet it's just a matter of how you are going to vary the height it's of things in your flowers and how tight you're holding your bouquet so so wild is really trending right now we call it the wild child we always give the option of the prim and proper the wild child of the two options you that when we do weddings and all but one recently has been wild child people tend to like it so we're gonna make it a little bit wild today yep so making that for you and christine is going to help me get all my flowers together here but the first thing that I usually start with this some type of foliage material to kind of just start my bouquet off so that is a nice and full so I'm going to go since we're trying to make the type of wild type of bouquet I'm going to start with this big floppy piece of green and then I put it at that angle um ninety degree angle in my hand and I'm going to hold it there just like that kind of pinch it and then I'm going to add the next flower same thing ninety degree angle and then as I'm adding more flowers you'll see the twist and turn a little better but I'm going to like keep twisting and turning the flowers and what that does is keep your okay it keeps your bouquet kind of round and symmetrical so that it doesn't get too lopsided or heavy on one side so again at an angle insert some more greens and you know there's no real method to this I'm just kind of adding what feels right here um if you want a bouquet that has like all the same color on one side you would just every time you got to that side of the bouquet at that color flower theirs there's no real method here other than I tryto very my materials so that I'm going back and forth from the thriller spillers and filler materials so that it's nice and spaced out I'm excited to you see this beautiful ridiculous hearing these how did you choose how did you ultimately choose the colors that you were gonna that you were going to use today yeah that's a great question all actually like christina handle that she's our resident color experts at farm girl eso won I'm building this all let her talk a little bit about that so I'm a little crazy about color um really crazy about you know what you like yeah I know what I like so I guess that our recipe we tend to do a bold color uh one or two muted colors and some neutrals it kind of goes the same way for bridal we do a very saturated like we're doing the burgundies on, then the pale pinks and the the peaches will be the muted and then the whites and greens will be the neutral um what? You know, colors really important to me and to most people, I think to make it visually pleasing if you put too many colors even if you know they technically match on the color wheel, it doesn't look very cohesive to me, and so we like it to look very cohesive and this season, you know, writes, always went, uh, coral and blush that's the biggest bright color, but we did see some trends with people wanting more saturated color, so this is a very popular palate here we use peach and everything. It goes with every color except for bright yellow every unless you can think of. I've like, sent out the set down the golf gauntlet to so many people asking what colors doesn't teach go with any matches, everything except for the bright yellow so winning dow if you need something to kind of tone down a very saturated color, go with peach it's if photographs well to women over bride really cares about as well um yeah, I guess so you won't talk about what you're doing here, so as I'm inserting the flowers, I am varying the heights of the flowers so and you can as you go, you can adjust things like all of these fires could move don't be afraid to move him around, but this is really important if you wanted a very proper bouquet, you'd have everything at the same height, if you want it more wild, you want things at different heights to give it a little more transition and visual interest. So that's, what I'm doing there? Did you have a question you mentioned having, like, the smaller flowers on top and the whole pyramid thing? How does that translate to this one? What doing the same for a look. See some of these buds, the's air the things I want hanging out to me. This is like very this is a good spiller that draws your eye through the arrangement and gives it movement. The's little buds, definitely a lot less weight and a lot less heavy than some of these larger flowers like this gardenia is something that I want kind of towards the base of the arrangement. So same idea, same concepts, and that helps give it balance. I was it's one of the most common mistakes with young designers is they'll put really heavy big roses three inches above everything else because they think it's a focal flower and so they obviously wanted to be in a showcase position but it really just makes it look um not balanced and out out of portion basically so you want to keep everything kind of dense and one you know they could be different clusters in areas but you definitely want it to be more area on top yeah so that's great and then another thing that you can do as you're going you khun thread flowers through again this is a very flexible way to make your arrangements because I'm not cutting each stine and putting it in a vase so I can say like you know I need something over here to balance out this crazy little leaf I have so I'll just take this and I can thread it through as long as you can find where you put it in the bouquet then you can find it yeah e find the stone and then adjust the height that way too so that's a really easy ways from the new brit and then as you get closer to the end of your bouquet so that's about the size that I wanted you know for a bridesmaid or something it is just a matter of how big you want your bouquet is how much money you have to spend on your flowers you could definitely think this a lot smaller if you want to or it's the same method for a bridal bouquet you're just going to have more flowers, so it's just again, a matter of personal preference. And then as I get to the end of move my bouquet, I will adjust things, make sure that I have everything as I like it. And then again, making sure I'm doing that twist and turn as I go, I like to usually do that a final time. Amir is a great tool if you're doing on your own and don't have somebody to ask, is this look proportionate to stand in front of a mirror? Flores do this all the time, they'll stand holding it like they're walking down the aisle in front of a mirror to see if, oh, this looks like it's very, you know, left cited, yeah, it was really full, and the right isn't so, but a lot of times I just use christina is my mirror early, and so let's move this out a little bit. A lot of beginning designers will do all of their work in their hand, because that way you don't waste a bunch of flowers cutting them a height that then you have to change later, so it's a great way to do almost everything that you do, like centerpieces, anything, do it in your hand first, because like you so you can just pull it out so here's one thing I'll say to wish is doing that so right here the econ atia is the same height so that doesn't work for me anyway so what? We tend to want it a little bit, you know? Give him you have to give it more visual interest yeah, so doesn't look like twenty years or something like that. Yeah particular flower you're actually using as the focal point of this bouquet while you're doing it because you have such a beautiful variety there yeah, we'll definitely the bigger flowers they're kind of my folk also banned this big guy is kind of like one of the I'm just using one typically and this is just one of those kind of things that you hear and it works typically your focal flowers look best in odd numbers, so like one, three or five so like one of these is is enough. So but yeah, two might look too much like eyeballs kind of staring out at your so usually looks best in on numbers so she's that latter rules that florist like when you I'm sure if you've read things online there's all these rules that you have to adhere to I say it's all bunk like I can do whatever you were working here makes you happy flowers are supposed to make people happy so whatever you like do you like the ronald mcdonald colors that I just talked about? The reds and yellows, everything that I don't tend to like that's fine because that's what you like and that's what you are you're designing for? Yeah, so yeah, whatever were expressed for you and then, um, any final flowers that you need to thread through the arrangement, you could do that so just a few more and then the final step once I have all my flowers and is that I'm going, I need to protect all of my flowers, and so I have this hardy green this is like, camelia leave it grows everywhere in california is really think easy thing to just ask your neighbor if you can trim some from their tree you want some kind of hardy green to just protect your flowers? I say kind of make a caller with around your flowers so the same concept though I'm going at that ninety degree angle, twisting and turning and just going all the way around once you don't want to too much of this, but this definitely helps just kind of finish everything and keep everything in place you'll also see I have like, these heavy come quad that are really fun in the bouquet, but they're definitely kind of floppy, so this will just kind of help prop that stuff, huh? And to answer your earlier question something many times you're not going to know what side of the bouquet is going to the front when you're making it so you know, even though this gorgeous prodi oh you know is a very show showpiece, you know? You know, it looks like we made it just with that in mind that this would be the front I didn't back we're like which one which side do we like the best and yeah there's been many times that we think the front is one and then we'll see the bridal pictures and it's the total opposite side that they like the best so yeah so yeah, whichever feels best to you and then once you're done with the bouquet then you need to secure it and for the boo near I was using the floral tape but that's a little too week for this many flowers so I'm actually going to use this waterproof flower tape that's a little more sturdy and then christine if I could have it cut a piece thank you and then I just lay this like right above where my hand is and you know after doing hundreds and hundreds of arrangements and bouquets I'm good at multi tasking with my hands if you have a friend you can ask hey, can you help me hold this while I do this or can you wrap the tape around don't be shy to ask um because you have my hands have gotten pretty strong after this and so I just wrapped a couple of tens around the bouquet just to secure it in place on dh then that's all you got to do that I'm going to show you how to ribbon the bouquet after we cut it so then for the cutting part you basically want to have it about to hand links down so that there's enough stem showing after the brightest holding it so that's the idea there so when I cut this okay, now we've told you to always cut on an angle with the bouquet you want to cut a little more straight so I'm going to cut straight at that length it's what? Yeah, I have a lot of fun making my husband does not enjoy it as much as I do, you know, when we started farm roll our start from well from my dining room and I had a very understanding husband messed up so we're going for when you do this bouquet is that you should get a nice spiral at the inn so that's how you know if it's like balanced enough so you can see I have a pretty nice spiral this is pretty pretty dangerous trick to do but um so ideally the bouquet should stand by it so fire also doing that on tv is rules little charlie and don't be afraid you can set your bouquet down like don't be afraid like once you have it tied up together it should be pretty sturdy and the flowers are hardier than you think people start they're like, oh my gosh, you're so harsh with the flowers they're really a lot of them are very, very hard so you know, I heard it by setting and then so the last of your bouquet is just like we did the bit near we're going to put a ribbon on it however, I do make this a little bit nicer than I did with the boot near and I'm going to show you what I d'oh so basically you want to avoid having any frayed ends on the ribbon so first thing I'm going to do is give this ribbon a fresh cut and then like I did with the boot near, I'm going to take my glue dot's and put it on the inside of the ribbon so just one piece on the inside of the ribbon take off the paper and I want to find the back of my bouquet and so what do you think? I think maybe the back is where the party is what do you think? Is that a good front? Mmm okay, try the other way yeah, what do you think other side okay, so you want to start so that way the bride knows where to hold it we're going to put pins on it at the very end so that they know what is the front and the back but I start at the back so they can see the s o I know where to follow the ribbon and then a wrath it down and then I'm going to come down with the ribbon a little bit lower each time so the first time around I want to make sure I'm covering all of my flower tape and then with this because it's set so thick you want tio keep adding more glue dots each time you come around so I got my little glue dot down on the stems and then I'm going to come around are you putting on the stems are on the other piece of the ribbon you could do either or it won't so also this it is a good question because you have to be careful that your stems aren't too wet because if they are the glue dots aren't going to stick on it very well so on and then it's up to you again some brides liketo have the entire thing covered with ribbon if you if that's what they want or you want you would just keep coming down with this I personally like the natural stems exposed look so I'm going to just come around once more and that also allows you to put it in water so keep that pressure um where if it's covered the whole time you want to you want to do the ribbon right before their money yeah definitely great point and then so I cut my ribbon and I cut it a little longer than where I wanted to actually end up going so I gave it about a inch access because when I'm going to do so that the ribbon doesn't fray I'm going to glue the ribbon inside of itself so that it has a nice uh nice finish seem so if I put the frayed in on the inside they will hide those phrase and then to do this part I used two pieces of the glue dots um so that it's nice and even and that one part doesn't uh lift up so I fold that on the inside and then I'm going to use some more glue dots see we should've been putting a couple more of these and then this should keep everything nice and secure in place but then the last thing I'm going to do is put in some bouquet pins so that I don't have to worry you can see that there's still a little bit of a flap here s o if I use the bouquet pins that will keep everything nice and me and in place but also showed the bride where she should hold it in her hand should be at the back some people like the pen so much, they think it's the front, yeah, you guys know it, the back, and I've seen people do. You could do like designs with these to, like, make a diamond, or hard or yeah, have fun with it. S o I insert the pins at an angle into the stem, um, and then again trying to avoid those glue dots, because that makes it really hard to go through the bouquet. Um, so I'm just gonna put two to finish these off, and sometimes, like, if you hit something, you might feel your pin bend that's. Fine. It happens a lot, um, and then you just grab a fresh spin, so I got that in, so that keeps a nice and sturdy. So there you have it. There's, your completed bridal bouquet.
Class Materials
bonus material with purchase
Ratings and Reviews
Student Work
Related Classes
Floral Arranging