Lessons
Lesson Info
Pattern Envelope Overview
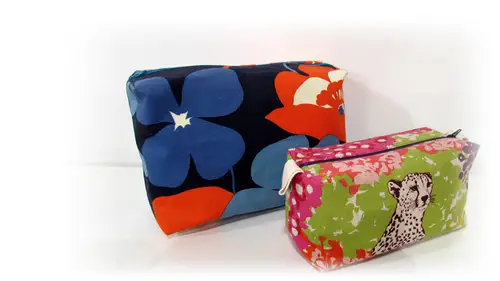
So we're going to start out talking a little bit about the pattern envelope in this pattern, there are two different sized bags that you can choose from there's, this larger bag that's meant to be a toiletries bag and a smaller bag meant to be more like adopt kit that's pretty much all the information that we have on the front of the envelope. Most of the information is on the back of the envelope there's a description up here, and it gives us some dimensions so we can see it's hard to tell from the front what the scale is. So the back tells us a little bit about the dimensions of the bag we go through, and we see what kinds of fabric they're going to be recommended, and then it tells us the yardage is that we need to make either bag and anything else that we're going to need besides the thread and the fabric and the pattern to make our project, so it appeared the top. It says that this is a pattern that's designed for intermediate beginners who are comfortable with basic stitches and ...
techniques, and he would like to learn a common method for inserting a zipper. So this kind of zipper you see on most lined bags, it's one of the most common methods out there and you're going to learn how to do it step by step this pattern assumes you can set up your sewing machine and that you can so a straight stitch with a reasonably accurate seem allowance meaning that your stitches are even in straight along the edge of your fabric so view a the toiletries bag when it's finished it measures ten inches by six and three quarters by three and a quarter and you be the docket measures eight inches by four inches by three and a quarter both bags are made from a heavier fabric on the outside this is a canvas from alexander henry and this particular canvases called heath it's one of their most popular designs the inside of the bags are going to be lined with a quote wait cotton this one is many calla vera's also by alexander henry and the outside fabric is also going to be reinforced with something called off usable interfacing I have right here woven for usable interfacing so when we look at it nice and closely we can see that it's woven like fabric and then it's got some glue dots on one side here we're going to end up refusing this right to our fabric where their iron and that's going to make that outside bag a lot stronger so this says that the pattern includes easy to follow sewing instructions, a fabric anatomy guide and a glossary of sewing term so I'm going to explain all this stuff as we go along it also lists the recommended fabric so like I said for the main fabric the outer fabric of the bag you're going to want to pick what we call a home to core wait cotton so a lightweight canvas a cotton or linen canvas or a blend twill denham home decor wait cotton or home to core wait seventeen all of these are going to be great choices for the outside of your bag it needs to be a little bit sturdier and stronger than your basic lightweight cotton but the lining you can pick ah quit wait cotton a sham bray a lightweight denim or even a lightweight laminated cotton so this is what the laminated cotton looks like and this would end up being on the inside of my bag when I was finished it's basically cotton fabric with plastic laminate over it great for the inside of a makeup bag underneath all that it tells us that the fabric requirement allows for nap one way design and some shrinkage. This is important to know this tells us that if you have a fabric that has one direction on it, this fabric looks the same if I do that or if I do that but my inside fabric has a direction this is right side up and the other way would be upside down so this tells me that I don't have to worry about having fabric with the direction because this amount that I'm asking you for is going to be the right amount no matter which way you need to put the pattern on the fabric extra fabric may be needed to match design so if you have big stripes on your fabric and you want them to line up on the sides of the bags you may need a little bit of extra fabric so that you can cut each piece exactly how you want it underneath all of that information it tells us how much material is going to be required for each bag so for a view eh it's a little bit bigger you're going to need a little bit more fabric view bees a little smaller so it says here for the main fabric forty four inches or fifty eight inches so it doesn't matter how wide your fabric it's for this project you're going to need the same amount three it's of a yard for the main fabric in the lining twenty two inch woven feasible interfacing three quarters of a yard you can follow along on your pattern that you have at home to see how much fabric you're going to need for each of these bags optional for both views is one quarter yard of one inch wide tool tape that's what's going to create the little pull tabs on either side of our zipper so if you would like this little pull tabs you can grab yourself central tape the last little bit on our pattern here talks about the notions and tools these are everything else that you're going to need to make the project besides the fabric in the pattern, so you'll need some matching thread you're going to need a zipper foot for your sewing machine. My zipper foot looks like this year's a perfect might look a little different, but it's going to have the holes on either side just like that. And you can also check your sewing machine manual to see which put your zipper foot isthe andi, you're gonna need your basic sewing kit. So these are the tools that we use for every sewing project good fabrics, years glass had pins and a pin cushion a seam ripper in case you makes a mistake, tailor's chalk and a two inch wide it by eighteen inch long, clear ruler to help us mark our stuff and to help us line up everything on our fabric, you're also going to need one standard twelve inch non separating zipper. So this means that when you hold the zipper up in the front, you can see the teeth and you can also see the pole. If you can't see the teeth, you may have an invisible zipper and that's not gonna work for this project non separating means that when I unzip it it doesn't come apart like a coat zipper. It stays put together, that's going to be the best kind of zipper for this project, and you wanted to be twelve inches long or bigger. If it's going to be a little bit bigger, we're going to chop the extra off. You just don't want to go smaller than twelve inches. You're also going to need an iron and an ironing board for this project.
Class Materials
Bonus with Purchase
Ratings and Reviews
Jaime Baggett
This was such a fun class and I felt so confident once I finished the box zip bag! I just bought the class last week and I've already finished two larges. I had been wanting to learn how to sew a zipper for a while and this class was a perfect choice. I love the instructor, she's easy to follow and doesn't use weird, hard to understand terms. And she defines things that might be unknown. THANK YOU, SHAERIE!