Lessons
Lesson Info
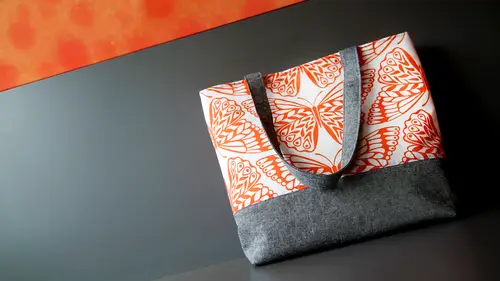
Construct the Lining
All right so we have everything cut and everything fused everything labeled so we're ready to get started on our sewing are you excited? Good all right um so we're going to work on our lining first and get my pieces out here all right? Um let's see? Okay, so the first two pieces I have out here are the main lining piece that is made out of the quoting cotton and then I have my facing you'll have two of these but we're just gonna work one at a time here and as you can see him using a different fabric than the example bag and um it's really a two way fabric there's no reason that you know it has to be, um one side up in particular if you did have a um I think it's something you have, like a little apple or little sheep and they're all going in a row and there's definitely a direction you want to make sure you're kind of laid out and think all right, I want my sheep to be standing up so go like this when I do write sides together so that way when after you've sewn it then they're not stan...
ding on their heads unless you want that that could be okay all right singing the line at my edges and I'm gonna pen cross like to do one on each end and then a few in the middle this since it's a straight seem I don't really use a lot of pens if this was kind of a more precise curved seem, I might use a little bit more but I think that's enough for there and then I'm gonna take this to the machine, ok? So for just regular scenes, I have my machine set two and a half um stitch length and I'm going to use a half inch seam allowance and really a bag can have you know, if you buy various bag pattern's, the same allowances can vary from a quarter inch to, you know, five eighths of an inch really it's just a matter of personal preference or or the sewing pattern that you're working with, I usedto having cheer because I really wanted tio work on that work off of that grid and that diagram that I provided and I just thought math wise would be really good to have a nice happens so so most plates on the machine have a mark for quarter inch three eight's half inch etcetera, but if you have trouble seeing that little line, you can take a piece of your painter's tape and just sort of mark that for the particular project you're working on, so I'm going to put this on mine for half inch and then you also want to make sure that your needle is centered um you know centered on your foot? I'm just using a regular basic foot that comes with the machine on then I'm just going to do a real quick check here to confirm that yes, this is actually a half inch okay? Because sometimes and we'll talk about this later you want to move your needle position you know? So you're doing top stitching and you wanted to be kind of close but you know anyway so you want to move that around but for starters it's not sticking for starters will work with half inch and two and a half stitch length and then another thing that I always do um is back stitch and so the more you so the more that will just be second nature and you always backstage at the beginning and the end of every scene so back stitching is kind of like the machine equivalent of tying and not if you were hand sewing so just going toe start so a couple stitches press the reverse button on your machine or however your machine reverses and do a couple backwards stitches and then stitch forward if you have a little trouble getting started and having your it's called I think it's called bird nest of thread on the bottom that sometimes happens when you you know, started the very edge of the fabric it's a good idea to hold your thread tales when you start sewing and then that just provides a little tiny bit of tension and it will be less likely to get sucked down into your machine okay, so we have my scene done and I'm going to bring it over to the ironing board and press that seem open so this isn't one of the other reasons why like spring is that sometimes um when you go to start the pressing a seam, the fabric is just really resistant to going in the new direction that you've just shown it in and if you have like a bulkier, stiffer fabric spraying it just kind of like softens and a tiny little bit and then you can get the iron in there I could give my whole piece of press here because it was folded okay? I don't think I'm going to do here is turn this bag right side out or inside out rather so you can see the lining since that's what we're working on now. Okay, so right now we're working on sowing the lower part of the lining to the facing and now that I've got mind sone I'm going a top stitch just like an eighth of an inch from that scene and when I top stitch I changed the stitch length to three so it's not that much bigger but it's just a little bit bigger um the trick is kind of remembering to change back to your regular seem length, but if you forget it's not the end of the world, but if it is for you, then you can come back over but in general and you'll be fine it's only a half stitch length difference but usually it's slightly longer stitch length looks a little nicer for top stitching and her new top stitching on the lining piece or the top stitching on the facing on the face you could dio either or both. I'm just going to do an end to the facing mill just to give it a nice, clean finish, and depending on your fabric choices, you may or may not want to change your thread color for that top stitching. So to do this top stitching, I can't use the mark that I put on my machine with the tape because now I've covered it up. So this is when I like tio use a part of the foot is a guide, so in this instance my foot has he's too little skis off the front and then a wide hole s o I am lining up the inside of one of those little skis and then my needle is about an eighth of an inch from there um and this is also a time where you can change the needle position if that gets the stitch line where you want it you can also practice on a little scrap if you're not really sure and you want to try it? I actually forgot to make my stitch length longer, okay, so now we have the facing attached to the lower panel and I have a top stitched and the top of this bag has a magnetic snap closure, but you can see here so we are going to install that now the word install makes it sounds scary, and I think it's really not scary was actually one of the easiest, uh, pieces of hardware tio add to a bag, I think, um, I think the trickiest part is making sure that the two sides of your snap are aligned with each other, but the cool thing is, you know, it's it's, it's a big magnet and if you're off a little bit, it'll still hold and might not snap perfectly into that perfect position, but it'll still work, so no worries. So the first thing I'm going to do is turn over my facing and I'm going to find the center of my facing some going toe fold in half and just give it a little finger press and open it back up and then I'm going to take one of my marking tools and make a little mark on the fold I just made and then I want to find the center basically roughly the center of this space here, so since our seem allowance is a half inch, I'm going to just sort of pull down a half inch to visualize, you know, how much space do I have here between these seams? And it is about two and a quarter inches, so I want the middle of my snap to be about, you know, one in the eighth from there, so I'm just going to kind of leave that on here and put my washer down, and then I'll take my marking tool and mark that center spot, and then I'm going to mark in the little slot, so I should probably talk about the snap. What does this washer thing? Okay, the snap comes into components there's any analogy? Um, it doesn't really matter groups these air both anything. Well, so you have any analogy? Oh, there's the our teeth on the piece I already made. Ok, so you have the two pieces and then you have the washers to go with, and basically what you're going to do is make slits that these prongs to go through, and they're going to go through the washer and then get folded down so an extra thing that you don't have to d'oh you could just keep going right now is to put a little bit more stabilizer where you are I'm going to put your snapping and that just gives like an extra little padding and it's extra support for that because you know you're kind of hole in your bag so um and this will be cool actually because thiss black pen that I used is that freaks ian marker that I mentioned that disappears with heat and how you can see it disappear see I knew there was a reason why you see that gone magic okay so we're backing up a little bit it's still important to know where we're going to put this not because you have to know where to put your piece of stabilizer and this is just ah little piece of usable fleece and I'm going to cover that up a little mist ok and I'm gonna press it from the other side too you could use another layer of um just they're woven interfacing too if you'd like all right so that's just going to give us an extra little bit of stability there okay I've marked um the lines where the little holes are going to be through my washer and since I've already done the other side when I'm going to do here is sort of skip ahead just a tiny little bit and lay this on here I wanted to show you how to find the center first but since I already have my maid I also want to make sure that it's going to line up feel it right there. All right, let's, get the washer back on here in remark the spots now this you could even just use a regular pan er or pencil at this point is this is going to be totally inside your bag no one's going to see it and then you can take my seamer burr and cutie little slips I always cut just a little and then see if I need more so I don't over cut, all right? So then I'm going to find them from the right side of the facing and push those through so I know that the little cuts are big enough now, so I'm just gonna pop this out for a second and grabbed my friend chuck. This is kind of like a lightweight glue and you just want to put a tiny bit on there and that just kind of blues, those little ends that you cut and they should be fine anyway, underneath um your snap, but I just want to make sure everything stays weren't supposed to be so ok. So now you're reinsert that through there and then we'll take our washer and put that back on and really doesn't matter which if you start with the any of the audi just, you know, have one of each and then some people press the little problems that word um and some people trust him and I like them to go in because even though it leaves sort of a bit of a raised bump um I think it's better than having those two points of friction kind of on either side of the snap because that can over time where through so then you can use a pencil or a pen something to push one side down and then the other side down and then I also just kind of push on the table like this and then you go see how that installed and then you want to go ahead and do the other side all right any questions at this point no we're good okay okay so uh the only other thing we need to do on our lining side is that pocket so I'm going to set this aside for a moment and get my pocket which I know where it is because they labeled it all right um give us a quick press okay so just tow refresh your memory this is a little pocket we're making super simple it's just a little patch pocket it's just this one piece that we're folding over to make it double thick you can interface this if you want but I'm not going to interface this piece I think it's fine for the purpose that it's serving so I folded in half lengthwise are of no I guess it's crosswhite um and I'm going to sew thie three raj is together and I'm going to leave a little space for turning so you said the three raj is yes don't give those little pin just to keep myself straight here ok so for the bag in general the same allowances a half inch for some of the smaller details like the pocket and the straps were going to use a quarter inch seam allowance so again you need to look back at your foot in your needle position and find that quarter of an inch on my machine there's a little mark by the feed dogs that's a quarter inch so I'm just going to follow that and keep my needle position in the center now when you get to the corner, stop it about a quarter inch from the corner and then leave your needle down in your work and then you can lift your press your foot and then rotate the pocket and then put the president put back down and then keeps going on that will give you a nice pointy corner now I want to leave about three inches open at the bottom so is a so across that bottom I'm going to stop back stitch jump over to you know about three inches away again doesn't have to be precise just enough to be able to turn the pocket right side up and you're going to want a back stitch at the beginning and end of those okay, now I have my pocket sewn with my opening along the bottom and before I turn it right side out it's important to clip the corners of the seam allowance just because it will make your corners nicer you'll be ableto turn them right side out and not have an extra little lumpy thing in the corner so we're just going to cut like this at a forty five degree angle and you want to cut pretty close to the corner but not obviously you're seeing line just cut pretty close maybe a sixteenth of an inch away get my threads off and then I'm also going to cut this corner that's by the fold okay, so now I can take that little opening then we left and use that to turn the pocket right side out so this is a good time to use one of your turning tools um I'm gonna use this little chopstick looking thing and put that in to the opening that we left and just kind of work out those little point and one thing I try to keep in mind for lining details is that on inside your bag? Of course she wanted to look good, but at the end of the day you're the only one that's going to see it so um if it's not perfectly perfect in every way it's totally fine with me it's a good practice okay, so now I'm gonna give this a little press and I'm this will kind of happened naturally but you wantto sort of work in those seem allowances from that opening and they should just sort of fold back next year stitching and then press that press them in flat okay? So I'm going to take that folded edge and give it a little top stitch line because that's going to be the top of our pocket and we'll just give it like an extra little finish and I'll do that at a quarter inch ok, so the next thing we're going to do is place the pocket on our lining and you know, we still have that little opening at the bottom, but when we so the pocket to the lining it's actually going to close that because we're going to so really close to the edge so we don't need to worry about so in that and then selling it to the bag it's one one step okay, so I'm going to give my pocket just a little pinch here at the top to find the center and sincerity have my snap in the center, I can just line it up directly below and I'm going to place this I'm just going to eyeball it um I don't know maybe inch and a half from the top it's kind of depends on where you know you don't want it too low because this is kind of one of those little easy access pockets that you have inside your toe or maybe your phone or a pencil or something like that is so you want it pretty close to the top and if you're not comfortable eyeballing you can just put a ruler up here just to make sure that you have that top edge parallel with you're facing and then I'm going to pin it to that piece and then I want to make sure when I penned this bottom edge that I pin that little opening because I want to make sure that I get, you know, get that when I stitch people pinned different ways I like to pin perpendicular early to where I'm sewing I just find it easier to remove the pen and I find that it also keeps, uh it keeps the edge of what you're painting straight if you pin parallel to it, sometimes you get, like, a little ripple in there so everyone has their personal preferences and like they said, lots of different approaches work, okay, so obviously we want to keep the top edge of the pocket opened arabs don't just be a patch s so we're going to start at one end, we're gonna backstage that's a particularly important backstage because that's going to get like a lot of, um you know tension on it when you reach into the pocket or when the pockets full so really good back stitch there down a pivot across the bottom back up the other side and back stitch again at the top and this I'm going to do because because I'm excuse me sewing a pretty close to that edge um I'm I wanted so pretty close to that because I want to make sure that I close that little gap that we had from turning so it'll be about eighth of an inch put the needle down and pivot wait now we have our lining pocket done you know just trim your threads and then we're done with that pocket so now we can do the next step and so are lining panels together so we'll have the front in the back and we're gonna put those right sides together and you're gonna wanna pin the sides and the bottom and the bottom is going to have an opening just like your pocket had because when the lining and exterior bag or sewn together you needed space to be able to turn them right side out so we're going to do that again this time market um just because it's going to be but the time we're turning the bag through this hole it's going to be the whole bag it's going to the hole lining and the straps and exterior the bag so I wantto leave at least you know a good six inches open sixty eight inches all right? And we're going up in the sides in the bottom and you want to make sure that you're facing lines up so that is the first place I'm going to pin I'm going to make sure those two seems meat and then you might want to put an extra pin in your seem allowances so that they behave when you so over them and they don't go flipping around okay, so I could see my cutting is just slightly off down here the bottom, but that doesn't matter because we have a whole half inch seam allowance that even if there's a little bit of a, you know, a the manager whatever off here and there that you've got plenty of room to work around that so I'm not going to worry about that, and I'll put a pin right at my mark and these air just kind of estimated marks of where to stop it's not critical, it is critical you leave the opening mail all right? So I'm going to sew around kind of like what we just did for the pocket down one side pivot stop in back, stitch at my gap and then start again and go back up the other side okay? So I've soon around thie sides in the bottom of the lining, and I've left that opening for turning and I'm going tio dio just a little trim on the seam allowance I'm here at the facings and some of those trimming will seem sort of like for real you're kind enough that tiny little triangle how could that possibly? But all of the book adds up and it's a really good habit to get into two nick off those little points so what I'm talking about is pretty much every time you have two seems intersecting that you don't really need all this extra seem allowance so again you you're going to want to be careful that you don't actually cut your seems but you can just take off those little triangles there um this is you know, important in garment sewing and in bag sewing you know, back I tend to have a lot of bulk going on so um we'll get rid of those and you know we're only at the lining at this point so all these things you know can add up which if you have a surgery there any parts of the bag that you would use this surgery on because it's just straight sewing you could um a lot of times people use searchers morpher in its I mean, you can definitely he's a surgery on waldron's if especially I would say if you had an exterior that was like kind of a loosely woven something or other um you know that just you just felt like it might need that extra something to kind of keep together or as your sewing if you're like oh my gosh this is just fraying like crazy then I think the surgery be great I mean, you can also if someone doesn't have the surge er and they're having that problem you could use this exact stitch on the machine and then just go back over uh you know the edge of your same allowance and would it make it any full gear do you think um I would try it you could surge seems separately like surge the seam allowance and this theme allowance which seems like it would be bulkier but if you press the seem open that would kind of distribute some of the bulk um and sometimes I found this is probably more with nits than with weapons but sometimes I found a few surge two seam allowances together it can it can kind of like it can kind of be a lie gets like a big ripley thing going on so does something to keep in mind on that. So any other questions? Um all right, so the next thing we're going to dio is add the dimension to our lining by boxing the corners but what I'm going to do first is just give these um actually maybe I'll do this afterwards I was going to give the seams that we just soda press I'm a big proponent of so press, so press because I feel like everything looks better if you process it in between, but in this instance, let's, just take care of those corners done here first, and I'll show you how we add dimension. So if we look back at our diagram with the grid in the corners, there's a next to a little, many diagram in the corner that shows the dimension that we're going to use for boxing these corners, and I've got two different ways we're going to box the corner on thie lining, but then also on the exterior of the bag, so there's kind of two different approaches, so I'm going to show you one approach on each piece, so if you look up here, this is just sort of like a blown up version of our corner here. So right now you've sown down to the corner of your fabric and across, and we know that we want the depth of her bag to be four inches, therefore each side of the bag or taking away to, um so what we're going to do is I'm gonna measure from our kat korner two inches in, and then when I saw my half inch seam, it'll be happens, it will be two inches in from the scene line that we just made and it's kind of confusing, but um you can either look at it from from cut cottage to cut edge, which is the solid line two inches or from stitch line to stitch line and it will make more sense when I show you that I'm going to measure two inches from the edge of the bottom so I'm going to find and use my clear ruler and use the two inch and and to inch up mark to draw a square and I'll do that on the site to have got it all right, so we're going to cut on this line that I just made and then when we saw the corner are stitch line will be half inch in from there so that will make that whole from the side seem to that corner seem to inches ok? So I'm going to go ahead and cut that, okay? So now is sort of the that's, not the super mind bender but it is a little bit so basically what we want to do is we want a lineup besides seem with the bottom seam and have them like laying right on top of each other and so to do that we're going to take a little corner that we just cut and open it up and basically close that little opening so that it's perpendicular to the seems we just did so your bottom seam and your side seem are on top of each other here and hope in that. Okay, now, so across that half inch in from the edge, ok, so there you can see you can start to see that corner and the dimension of the bag happening it's going to go ahead and do that with the other end or the other corner other, so we'll line that up, ok? Now I'm going to go ahead and nick off these little points, and we might find that we actually want to turn this whole seem allowance on the lining just because if you have a half inch seam allowance of the lining, you know, inside the bag, bumping up against the half inch seam allowance from the exterior that your corners might not sit really nice and cleanly inside each other. S o I think I'll just go ahead and do that. Now again, you don't want to cut too closely. I think I'll do leave about a quarter of an inch and and still, you know, turn my little from our corners off. Now I'm pretty bad at keeping on my threads that day, and so I tried to train them as I go, but I think if you use the thread cutter on the end of your machine, you might have a tendency to have more threads. And it's really fast and just use that. But then, you know, you're not trimming. It is closely as you could. So, um, you know, you might want to make sure you trim your threads as you go along, and the other thing I found is it doesn't seem like it would matter, but, um, it's possible that some of your threads end up showing if you have a dark thread, say, you know, you have a dark lining in a light outer bag. I've accidentally fused threads in between layers of interface. It's not really what you want to do. Okay, all right. I'm going to give the seams of press and then are lining will be pretty close to being done. Okay, so it's kind of looking like a bag it's getting dimensional. You know, you can tell if you're going to like the scale of it. It'll be, you know, happen in shorter because of that seem allowance at the top of basically this is the size of your bag. So, um, we can put this lining aside now and start working on the exterior.
Class Materials
Bonus Materials with Purchase
Ratings and Reviews
Lynnette Simpson
5 stars +++++ I thoroughly enjoyed the whole course. I found that these classes gave me the understanding and confidence of sewing 'any' tote with both a slip and zipper pocket, etc. After watching these classes of Betz I'm able to put together my own tote without having to refer to patterns or instructions. I started as a beginner not able to figure my own dimensions. Now I have confidence to do just that. Yes, very happy I purchased this class and am happy with the confidence it has given me. Thanks Betz and creative live Cheers Lynnette
user-d19582
I enjoyed this class very much. Great class for the beginner who wants to fine tune their techniques. The instructor is very knowledgable and guides you through the ins and outs of making a better bag. I am looking forward to her next class, I believe it airs the end of January. Thank you Betz
a Creativelive Student
Betz is organized, pleasant, and interesting. I am enjoying her courses. I watched a free preview, and that sold me on getting all of her classes. Love you, Betz!