Lessons
Lesson Info
Decide on Scale & Dimension
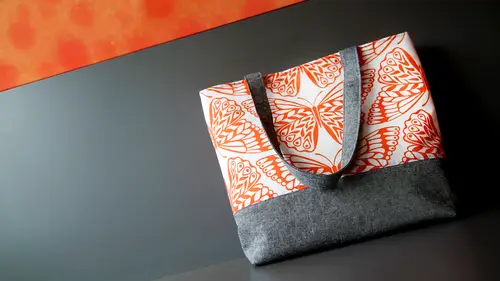
Okay now that we've talked about all the materials and stabilizers we're going to talk about the size and dimension of our bag so we're going to look at our diagram that has the basic layout of this foundation bag and it looks a little strange but I'm gonna walk you through it um so I made this diagram because I want to try to explain how to visualize the three d object that is your bag because I want you to be ableto make a bag that's to your specifications so maybe you have a bag in your closet that's like your favorite bag but it's trashed and you you want a new one or you have this great bag for travel it's nearly perfect but I just wish it was a little bigger so how do you do that and have it come out like how you want so I do this on a grid that basically each square equals our represents an inch so I planned out that I wanted the face of the bag which is indicated by the gray area and basically you know from the corner of the bag up that represents that part of the bag okay um t...
he outline is for one half of the bag that's the whole front or the whole back of the exterior or the lining or actually not worth and it's for it's for all of those things s o this represents the face and then the's part are the sides and the bottom but it's half of the sides and the bottom. So what happens is we have our top measurement. So this is seventeen inches across. And then when you take these little notches out in the corner to make the dimension, which is way caught boxing the corner that's here than that, as you can see, like, takes a little bit away from the height in the wit. So if you map it all out on a grid you can kind of get your bearings for how how big is this going to be? So for this bag, I wanted the bottom corner. I'm one of the depth of the bag to be four inches. So since half of this is the front and half of this is the back, my little notch in the corner is two inches. Okay? Thie seem allows for this bag is a half inch. So where you're seeing a dash line is essentially what's going to be your seem allowance. So, like the top measurements and seventeen inches says eighteen and parentheses because it's seventeen between those dotted lines and then half inch half inch eighteen so that's where you would cut it now the lines that across here and here represent. You know you don't want a solid bag you want peace across the bottom because you know nice but adds a nice detail, for example, so you'll see from the measurements that I have from the bottom seam tio here and from the seam to the top of the bag and that can help you figure out can I want the scene here? And then I add half inch seam allowance and I want it to come down to here and then I add my half interesting sounds this scene is actually for the lining and the facing at the top so way have thiss top portion of the bank is called the facing and that's where we're going to have our snap and just, you know, have the seam to the rest of the lining, and so that is what that line indicates, so basically you can use this for the bag that we're making, and then you can alter it to make a larger and smaller bags and I have examples here this is another bag that's the same proportion is this it's the medium size and then I'm also including and your materials a small a diagram for the small bag so you can see this one has a depth of three inches and a little shorter and just proportionally different that's all mapped out on a little grid and then this bag is the large bag and, again, deeper, um, not really taller, but just different seeming options and different proportions. So just mind you to get an idea of how what we're making today, even though it's, a super basic toad, it's, really easy to just shipped a few measurements and change the proportions.
Class Materials
Bonus Materials with Purchase
Ratings and Reviews
Lynnette Simpson
5 stars +++++ I thoroughly enjoyed the whole course. I found that these classes gave me the understanding and confidence of sewing 'any' tote with both a slip and zipper pocket, etc. After watching these classes of Betz I'm able to put together my own tote without having to refer to patterns or instructions. I started as a beginner not able to figure my own dimensions. Now I have confidence to do just that. Yes, very happy I purchased this class and am happy with the confidence it has given me. Thanks Betz and creative live Cheers Lynnette
user-d19582
I enjoyed this class very much. Great class for the beginner who wants to fine tune their techniques. The instructor is very knowledgable and guides you through the ins and outs of making a better bag. I am looking forward to her next class, I believe it airs the end of January. Thank you Betz
a Creativelive Student
Betz is organized, pleasant, and interesting. I am enjoying her courses. I watched a free preview, and that sold me on getting all of her classes. Love you, Betz!