Lessons
Day 1
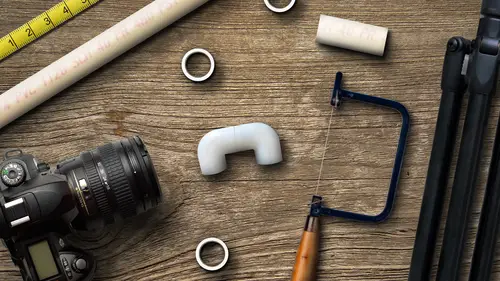
1Everyday Carry Kit
16:48 2Three Essential Lighting Styles
16:20 3Rules of Lighting
14:58 4Lighting Q&A
12:11 5Camera Gear
18:17 6Building a Door Scrim
20:13 7Lighting Demo with Door Scrim
23:55Building V-Flats
12:17 9Triple Reflector V-Flat
11:06 10Building a V-Flat Window Box
25:07 11Building a Medium Sized Softbox
27:17 12Building a Snoot
16:30 13Stabilizer Cord and Milk Jug Background Light
19:43 14Flashlight Lighting
27:48 15Flashlight Lighting Q&A with Review
08:27Day 2
16Making a Beauty Dish
12:14 17Beauty Dish Lighting Demo Part 1
26:42 18Beauty Dish Lighting Demo Part 2
25:25 19Making Tube Strip Lights
20:49 20Making a Kaleidalight
26:30 21Making a Wall of Light
19:47 22Making a Human Light Tent
16:30 23Making a Backlight Wall
17:32 24Kid Kooperators and Mobile Shooting Cart
07:42 25Making a Shop Light Ring Light
34:35 26Making a Photo Booth
33:07 27Final Review
18:02Lesson Info
Building a Medium Sized Softbox
They were going to make us a soft box now and everybody knows it soft boxes are I'm assuming but maybe not soft talks this small it's or can be small or large light modifier that contains the light and generally a size that I like it's roughly two three foot ish size is kind of nice because you that medium diffused like we talked about the beginning of the day is our second primary light type on so the soft box is kind of a standard tool it's been around forever so caitlin could you bring out the pieces there and are straight edge and so what we're going to do this is um when you take a soft box you need a box that's pretty basic you can probably imagine where this is going with this year we're going to cut this into four panels and make it into a box that the hardest part is mounting your light your speed like to that box and so what I started thing but as well manufacturers use speed rings basically so as I'm walking the hardware store in the toilet department here's a here's a toile...
t thing I don't know what exactly it's for but it's something for your toilet and it looks like a speed ring so I said, uh that'll work so that's what I did I bought that it's got a bunch of little holes and things on it so they say it took this old l bracket from my bag of junk in my garage and then screw to screw through had to drill it out to slightly, but already had a whole screwed that through put a locknut on it, and here I have something to put the speed light and this it was two or three bucks or something for this ring with speed, light fits perfectly right in the middle, and all we need to do now is to put this in our opening and tape it up, and you're good to go. And this this should work as good as any off the shelf commercial speed, light or soft box rather ok, so here's, what? We're gonna dio each one of these panels, these air thirty by forty boards, and the reason I'm using thirty by forty former four boards is these are easy to get in any office supply store using for like posters and sign boards, you know? So I got this at staples er you walk in there and there three bucks, four bucks or something for sheet thirty by forties that's a good size to start with. So each one of these will make two, two pieces of our final soft box, so first thing we want to do is you want to measure and half and make a line halfway across this board okay when you're gonna help me out here bid twenty inches this is forties they're going to make a pick market twenty and another ticket twenty oh my god okay and then we're going to draw a line across those I meant to do that there's nobody on the street all right and then we want to find the center of this what's half of it thirty very good so fifteen we'll make a little market fifteen very cross make a t there get it all right and what we want to do basically at that center markets figure this is our do dad that's going to go into this opening of the box and we're done so we want to measure this opening and I could just measure this and put it on there or you could you know basically it's going to go there so this is theo opening here is four inches so I basically want two inches on either side of this little martin so give me a mark two inches on either side and then so that's going to be our opening for this it should be four inches whom she got it and we just connect those to the corners of the boards the draw line from that tick mark that you made to the point turning into she confessed to me earlier that her problem in life this is her biggest problem is that she can't draw a straight line to save her life and her family teases about her she's had issues has been in therapy countless psychiatrist appointments but so we're working through it now on the show and she's doing very very well drawing straight lines ok here's one more jeez okay and draw the other direction to the other point and one of us there it was kind of street now we need to cut you ma'am we're gonna cut we need are cutting board if we could not gonna trust caitlin to cut is dangerous so you can cut um yeah sorry I think I can bring that believe this underneath so first thing I want to do is just cut through there this part if you're crazy over here it doesn't matter but this middle part we want straight laid down a straight edge for you but you do want to cut it all across that we can separate these two she goes crooked on the one part I told her not to go crooked on skating it's going to totally flying just cut that althea down so it separates the two boards ok beautiful now we have a couple more cuts to go we're gonna cut this one right there that's online so you've got a problem too with cutting straight lines don't you way we need to have a special therapy class on straight line cutting hold on hold on hold on lined up okay marine life class new class cut straight and carry a big stick he's won good sorry all right better practice makes perfect so then we want to do that here but we're going to make it quicker and just trace the ones we already cut play that sucker down when you match those corners for me there were a pencil kayla trace that went on to there straight enough little slicing and dicing you could make a straighter than it was before uh oh yeah I'll get the rest of your off the hook yo I'm deadly with a knife back up but you could you could you could you way are making a soft blocks it's going to be about the right size for medium diffused light which is cut my would a little bit there um a beautiful all around useful style and size of soft bucks using foam core and toilet stuff toilet accessories all right, so there's the pieces are triangles they're going to go together or something like this we need some white duct tape palin good so we're gonna put that like that tape it if you want to put little pieces to kind of hold it and we can do a big piece that's fine one of the top on the bottom and then we'll run a full length one when you're done I didn't need that it's going to be extra careful and I was good. Tearing off tape is the hardest part of any jobs I let her do it. Was that all about what's? The old put on the leg, terry, back off again. It's. Just something I've heard something she heard on the internet. No doubt. Okay, that's good slice that from a food writer. Oh, no. See that's that what's what happens let's? Start over this time. Don't put it on your leg. Okay? I think what you saw was like a tip for pulling off lint from your clothing that you kind of confused with something you're gonna actually use in the real world. Can I ask you some questions? We're doing a little longer one here who'll so people are a little bit confused as to as my why the white is on the outside versus the inside because I forgot we had black and white bucks take to take to wow, internet books are always super smart. Thanks. Everyone was so funny I usually make I don't use the black and white board right way. Make it with the only whites on just kind of going on autopilot forgot we had a black and white board come hold this for me, caitlin, what ok, put this smooth, all right, problem averted let's put it if you could put more tape on here while I talk you could take that up a little more solid and make sure these come close together like that all right so while she's finishing taping it up thank you for catching that uh this will go right into the middle like that and there's a little bracket that I have here that if it doesn't fit you may need to just a notch it a little bit right there okay, so I'm gonna add just a little bit of a nudge make room for my bracket I should sink right in there will be good to go in just a minute he's taping pretending all right that's going to go like that so it's going and support me that tape there I'm gonna take that to the actual bucks with tape as well and to get this thing I'll finish up you could use black box black tape obviously if we were going to make this a little cleaner um black tape would be nice on the outside technically that really matters so much we need a little more tape caitlin don't put those away it let's finish this up if you could put full tape here full tape here man for the facing on this we're going to use just some parachute cloth so there's a piece that I have here a thankful extra she worked good all right hey, this is my face will attach this here and again black or white let's use black make it prettier so I'm just going to duct tape this ring the ring sits right in there and I'm literally just going to put a strap here boom boom boom and duct tape it on you know um you could probably find a more secure way to do it but you know, duct tapes kind of the winner in most places gaffer's tape so what is it once you have four pieces on the ground in pre cut for three more two more two more someone taped to the top and the bullet taught down against the sides let's do one more if you would is it can't mean that there were here all right there's your speed ring and that's pretty much what you got that's pretty solid doesn't go anywhere and we're ready to attach the face to it now okay, so they say you're going to cut yourself a piece of ah parachute cloth nylon ripstop nylon whatever it is it's just about an interest so larger than your box and then we'll tape it on again using duct tape what we do without duct tape listen actually has a corner left over this is my old screaming things you just slide that corner right under there and caitlin's gonna help me take here it comes so you take one side switch to the other side make it nice and taught that kind of pull this tight ish so hold it you take it go up to the corner it's been almost switched to the side so obviously if you spend a little more time making pretty your tapes strips on your you could actually put black tape on the outside um white on the edges if he wanted to or even use black and then clean it up and look it's actually pretty decent once you get it all spend a little more time making fancy let's do one more right here questions yeah could you tell us again about the plans? The piece that there yeah this is is it's a planned from plumbing department for toilet things don't even know what it's called what they used to attach to a toilet the more for actually ok that's what it is for attaching toilets two floors or lights to light boxes whatever whatever your vision calls for her and then and you attach it to the bracket yeah then the bracket there's just a screw through one of the holes because it comes with these holes already drilled in it. So I basically used one of those existing holes and screwed on an l bracket put a little locknut on there so it stays nice and secure and doesn't legal and yeah, you're it's pretty solid and then this is some of the same cloth the parachute block that we use in the cloth is a parachute cloth program in the first place for the scrim cool so when you put your speed light in here what you want to do is to make sure that it is I beg you hear anything? I beg you my brackets it's one of these sorry that you set your zoom setting on your speed light to be wide as possible s so that we can evenly illuminate bounce light off the inside of the box okay as much as possible let's go ahead and find a little bracket for that here we can mount I have one in here somewhere always got brackets here we go so this is ahh specifically for two cold hugh mt he slides onto that l bracket and need a spigot of some sort you can use this one off here and on the table is my leatherman thinking the job? Can you grab that? You know it's pretty tight enough money that case that's gonna go like that and then we'll take a flash about that. All right? So I'm just basically and they had sunk in there about yea far enough to make sure it's coming through the other side of the flynn jj and then we're we're good to go we just need him out that to uh to a light stand okay a pretty body works ok, ok so let's go ahead and put this on something you know we could just have you hold it we'll have you hold it will turn the light on and power on channel a put this in the mood of manual deal okay, this is on channel hey, all right, so daniella this spring you in I just gotta grab it here most will think it's doable and, uh try this might bring out this way a little bit and we're going to light this time from the side the other lights off so we're gonna come in kind of directing the side you're just kind of turn towards the light this time okay? You keep your your body that way is good. Yeah, I just want you to turn your face towards the light, okay? And we're going to aim this so that tapes coming off here all right about there come closer okay, so we're still thinking about the ear to hear positioning it roughly they're coming forward, but because she's going to be turning into the light her face this time we're just going to kind of keep it instead of angling and so much that way we'll kind of keep it slightly that way and we'll make sure this thing firing the good tio best that light went off to turn that one off like that channel, eh all right, so again, I don't know what we're set out. I do know that the zoom is set for twenty four millimeters with this, which is about as wide as it goes and that's important. So that when we need more duct tape on that thiss tape is not liked, actually, the white ones more sticky if you like the black because it wasn't so sticky. Old. Better black wanted to stick it all. Scaffold, I'm not sure where we got this, but it's not quite, very sticky. With all the decorative duck tape you could make designer soft boxes. Yeah, with your with your fancy duct tape. Yeah. Yeah, actually be kind of fun. Way to make the most of this fact that you're using duct tape is, you know, duct tape comes and all these crazy designs and patterns now and when I make a fun one with all your crazy I have dragon duct tape at home that I really like, is that all right? So this one's much more, much more betters tape seems to hold on. Okay. All right. Come on. A little closer. And if you would, we'll see where we're at as faras flash power pretty close. So one of the things you'll notice now, my background doesn't have a whole lot of light. Why? Because we're having a box. Just somebody asked that question earlier. You don't have a lot of the extra light bouncing around, so I'm not really getting any of that spill onto my background. So for a one light set up now, um, I'm gonna have to either open my shutter speed to get more of that background, or we have to have a second life. So if you're thinking you just want to one light, sometimes boxes or not the best, because it really does limit where your light goes and you don't get the effect, which sometimes is a benefit of bouncing it around and filling other stuff. But by itself, you can see it's a pretty nice soft light, and I was going to open up my shutter speed and see if we get some of the ambien case. We lift this up. Caitlyn right there said the same about the same distance we were at the whore thinks so. I added a little more shutter speed radio, so we opened up. Now we can see some of our background, but look at the quality of the light on her face is really beautiful casting. Great detail into address by putting it directional. Ok. One reason I put it to the side is she's got this lacey dress and if you put it to the side, would bring it out. All that detail in her dress. It's still soft, great catch light in her eyes. Um, the only thing it really needs is a portrait would be maybe a little glow in the background and maybe a little hair light.
Class Materials
bonus material with purchase
bonus material with enrollment
Ratings and Reviews
Geo Montecillo
Super good course highly recommended it will help you get started on a low budget, yet creating wonderful images. Is there a link to west got?
F8 and be there
This was an awesome fun class! So many great ideas on how to achieve various lighting effects on a smaller budget. You will save the price of the course most likely by making one softbox (or whatever) yourself. Highly recommended!
Adrian Martinez
Going into my 4th year of photography, I finally built a photo studio in my home and after purchasing some lighting gear and other accessories, I decided to buy this course for additional ideas - GREAT class! I learned a LOT and was very inspired to be more creative. I especially liked that Kevin didn't joke too much or stray away from the course very much at all. Yet, he was still very entertaining and very informative. I'm putting so much of what I got form this class into action right away! This course DEFINITELY pays for itself - right away!