Lessons
Lesson Info
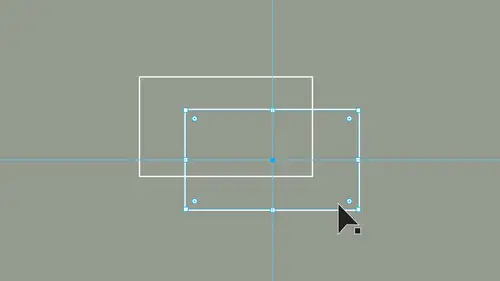
Selection & Shape Tools
So what I want to do is start off with my basic shapes here. With the drawing, we're going to start off with a rectangle tool that's going to allow us to go in and draw rectangles. Click on that shape. I get my cursor when I can simply drag on my page and draw my rectangle and I get my rectangle with my transform palette up here. Whenever I draw any shape, it's going to give me a lot of information to position on the page, as well as the width and height, the angle of rotation and the angle of sheer or skew that I want. It gives me a whole bunch of other parameters in here, which we're gonna talk about as we go through this. But there is my rectangle. So if I'd like to draw a rectangle or a square or a circle of particular size a couple different ways, I can do that just by drawing the rectangle on the page here or any rectangle. I simply draw that, but I don't know what size have drawn that. Thankfully, because of the transform panel, I can see here that I have the within the height t...
hat I can easily enter the values in by highlighting this typing in the value, highlighting the next one, typing in the size or the height right here and clicking Return and I can very easily re size any shape that I've drawn to move things around. That's what you're gonna need. The selection tool for the selection tool shortcut for that is the letter V. It's nice to use those shortcuts as necessary. Saves you from going and moving your cursor over to your toolbar. Any time I draw shape, I can go in and I can click on that shape. Move it around after I've drawn that shape. And if I'd like to get rid of those shapes, I can hit, delete, select out with a selection tool. Move that all around and hit delete. So drawing a square or a rectangle, I can simply click and drag. Now if I want to draw a square, one of the things I can do. If I want a perfect square when I draw here, I'm gonna go we and I'm gonna hold down my shift key. So shift always constrains. So if I want a perfect square or a perfect circle or a straight line holding down my shift key will allow me to constrain so that I always have a perfect circle, square or line When I draw, it's quite nice. I draw hold down my shift key. I get that. There we go. So it works out Awesome. Now one of the things that I have here is I have my smart guides. You'll notice when you draw and I get to constrain is a perfect square here. In this case, I'm not actually holding down my shift key, but with my smart guides turned on, this will give me this little angle, showing me that I'm drawing a perfect square. It also shows my little tool hint in the corner, telling me the size that I have. So how do I get this? Well, you get this by going into the view menu, and we're going to go down to our guides are smart guides here, and we're gonna turn no smart guides on The smart guides are going to give us our tool hint in the corner, and this is going to show us that little that red line or the magenta line that shows up when we're drawing something that is constrained. So smart guys, air turned on. If I draw shape here, you can see that line that connects the corners here. And this shows me that I'm drawing a perfect square without holding down the shift key. However, if I hold down the shift key that just guarantees that I will always have a square when I'm drawing a square Tool works kind of nice. So I'm gonna go back to my selection tool, select those shapes and I've been able to draw a square or a rectangle and set the size using my transform. We're gonna jump over to the Ellipse tool. We're gonna get back to the rectangle tool here. We haven't missed this. We're gonna show you why in a little bit Ellipse tool, same concept. You simply click and drag on the page. You get your tool hint in the corner, which shows you the size. I would recommend not trying to get that tool hint to be exactly where he wanted to be. As you can see, getting the numbers to that exact point can be a little bit tricky. Draw your shape and you can always go into your transform panel and highlight the size type in the size that you want. A quick way to get to your next field is simply hit your tab key and with that tab key there you can go in and type in the size that you want hit return, and then your shape is drawn the size that you want to. If you want to draw a circle or square or anything, and you wanted to be a certain size without having to draw it first and then go to the transform panel, take whatever shape you want, and instead of drawing on the page, simply click with your mouse. When you click with your mouse, you'll be able to go in and set that parameter first. So instead of drawing it and setting it later, I could just go in, click on the page, type in my value, hit my tab key. Jump to the next field type in the next value and return is gonna be the okay button. So if I click OK, it's going to give me the size and the shape that I've done just by clicking. If I do the same thing with my circle or the Ellipse tool click I put in my value here. Tab Key. Put in my value. Click OK by hitting the return key. I get that size quick and easy ways to go ahead and draw set the size before you draw or set the size after in your transform panel. If I have multiple things on my page that I would like to delete, go back to the selection tool and I can select multiple items at once. I can select directly on those items. I can also go into the free space with my cursor and simply click and drag over them any point. As long as that cursor selection touches, it selects them, and I can delete those just a ZZ. Going through to the next shape is my polygon tool, and I can click and drag with my polygon tool. Normally, the default on this is going to give you a six sided polygon, and that's going to be the default right there. So when you draw and you'd like to go ahead and change the shape, the number of sides that are on the shape, the polygon tool allows you to do this in many different ways. Whatever you've last used is your default. The last time I drew this, I had a rectangle and I change the size of this. So whatever, our last use is going to be that shape. So if you'd like to change the number of sides while you're drawing, the easiest way to do that is draw with your polygon tool. Keep your mouse key held down while you're drawing. Use your down arrow to take away sides. Use your up arrow, toe ab sides while you're drawing. Now, many people don't know that you can get a triangle out of this. I've seen a lot of people create triangles over the years, but a polygon or a triangle is just a polygon with three sides. So you draw up era was gonna add sides down era was gonna take them away. That's one of many ways we can go in and create a polygon with multiple sides. One more feature that weaken do while we're in the middle of drawing. This is if you hold down your shift key. The shift is going to constrain it so that we have at least one flat side, which is really nice because trying to get that side flat while you're drawing can be a hassle. But if you hold down your shift key and if you use your up and down arrow, you'll notice that we always have that one flat side on the bottom. The trick to this is when you're holding down your shift key, let go of your mouse first and then let go of your shift key afterwards to keep that side flat. And there's our polygon. We're gonna show you other ways that we can change the sides a little bit later once we get past are drawing Now. The same thing works for the polygon tools with other tools. If I'd like to call up a dialog box, select the polygon tool, click on the page and I get the radius of my polygon, which is going to be from the center to the edge. So the width of my shape here was going to be double this amount. So if I put in a radius of 150 millimeters is going to be 300 millimeters wide, I can control the number of sides here and click OK, and that's going to give me my shape. Any of these shapes, you can simply click on the page. First, get the dialog box, set the parameters there, or you can do it afterwards as well. Next is the star tool, and the star tool creates a star. Same is true with this. If I hold down my shift key, you'll see that constrains with legs of the stars are going to be on the horizontal surface. If not, we can rotate the stars anyway that we want to. While we're drawing the star, we can adjust the number of points and how long or how short the points are. And just like all the other tools, click and drag. Keep your mouse held down. I used my up arrow that's going to control the number of points down. Arrow is going to take the points away. Now this is a little bit more tricky. If I would like to control the length of the points, I'm gonna hold down my command on the Mac or control in the PC, and I can pull out from the center or push in from the center in order to control the length of those points. If I go in far enough, you'll see that it will start to reverse that. But I'm holding down the command on the Mac control in the PC and pulling in and out from the center. So up Arrow gives me points down. Arrow takes them away. Command in the mac, control in the PC in her out controls the number of points. Now, if I want to set these parameters before I draw Aiken, simply delete that. Take my star tool, click on the page and then I get my dialog box. And this may be a little bit more confusing. And how this works. We have radius one and radius, too. What does that actually mean? Well, radius one and radius to our this. When I draw my star and I'm talking about radius one radius one is going to be the point. The distance from the center point to my most extreme point radius to is going to be from the center point to the most inside point here. So the more extreme difference you have between radius one and radius to the sharper the points. So if I have radius one set to 25 and radius to set to 200. I'm going to have very long, very exaggerated points. But I'm going to get an extreme difference in between the outside radius and the inside. If I set something that doesn't have much of a difference between radius one and radius to, I'm going to get more of a burst than a star. So simple way of going in and setting this back to you, the normal star, a normal star is going to be one measurement. The next is gonna be half the measurement five points and that's gonna be back to what you would consider a normal star. People always ask me, How do I get back to the default will? The default is whatever you said it to be. In this case, if you want to get back to a normal star, that's what you have so pretty cool Be able to do that. So there's our basic shapes now, one of the things I've saved as I've skipped over the rounded rectangle tool in the reason why is because while the rounded rectangle tool is nice toe, have you don't actually have to draw with the rounded rectangle tool to get rounded corners. Now, when I go in and I draw with rounded corners here, it automatically sets the rounded corners here. The last one I used, I had rounded corners, and I set that when I drew again. If I take my rounded corner tool click before I draw, I consent the size of my shape. Use my tab key to go through the fields and set the corner radius. One thing I don't like about this is that there's no preview. I can't see what I'm doing, so I have to kind of guess so. I click OK, and there's my shape with my rounded corners, and it's like, Wow, wouldn't that be nice to be able to go we and and change those corners? Well, that's what the transform panel is for as we go when we draw any of these shapes. Many of these attributes are changeable here in the transform panel, including the rounded corners. So with my rounded corner rectangle here in the lower part of my transform panel, I have all my corners where I can go in and I can change the rounded nous of the corners but this is not unique to the rounded corner box. I'm gonna go back to you Just my rectangle here when I draw my rectangle and you'll notice when I draw a rectangle in my transform panel, I have all the rounded corner options set right here. So a rounded corner rectangle is nothing more than a rectangle that has the corners rounded to begin with. But I could round any rectangle or square. Here I have the ability to go in and set the corner types by clicking on the drop down menu next to the fields in the transform panel. If I choose a rounded corner and I set something, so if I choose a rounded corner and I begin to increase the size of that corner, that's going to go in and that's going to round that particular corner. Why is it doing only one? Well, this link right here this is a chain with a slash through it, showing me that those corners are not all linked together. If I click on this and it becomes a link and I set those corners, I'll be able to go in, and I will be able to set all those corners to be the same. So if I set those corners to be 25 Aiken set that to be a 25 millimeter corner, and then I can set all my corners to be 25 millimeters, and they'll all set to be rounded corners at 25 millimeters. If I then increase the size, I can go in, and I can link or unlinked these so that they work together or separately so I can go in and use the rounded rectangle if I want, which is fine doesn't hurt anything, or it could just start off with a normal rectangle. Keep those all linked together, and as I change the sizes, it allows me to round those corners. I can change the corner type from rounded to inverse Rounded and Aiken do these one at a time as well, so I can get different types of corners as I go through. When I link these together, it does not link the corner types it on. Lee links the values here so I can size up or down those particular corners as we go. So the transform panel can be nice to use. There are other ways we're gonna show you how to go ahead and around those corners as we go. So you don't need the rounded corner tool. You can use it if you want to. The rectangle tool is going to give you the same thing. Not a problem at all. Either way, they're both there for you to use. Now, one more thing that's interesting with this. What? I'm going in and drawing a may not just be drawing basic shapes just to get a shape case in point. I'm going to go and I'm going to draw a circle on a perfect circle. I'm gonna draw that circle on the page. I'm gonna go back to my selection tool. I'm gonna click off and there's a circle. I want to create a doughnut and I want to be able to put a circle right in the middle of this circle. And I have my smart guides turned on here under view. Smart guides. They're turned on by default. But if you've turned them off, make sure they're on for this. I would like to draw another circle or another item in the middle of this exactly in the middle, and I want to draw from the middle. You'll notice when I draw any of my shapes, I'm drawing from where I click and worry poll. But in this case, I want to draw another circle right in the middle. Well, thanks to my smart guides, when I go in with my cursor and I'm ready to draw wherever I click, it's going to show me that location. So if I want to draw right from a certain position or right from the very middle of my circle, I can hover my cursor over, and it actually tells me I'm in the center right here. Well, if I want to draw another circle directly in the center from the center and I click and drag here, you'll see that it pulls the direction that I pulled my cursor, not what I wanted. But if I want to draw from the center here, I can actually hold down my option or my all to key on. You'll notice what the cursor does when I hold down the option of the Ault. It gives him a little radius, which allows me to draw that object from the center. So if I've landed my cursor in the center and I hold down my option or Ault and I go from the center. This allows me to park that right in the center of what it was drawing. This is not unique to circles. I jump over to the square here on I put my cursor right in the center. When I hold down my option or Ault, it allows me to draw from the center. So I get these items positioned right in the centre. It's kind of nice that I could actually draw these and not draw them separately and then moved him together. I can go in and simply draw them right on top of each other. The key to this is you can't have your initial object selected because when you have your initial object selected, when you try to draw another shape in here, it's going toe. Want to grab this shape and move it? You'll notice, even though I have my circle or my lips tool selected, and I park this in the center. It goes here and gets my selection cursor because it thinks that I want to go in and select and move this around. I don't so I have to make sure I select off my shape. Select my new shape, have my cursor find the center. It actually says center. And to draw from that center, hold down your option, your old key and draw. If you want to constrain that to a perfect circle, hold down your shift key and this allows me to do both at the same time, draw from the center and constrain it as well. So there's the very basics of going in and drawing your shapes. Simple isn't easy. Is congee, simple shapes, anything that you want to do with these shapes, You can see in the transform panel here, the within the height you want to rotate or sheer any of this you have it. If you draw a rectangle and you'd like to rotate, here's the rotate tool right here. You can go in and rotate that shape anyway that you want Teoh pretty easy. So there's our basic shapes. Now, once we draw our basic shapes, we're gonna want to go in, and we're gonna want to manipulate and edit these shapes any shape that we've drawn. When you have your selection tool, you're gonna have a set of pull handles top bottom, left and right, and then every single corner here. This allows us to click on any shape with the selection tool and pull those corners anyway, that we want to and resize that shape nice and easy. Doesn't matter what we have. Circle Square simply selected with the selection tool. Pull on those corners and we can resize that up, down, left to right. Every shape is gonna have those handles in those tools. Now, if I want to rotate a shape to Aiken, select that shape and I can take my selection tool and hover over the outside edge, not touching the actual corner, but hovering just outside it. I'm gonna get my little double headed arrow, which allows me to go on an rotate and you can see it gives me a little tool hint that shows me the angle of rotation there. If I would like to constrain this while I'm rotating because I'd like it to snap to 45 or 90 degrees holding the shift key down allows me to snap right to that angle of rotation. So if I want to do that, hold down the shift key and this allows me to snap right to that selection. To select an object you don't have to select and click right on that object. You'll notice that I can take my selection tool and simply click and drag, starting some from the free space and the document. I can click and drag over and touch that object to select it. Hover over any one of the corner handles. I can rotate. Hold down. My shift key is going to constrain. This is true with anything that we draw. So pretty simple way to rotate. If I want something specific in terms of rotation, I can select either of those objects and go into the rotate section here. Choose the drop down menu or apply a value to this and rotate it and I could rotate this back simply by returning it to zero. Any shapes transform Panel is going to be your friend for sure, so we can resize. We can rotate any of our shapes, works out just fine now if I want to resize something here and I want to keep everything in proportions, I like this rectangle and I like to proportions of this and I want to make it larger, smaller, but keep it in proportion. I'm gonna hold down my shift key, and when I click and pull any of the handles, the shift key is going to keep it all in proportion. It's going to constrain it. Same with the oval here. Shift key makes it larger, smaller as we go. What keeps it in the exact same proportion. Don't hold down the shift key, and you can go anywhere that you want to. But hold down the shift key, and that's always going to keep it in proportion. Works great another way we can go in and scale this without using. The shift key is if I select my object and I go over here into my within my height. Right now, the chain is active, which means if I adjust, the width is going to adjust the height and a quick and easy way of doing this. If I don't want to go in and put in a specific number, it's just put your cursor in the field where you're with your height is and simply use your upper down arrows on the page or on your keyboard. You'll notice because the values are linked together here, they will do them both together as I use my upper down arrows. Here they go up or down as we go. If you're impatient and you'd like to scale this faster, hold down your shift key and use your up and down arrow while you have your cursor in that field and that's going to do it in 10 times the amount. So if you want a specific number, you can type it in or scale it easily, doing it directly on the object or here in the transform panel. Either way, works works great every time.
Ratings and Reviews
Tomas Verver
I have done all Jason Hoppe Illustrator Courses. I still like the way Jason is teaching. i like to train my Illustrator muscles. Although I'm quite advanced and a few years of experience in the program. Still some smallers tips/trucs are picked up using this course. And it's a nice refresher, course to keep up to date with your skills. As part of the pass it's a nice course.
Peter Tan
As usual, Jason's teaching of AI is straight forward and right to the point, make the student thinks AI is too easy. Great to learn from JASON.
a Creativelive Student
Provides a great overview
Student Work
Related Classes
Adobe Illustrator