Lessons
Lesson Info
Create a Gallery Wrap
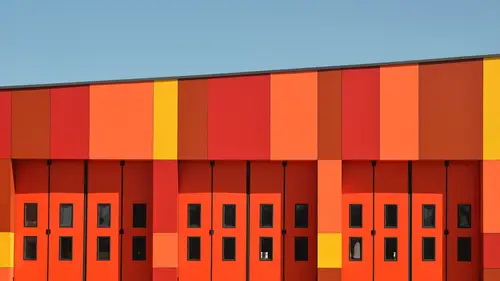
gallery wrapped canvases are a product that a lot of labs offer, where the images printed on campus, and then it wraps around the frame. So when you look at the finished piece from the side, for example, you actually see the image wrapping around the sides and the top of the bottom of the frame is a very cool thing. And personally, I like them best when the frame is really thick, like a 2.5 inch thick frame, and in such an example, you actually need three inches of image to wrap around. So if you shoot, portrait's a lot like in my case, I would always have these really close up like dramatic pictures. And people would be like, I love that I want that in the camera throb. And then it would make it so that, like their forehead or their eyebrows, like wrapping around because there was a room because I shot it so tightly. So in some ways, that's my mistake, because I shot it too tightly. But at the same time, that's how I like it. So what do you do? So here's what you dio So in this exampl...
e, let's say that the client ultimately wants a 20 by frame to accommodate the rap For a 2.5 inch thick frame, we need three inches on each side, so we need an extra six inches for the width and the height. So let's go to our crop tool. So that means that this image with a 20 by 24 with all that added to it, is going to be a 26 inch by 32 inch time. So that that is tight, as you can see here. But it's gonna work, so we'll go ahead. I'm gonna leave resolution blank. Um, we'll go ahead and crop this great. So you think, Well, what's the big deal then? You just did it Well, this crop now includes the wrap, the area that's going to be wrapping around it. So how do we know what that is? Let's draw some guides so we can see that. So we have our rulers here. If you don't have your rulers on your screen, you can find them from the View menu. My choosing view, rulers or press commander control are so that'll bring him up. So all we have to do is click and drag. And you can see that as I drag photo shop is showing me the Y values for this horizontal ruler. And if I hold shift, I can snap it in half inch increments. And I think if I zoom in, I could snap it in quarter inch increments. So anyway, I'm gonna snap that 23 inches. Um, oops. And it kind of it moved a little bit. There we go. So there's three inches will go three inches here, too. And then this will be 29 from the bottom. Oops. Get a little, like jittery, I guess. Okay, so those guides represent the areas where the campus would then wrap around the frame. So obviously, that's not gonna work so good. I mean, I wouldn't want the top of the sign wrapping back around the frame or like the bottom of the cars. That would just be a weird if all we were left that was facing forward, was this? That's weird. So we're gonna undo all of this, go back to our original image, and this time we're gonna crop the image to what we want for the final 20 by 24. So we'll go. And again we're choosing the with heightened resolution. So we want a with of and a height of 24. So we'll just drag that about like there and go ahead and crop it. And now we're gonna use canvas size to fill in that border area. So I'll come up to image and shoes canvas size. And we have two options for the way that we do this. We can type in what we want. The finish dimensions to be so that would be 26 by 32. Or what I think is even easier is if we click this relative button. We can just tell Photoshopped that we needed to add six inches to the with and six inches to the height, and then we can decide how we want that to happen. If we click down here, it will add all six inches to the top of the image, and it will split the side. So three and three, or if we click right here, we can tell it to grow downward from the top. So then all six inches would be at the bottom. So what we want is in the center for this example. We can tell it what color we wanted to fill with. Um, there are some presets here or if I click other, What I'm gonna do is actually come in over into the image here. And I'm gonna sample this dark blue color from the building right here. So it's like almost black, but not quite. And then I'll click, OK, and it just filled that in with precisely what's needed to go around the image to make the nice border on. I don't have to worry that it's gonna wrap, and that could be really fun. So, like when you're doing kids portrait's and stuff, you know, you maybe you keep it simple and just go with a black fill or something. But you can also, it could be really fun to have, like a black and white portrait and then a fun color for the sides to have a little pop in those wraps as well. So that was always my technique of how to save those situations, which happened a lot Eventually I was kind of like, Maybe gallery wraps just aren't my thing. I just don't shoot for that I guess. Um So here's another example with Big Ben here. And let's say that we were in the same situation where we wanted a 20 by 24 of this image. Um, so maybe in this case, what we would dio we have this. I mean, Big Ben is just too tall to fit in the scene unless we extend the canvas. But then we'd have to fill in like the rooftops down here, and that can all be done. But maybe we just don't need to work that hard. So what I might do is actually just come like this, and we believe as much room is on the bottom as I can while still cropping those out. And then I'm liking this. I'm gonna tell it to use content, aware to fill that in, We'll see how well it does. And then we'll run the canvas size to add a border around this. But just to the top, actually. Let's see. Did it not do it? It didn't really campus aware any of that did it. We can always If we don't want to manually paint, we can always just select it and then run content aware fill and we'll see how it's going to do that plenty bad. Needs a little touch up work down here. Um but I would just paid over that. Okay, so anyway, something like that. Now, if we wanted Teoh, let's see that in this case, we we have the simple background so we could have Photoshopped fill that in even for the rap. So let's tell photo shop in that we do want Teoh. Um we want to add the six inches to the total dimensions, but this time we want to grow it from the bottom. So all those six inches vertically are going to be added to the top, and we don't have the choice here to tell it to fill with content aware. So what I'm gonna do is just tell it white and then we'll click that again. So this time you see how it worked. It added three inches on each side and six inches to the top. Let me bring that back up. So we told it six toe add each one. But instead of the center I call these chick lits because you is remember chick lit gum. Do they still make that I haven't seen it around, but they look like chick lit gums to me, so I call them chocolates. So instead of the centre chick lit, we're gonna click the bottom chick lit and I'll tell it to fill with white so that it's easy to just quickly select it. And then the shortcut to pull up, content aware fill is shift, delete, and then or at least that pulls up the fill command. And then you can select content aware fill, and then that will just fill it in. Hopefully, there is probably going to be touch up involved. So when we did this, the first thing we did with crop it to the composition we wanted, then we fill that in and everything, and then I went in and extended the canvas toe, actually make the rap. So then this is what the finished piece would look like. And the bottom three inches of Big Ben here. So if we go, is that right? It's 32 right? No, No. 30. The bottom three inches of Big Ben would be used for the rap, but I I'm fine with that. That's all. By design. I came in from Cayenne, who's been watching from New Orleans and just wanted to double check that you had the check box of the leak cropped pixels turned on and just wanted a quick clarification on why you were leaving that box. Checked? Yes. Um, in this case, it's really actually important to Leavitt checked because we want to cut off everything precisely to a certain size, and then we're growing the campus. If we I think in the next example, I'm gonna show you what that's all about are not the next one but coming up if we, um and that had this has actually confused me and caused a little bit of a mess before because if you don't delete the cropped pixels, they're just stay there. They're just sort of like off camera. So this week, And so what happens then is if you grow your canvas, they show up back in, and you may not have been planning for that. So I'll show you that in a minute.
Ratings and Reviews
Lael
Something that seems so basic, but so important! Big help & tips on gallery wraps, ratio vs size cropping and when to specify resolution or when you need to delete those pixels! Super fun technique to 'crop to shape' great ideal for web & social media. I appreciate that Khara covered the change from 'old crop' panel (previous versions) to 'new crop' (more recent CC versions), every time the interface changes it hard to switch the brain over ;)
a Creativelive Student
I just bought this class based on the previous reviews. I am so glad that I did, as I learned some new tricks to do in Photoshop! Thank you Khara for sharing this great information!
Amy Vaughn
I didn't think I'd learn much in a class about cropping, but Khara went over a few things I didn't know. I'm a Photoshop dinosaur that hasn't been keeping up with all the changes to the tools that came along in the CC version, and turns out there are a few new goodies for cropping. She also had some good tips for gallery wraps.