Cityscape Image: Layers Theory
Lesson 13 from: Capturing and Processing Night PhotographyTim Cooper
Cityscape Image: Layers Theory
Lesson 13 from: Capturing and Processing Night PhotographyTim Cooper
Lesson Info
13. Cityscape Image: Layers Theory
Lessons
Class Introduction
01:47 2Safety And Scouting
01:28 3Photo Pills App
03:45 4Civil Twilight Image Prep And Test Shots
12:40 5Setting Intervalometer And Capturing Cityscape
04:04 6Light Painting: Equipment Overview
03:20 7Light Painting: Composing The Scene
03:14 8Light Painting: Setting Sky Exposure Ambient Light
08:06Light Painting: Color And White Balance
05:12 10Light Painting: Mixing Warm And Cool Light
14:58 11Review Cityscape Library
02:01 12Opening Images In Lightroom And Moving In Photoshop
19:29 13Cityscape Image: Layers Theory
07:56 14Cityscape Image: Selections And Mask Theory
05:48 15Cityscape Image: Selection Using Color Range
08:27 16Cityscape Image: Altering Masks
05:36 17Review Light Painting Library
03:01 18Light Painting: Opening As Layers In Photoshop
11:00 19Light Painting: Layer Masks
12:05 20Light Painting: Edit Review
07:59Lesson Info
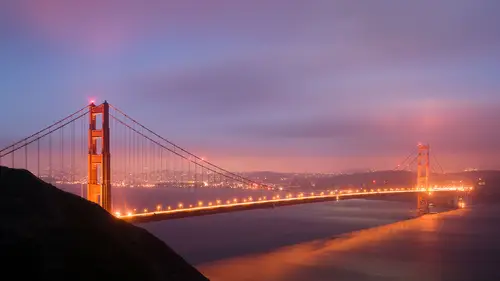
Cityscape Image: Layers Theory
You can see that we have two different layers, and I'm gonna get into what a layer is in just a second, but we do have two different layers. So, if I was to do something crazy, like grab a paintbrush and paint with black, or paint with white, and save this file: File, Save; and then close the file, it automatically goes back to Lightroom. So, here was one image that we opened, here is the other image. You can see when you look at the screen, it's a DNG, which is a raw, and this one is actually a TIF, so it always comes back as 'Edit', takes the first file, which is '6846', and it says, '6846-Edit'. That lets me know this is the file that came back to Photoshop. All right, now, in Photoshop, we're gonna be working with a lot of layers and masks and selection, and we need to preserve those layers and masks and selections. But now that I'm at a TIF, if I open this back into Photoshop, which I will do: Edit-- Oops sorry: Photo, Edit In, Photoshop, I get this warning dialogue box and it say...
s, "Hey, what do you wanna do with this? "Do you want to edit the original? "Do you want to edit a copy? "Or do you want to edit a copy with Lightroom adjustments?" Now, the safest thing to do is, once you begin to work in Photoshop, continue to work in Photoshop. So, we created this new file, we went into Photoshop, I made some changes, and it comes back when I save it into the Lighroom library, which is where we want it. We can track it, we can find it again. But, if I decide that there is something else I want to do to this image, try to restrain yourself from doing it in Lightroom. A better option would be to take it back into Photoshop, do that change in there, and then return to Lightroom, and continue to do that. It's a little bit more cumbersome of a process, but it doesn't get confusing. Here's the reason: when we go to re-open this into Photoshop, 'Edit Original' means edit this image. It does not mean the original image that this came from, which is this DNG here, it actually means this image. That's what we want to do 90% of the time. There is no reason for me to set a copy, right? I don't need to make a copy of this image, I just need to get back in there and work on those layers. Then we have 'Edit a Copy with Lightroom Adjustments': this is what you would choose if you had made some Lightroom adjustments very quick, kinda down and dirty, and then tried to re-open it. If you wanted those edits, what it would do is flatten the file, and let me just show you. I'm gonna 'Edit Original', so I'm gonna open that, and this is, again, what you want most of the time, I'm gonna choose 'Edit', and here we have our layers and we have everything that we need to work on, okay? So, this is good. Now, I'm gonna save this: File, Save. Actually, I didn't make a change, so I don't have to save it, I'm just gonna hit Cmd + W, or Ctrl + W, for close. Now, if I open this file, and I'll hit Cmd + E to open that, and I hit 'Edit a Copy with Lightroom Adjustments', let's say maybe we had changed this to black and white or something, so I just changed it to black and white, and I'll now open that into Photoshop: Photo, Edit In, Edit in Photoshop. This time I'll choose, 'Edit a Copy with Lightroom Adjustments' to maintain that black and white setting that I did back there, and when it comes into Photoshop all of our layers are flattened, which means all of our ability to re-edit that file are now gone. So, the long and short of this is: when you're working in Lightroom and you create a brand new file to go into Photoshop, what you wanna do is choose 'Edit Original'. So once again, we're gonna start this all over again. I click on this image, and I click on this image, and they're the two I would like to blend, and I choose: Photo, Edit In, Open as Layers. Those two DNGs get little copies made, they get turned into TIFs, the two images come together in one file as layers, and here they are. Now, my work process will be, when I'm done here, I hit 'Save' and 'Close', and it returns to Lightroom. At that point, if you ever wanna go back and work on that image, it's a good idea to take it back into Photoshop, make some changes, and then return it to Lightroom. And then, when you're in Lightroom, then you can send it up to the web, or put it on social media, or make prints, or whatever you need to do, from Lightroom, and that's much easier. Okay, so, we started off with a fairly overcast sky, some interesting lights in here, and our goal was to get better detail in the lights across the bridge, and to get some better shadow detail throughout here. And this we can certainly do. However, I'm starting to see that it kinda looks a little bit dull. And, maybe, I'm not in love with the white balance. Don't ever be afraid to go back and just quit. Quitting is fun, right? So, sometimes it's easier to return to Lightroom and adjust things, then it is to do it in Photoshop. So, I'm just gonna close this out, and readdress in Lightroom, my white balance. And let's see where we are at. We shot it at about 3800, which I think is looking pretty good, but I think what I'm gonna do is I'm gonna cool down by using my temp slider here, and pushing it towards blue. I'm gonna cool down the sky a little bit. But what that also does, is it cooled down my lights and my bridge, and I don't want that to happen on the portion of the image that I'm gonna use the lights and bridge. So I'll just leave this one alone. So let's recap: this image, I darkened the highlights down when I was processing it in Lightroom, and changed the white balance to be a little bit more cool. This one I also darkened the highlights down, but I left this as shot, to keep that warmth in the lights and the bridge. Now, let's take those two images and go: Photo, Edit In, Open as Layers in Photoshop. Excellent, okay, so at a quick glance, you can see that we've got warmer structure here, slightly cooler structure, but a cooler sky. Now let's see how we can blend those together. All right, when you're working with layers in Photoshop, do remember: you can always rename them by simply clicking on here, double-clicking right on that name, and renaming this 'Bridge', and renaming this, let's say, 'Foreground'. And that may help you at a quick glance to identify what's happening over here. You can have either layer on top, does not matter, we can have the light one on top. We can have the dark one on top by simply grabbing on there and moving it 'til a blue line appears. Once a blue line appears, you drop, and you can rearrange that, you can rearrange the stacking order.
Ratings and Reviews
Phillip Ziegler
This course, along with the others by Tim Cooper, are outstanding. His demonstrations and explanations are so clear and easy to follow. I've been out doing long exposure night photography using what i learned from Tim and and delighted by the results.