Light Painting: Opening As Layers In Photoshop
Lesson 18 from: Capturing and Processing Night PhotographyTim Cooper
Light Painting: Opening As Layers In Photoshop
Lesson 18 from: Capturing and Processing Night PhotographyTim Cooper
Lesson Info
18. Light Painting: Opening As Layers In Photoshop
Lessons
Class Introduction
01:47 2Safety And Scouting
01:28 3Photo Pills App
03:45 4Civil Twilight Image Prep And Test Shots
12:40 5Setting Intervalometer And Capturing Cityscape
04:04 6Light Painting: Equipment Overview
03:20 7Light Painting: Composing The Scene
03:14 8Light Painting: Setting Sky Exposure Ambient Light
08:06Light Painting: Color And White Balance
05:12 10Light Painting: Mixing Warm And Cool Light
14:58 11Review Cityscape Library
02:01 12Opening Images In Lightroom And Moving In Photoshop
19:29 13Cityscape Image: Layers Theory
07:56 14Cityscape Image: Selections And Mask Theory
05:48 15Cityscape Image: Selection Using Color Range
08:27 16Cityscape Image: Altering Masks
05:36 17Review Light Painting Library
03:01 18Light Painting: Opening As Layers In Photoshop
11:00 19Light Painting: Layer Masks
12:05 20Light Painting: Edit Review
07:59Lesson Info
Light Painting: Opening As Layers In Photoshop
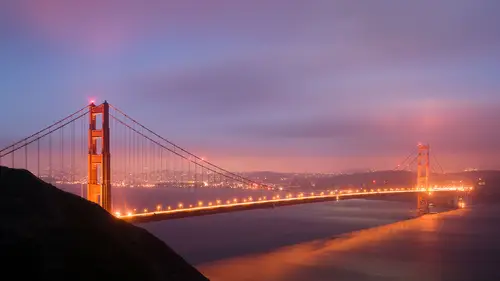
Now you may remember from watching that we did some light painting. And that was a ton of fun. And this is a technique that I do all of the time. I love light painting. But we ran into some issues. There was a lot of wind going on. So we had some images where the camera was actually blowing and they're a little bit out of focus. But fortunately we salvaged some stuff. So let's take a peek at this. You can see these different images that I created. And they each have light painting in subtly different spots. Here that's bright. Here we've painted back here. In this case we painted the, the bit of the railing. Here was a paint across the bottom to really rake the light and get some nice texture. And I wanna bring all of those out. So just as a reminder, we created all these images because I couldn't walk around my flashlight long enough in one single expose to paint the whole scene, so we shot it many, many, many different times. This is a technique I use very very often. And again, the ...
problem here is that we had to stop our exposure because of the city lights. So we couldn't go for two, three, four, five, 10 minutes and just run around the scene and paint. We were set at 30 seconds. And that's pretty fast. Or a minute I think is what the exposure was. So once again we're gonna take these images, and we're gonna go photo, edit in, open as layers in Photoshop. And it will open all of those different layers into Photoshop as one file. All right, now, what we're gonna need to do at this point is we're gonna need to discover which bits of highlight are on which image. And that will take us a little time. You have to figure that out. But it's, it's not too bad. I'll show you one little hint that will help with that. Okay, so all our layers are loaded up. And what we're seeing here is only the very top layer. Remember, this one's obscuring all the layers below it. Okay, now here's a cool little trick. And, I couldn't live without this in many cases. What I'm gonna do is I'm gonna select all these layers. And the reason I'm gonna do that is 'cause I want to ensure that they're aligned. Like I said, that wind was blowing. And so, if I take this eyeball off, I'll see the layer below it. And straight away there it is, you can see it. Look at how the camera moved in between those two exposures. Let me take this one off. Moved again. There was some fierce wind people. Moved again. Moved again. So these images are all over the place. Even though I was on a tripod and trying to be very very careful the wind dealt us a blow. So I'm gonna select this top layer, and select this bottom layer so they're all selected. I held my shift key down when I clicked on that bottom layer. Now, there's a great cool tool in Photoshop called edit, auto-align layers. And this magic people. I'm gonna click on that and choose auto. And click okay. And it's going to take its time. And it's going to automatically align all of these layers perfectly. Which means I'm probably gonna have some edges on the borders that I'm gonna have to cut out. But there. It's already finished. So as I take these eyeballs off you can now see that nothing is changing. Everything is perfectly aligned. That folks is a lifesaver. All right. Now all my layers have remained selected. So here's the trick to blending light painting images together. What we're gonna do is we're gonna change something called the blending mode. And I'm gonna change this blending mode to light. And just to give you a little heads up, that's also the same blending mode you'd use for star stacking, if you had stars in the sky. So, I'm gonna choose lighten. And suddenly, ta da, it all comes together. There is all of the individual areas that I painted with my flashlight, all come to the forefront of the image. So, this one even though this is the stairs and it's being illuminated here, it's not being obscured by this upper layer because the lightness is showing through. The light is part of each one of these layers, shows through to the top. So, this makes it really super easy to blend together all those different exposures that we made. All right. But we've got some problems. A lot of these are out of focus. So for example, if we zoom in now, you can see the bridge is not sharp. And that's because the camera was literally moving on the tripod in the wind. So what I have to do is find out which part of the image is sharp and which isn't. So I'm gonna do this by going down and taking off all of these eyeballs, except for this top one. And you can see that the top one is the one where the bridge is sharp. Okay. So, I don't want any of the bridges coming through through this upper layer via the lighten blending mode. So what I can do is ensure, by making a selection in a mask, that I am not actually seeing any of these lower bridges. So what I'm gonna do is I'm gonna use a very easy selection tool here, the quick selection tool, and I'm just dragging this across the image. It makes a nice selection along that bridge. In the top there. And down through here. And that looks pretty good. I'm gonna get down right to the edge of the darkness I think. Yeah. And, don't be afraid to zoom in. I see a lot of people working at very, on very small images and it doesn't allow for as much accuracy as we may need. And I'm just gonna go in here and add this bit. Add this bit here. And, add this bit in here. All right, now that's our selection. So, what happens is if I put that on this upper layer, which I will now do, it's going to eliminate seeing all the shadow stuff. Well, that's not exactly what I want to do. There may be bits down in here I want to use. So, what I'll do is I'll go down to this layer, and put it on here. Now, what that's doing is because this is white it's allowing that bridge to be seen. And that's exactly what I don't want. So what I'm gonna do is invert this mask by hitting command or control I. And it flips that mask. Now the white is showing me the lit stairs and the foreground here. But it is not showing me the bridge. Now, what I'm gonna do is continue that for all of the layers below. And there's an easy way to do this. I'm just gonna grab on this mask. Click on the mask. Hold down my alt option. And drag it. Hold down my alt option. Click on the mask. And drag it. And that copies it. And you actually have to click your alt button first. So alt, click, drag. Alt, click, drag. Alt, click drag. And alt, click, drag. Now because these are all black on the top that means I'm only seeing the bridge from this upper layer. But, now we can see how it's nice and sharp here. But, I'm still seeing all the illuminated areas from below. If you wanna see which areas are which, you just take the eyeball off. So, this layer is clearly the ground. This layer is the illumination back in there. This layer is that back light. All right, and this layer is that back layer, back in here. That's some nice light. We go down to this layer, turn that eyeball on and off, that's that railing. You can see that happening down in here. And the last layer is some more illumination in here. All right, now what I wanna do is because I want to use as few of these blurred layers as possible, I'm gonna actually look at them. And individually, without the rest of the image. And one way to do that is if you hold down, if you hold down your command key, I want you to notice what happens when you click on this eyeball. I hold down, I'm sorry, I hold down my alt key, not my command key, and I click on this eyeball. And it immediately removes all of the other eyeballs at one time. So I'm only seeing this layer. And if I alt click on it again, everything comes back. So that's a really fast little shortcut to allow you to look at one individual layer. And very handy of course when you're layering multiple images together. So I'm gonna alt click, and I'm gonna zoom in, and I can see how out of focus this is. So I wanna mark that. I'm gonna mark that by control clicking, or right clicking if you're on a PC, right on that layer itself. And I'm gonna give that a red label, which pops up there. That's telling me, hey, that layer's a little bit out of focus. So once again, I'm gonna go up to this next layer and alt click. And I'm going to zoom in. And that's not too bad. It's a little out of focus. But not too bad. So I'll leave that one alone. Or better yet, I will right click on that, and choose green. That's a sharp one. Okay. So now I'm gonna alt click on this layer. And see what's illuminated. And zoom in and that's, well, that's not too bad. And we'll label that one green by right clicking and labeling that green. All right, now the next layer up, I alt click and get rid of all the other layers. And that's that back area. And that's not terribly unsharp either. So we're gonna leave that one alone. Call that a green. Right click. Choose green. All right, up to the next layer. Where was this one? That's look nice and sharp. So that's a green. And I'm gonna alt click on that layer. Oh yeah, that's a good layer. That's the nice pavement illumination. So that's green. And, then the last layer is the top layer, which is good.
Ratings and Reviews
Phillip Ziegler
This course, along with the others by Tim Cooper, are outstanding. His demonstrations and explanations are so clear and easy to follow. I've been out doing long exposure night photography using what i learned from Tim and and delighted by the results.