Light Painting: Setting Sky Exposure Ambient Light
Lesson 8 from: Capturing and Processing Night PhotographyTim Cooper
Light Painting: Setting Sky Exposure Ambient Light
Lesson 8 from: Capturing and Processing Night PhotographyTim Cooper
Lesson Info
8. Light Painting: Setting Sky Exposure Ambient Light
Lessons
Class Introduction
01:47 2Safety And Scouting
01:28 3Photo Pills App
03:45 4Civil Twilight Image Prep And Test Shots
12:40 5Setting Intervalometer And Capturing Cityscape
04:04 6Light Painting: Equipment Overview
03:20 7Light Painting: Composing The Scene
03:14 8Light Painting: Setting Sky Exposure Ambient Light
08:06Light Painting: Color And White Balance
05:12 10Light Painting: Mixing Warm And Cool Light
14:58 11Review Cityscape Library
02:01 12Opening Images In Lightroom And Moving In Photoshop
19:29 13Cityscape Image: Layers Theory
07:56 14Cityscape Image: Selections And Mask Theory
05:48 15Cityscape Image: Selection Using Color Range
08:27 16Cityscape Image: Altering Masks
05:36 17Review Light Painting Library
03:01 18Light Painting: Opening As Layers In Photoshop
11:00 19Light Painting: Layer Masks
12:05 20Light Painting: Edit Review
07:59Lesson Info
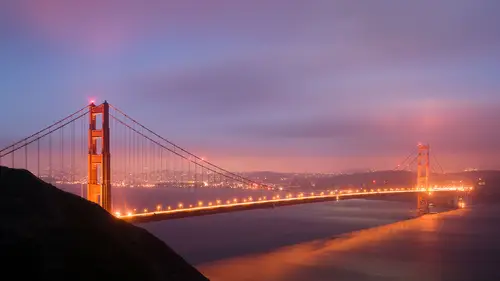
Light Painting: Setting Sky Exposure Ambient Light
One of the first steps we're gonna do with light painting is trying to marry the ambient light to the level of our flashlight. Now we're gonna start with our ambient light, and a lot of times it's gonna just sort of be guess work. The things to consider are how much time do you want to light paint, how much depth of field do you need, and how bright are your flashlights are. So I'm gonna take a guess here at ISO 200, let's put this at, let's put this at ISO 100. And I'll put it at 30 seconds. And we are at F8. Now, 30 seconds, I'm gonna run a test shot. Once you get to a certain point we tend not to trust our LCD display in live view. At night, some cameras perform really well with the live view, others not so good. So again we're gonna ultimately depend on our histogram. All right, so let's run a test shot here, I'm gonna have my table release and I want y'all to notice it's already stuffed into its little pouch so I don't disturb my tripod shot. And I'll turn off my live view. And we...
'll get this one going. Now remember what I'm looking for here is my ambient light. We're gonna set our first exposure for ambient light and then we're going to light paint to fill in the shadows, or not only fill in, perhaps make it brighter. We're gonna balance that light. In addition what we're also gonna need to do is balance the color. So, the white balance on this I believe is still set at 3,800 which is the white balance that you used to shoot the bridge earlier on. That may be a good white balance, it may not be. Let's just see what happens. All right, looks like that's not quite enough light. Let's pull up our histogram here. And yeah, we're probably about a stop, maybe about a stop and a half dark. So instead of shooting at ISO I'm going to change my ISO to 200, and maybe even a little bit higher. Let's go to, let's say maybe and we'll take another shot. Now once we get closer to our proper exposure we'll have a much better time examining the color of the sky itself. And then we'll set our white balance accordingly. Now remember, setting your white balance can be a really subjective thing. I may want that sky to be really warm, I may want it to be looking very neutral. It's really all dependent upon you and what you're looking for in your photograph, what kind of feeling you want to give your viewer. You can play color contrast, you can play with color synergy and harmony, entirely up to you. All right. So, we've got a little more brightness in here, I'm not yet convinced that we can't go a little bit lighter. The sky is pretty good but what I don't want to do is lose detail on that bridge. And it's always a good idea on these test shots just to make sure that our sharpness is good, and that's nice and tack sharp there. I'm gonna go up even a little bit higher. Now, here's the thing. I am at ISO 250, and that's 30 seconds. Another option I have instead of raising my ISO up to say 400 or 800, I can add more time in. So if I wanted to add another stop in that would be a minute. So I think what I'm gonna try here to keep my ISO fairly low, give myself a good amount of time to walk through the scene in light paint, I think what I'm gonna do is set my exposure at one minute instead of raising up my ISO. So to do that, I'm going to need to come down to my cable release and reset that from the last shot we did. There we are set at one minute and length. And our interval was set to one so we're just taking one shot, which I want. And that should be good. All right, so, we're at ISO 250, F8, and my camera's set to 30 seconds. And if I had a nickel for every time I made this mistake I'd have like five bucks. We've gotta set it to bulb. If it's at 30 and my self timer here, my intervalometer is set to one minute, the 30 seconds will override it. So what I need to do is I need to go to bulb. Now the intervalometer will take off and it will shoot for one minute. Now at this point we're still looking for the exposure in the sky and we're still looking for the color in our sky. So let's go ahead and take that test shot. All right, so here we go for one minute in length. You know what at this time I always start to think when I'm doing my test shots I'm looking at the scene and trying to imagine how I'm going to light paint it. Where do I want the light to fall? The worst thing to do is paint right from the camera. So what I don't want to do is take my flashlight and just illuminate the scene from here. That's the most boring light. It just adds no contrast, no depth, no angle to it. And that's what we want to avoid. So I'm actually gonna be going out into the scene, walking around, and basically just illuminating the structures in the distance. Now a lot of you might be wondering why do I not show up in the scene. If you think about it it's kind of interesting. I'm sure you've all seen those ghosted images of people. In order to get that that person has to stand in the scene for half the exposure time. So if it was a four second exposure then I would need to stand there for two seconds in order to be a ghost. Well if I'm setting a timer for one minute I would literally have to stand still for 30 seconds in order just to be a ghost. So you're not gonna see me in the scene as long as I'm wearing dark colors, which I am, and also, as long as I'm not lighting myself. So the worst thing I can do is as I'm walking through the scene, put a flashlight on my body and then that will show up. So I keep the flashlight off of myself and on the scene itself. All right, so lets look at this last shot we took here. Again remember we're looking for our sky exposure, and we're looking for sky color. All right, that's a pretty good sky exposure, you can see a large peak right here, that's in the center which means the sky is basically gonna be a mid tone. Again one the important thing about night photography to remember is our eyes are being fooled when we look at the back of our LCD, we see this darkness out in front of us and we're looking at this LCD and it looks really super bright and we're thinking, "Oh that sky is gonna be a bright white," but really as we look at the histogram we see it's only gonna be a mid tone. That's about as bright as a dark blue sky. So I think I'm happy with that exposure for the sky. And clearly you can see that the whole entire foreground is quite dark and it needs to be illuminated, and that's where our flashlight is going to come in.
Ratings and Reviews
Phillip Ziegler
This course, along with the others by Tim Cooper, are outstanding. His demonstrations and explanations are so clear and easy to follow. I've been out doing long exposure night photography using what i learned from Tim and and delighted by the results.