Lesson Info
21. Theater Shoot: Lighting Walkthrough
Lessons
Class Introduction
04:29 2What is Cinematic Lighting?
06:42 3Motivated & Practical Lighting
07:41 45 Cinematic Lighting Tips
04:53 5Low-Key & Upstage Lighting
06:26 6Control Your Fill Lighting
05:18 7Show Depth In Your Image
13:24 8Pre-Production for Cinematic Lighting
22:42Grip Tools: Clamps
08:41 10Grip Tools: Apple Boxes, C-Stands & Grip Heads
10:53 11Grip Tools: Pins & Portable Gear
04:50 12Grip Tools: Scrims, Silks, Flags & Tape
13:52 13Grip Tools: Wind and Haze Machines
04:07 14Grip Tools: Unusual Tools
04:47 15Grip Tools: Filters
11:05 16Grip Tools: Q&A
15:04 17Theater Shoot: Concept
08:03 18Theater Shoot: Pre-Production Considerations
08:48 19Theater Shoot: Lighting Gear
04:27 20Theater Shoot: Motivated Lighting Considerations
26:47 21Theater Shoot: Lighting Walkthrough
20:45 22Theater Shoot: Capturing The 1st Shot
27:37 23Theater Shoot: Hero Shot
21:47 24Theater Shoot: Capturing In The Seats
21:48 25Airstrip Shoot: Concept
05:49 26Airstrip Shoot: Pre-Production Considerations
19:31 27The Haircut: Location Specifics and Motivated Lighting
13:17 28Working With Scrims On Location
06:34 29The Haircut: Getting the Shot
24:28 30The Haircut: Shooting Plates
08:21 31Staggered Planes: Location Specifics and Motivated Lighting
08:10 32Staggered Planes: Getting The Shot
08:23 33Capturing Plates With Talent In Background
16:26 34Airstrip: Environmental Portraits
07:01 35Airstrip: Location Shooting Q&A
22:05 36Using Plates to Create a Pano in Lightroom®
16:08 37Transform Tool
04:50 38Post-Processing 1st Theater Shot
09:48 39Retouching Details in Photoshop®
13:09 40Color Grading in Alien Skin Exposure X3
06:27 41Post-Processing Theater Hero Shot in Photoshop®
08:11 42Creating a Spotlight in Photoshop®
05:31 43Adjusting Color for Cinematic Lighting
12:28 44Post-Processing: The Haircut
12:08 45Coloring the Sky and Removing Modern Building
05:10 46Creating a Pano Using Plates in Photoshop®
17:12 47Developing Cinematic Portraits in Lightroom®
07:29 48Retouching Cinematic Portraits in Photoshop®
08:57 49Color Grading Cinematic Portraits in Alien Skin
13:20Lesson Info
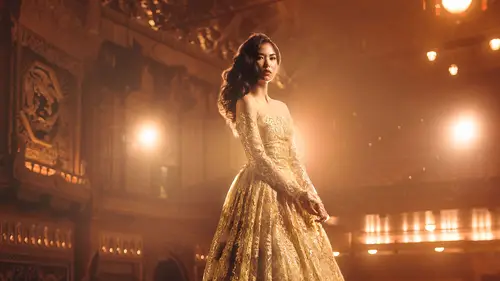
Theater Shoot: Lighting Walkthrough
Now I'm gonna show you the lighting diagram, what it looked like, and then we're gonna look at a video that's a walkthrough of it, and you can see it in place. Don't be too scared by the diagram. Let's go get that up, okay. So, this is the stage, this is how I broke it up. So stage is the bottom third, the middle third is the downstairs, and then this is the mezzanine up here. Just to kinda put it into perspective for you. This is where it ended up. So you can see some of the considerations that were being made, and some of the things that were being set up in the first video. This is where it finalized, and I'm gonna show you the video on that in a second. So we get the two multispots back on the mezzanine, which were created in the spotlight effect. I've got my five foot octabox as my main key light for my subject. Everything else, other than maybe this, like, this is kind of, like, the enclosure, when you're thinking about, hey I'm lighting in studio, this is for the most part what ...
you're thinking about, right? Key light, fill light, and then these were creating the glow and the rim on the back of her. Two lights there. That's her little tiny world. Everything else is environmental. So this is about lighting the space more so than the subject because that was the challenge here. So this is a B1 with a warming gel. It's casting a little bit of light across the stage, and this is also, to a degree, putting a little bit of light on her as well, but it's just lighting up the edge of the stage a little bit. This one over here in the back left corner, this is a B1 with a CTO. This is kind of mimicking, if you saw in the original shot there was a light over in the backstage area on the left-hand side, it's that, it's just meant to flare it a little bit more. So it's augmenting what's there. Right, building on that idea of motivated and practical light. The D1 modeling light is, sorry, the D1 is the modeling light only. I wasn't even firing it as a strobe. I just wanted a really low-power fill on that, and so I think I ended up turning it really close to all the way up on the modeling light, but it was enough power that could just give me a little bit of kick to the shadows, which is what I had in the backstage lights that I lost when I turned them off because it was creating those bad shadows on the neck. And so that was kind of solving that issue. These two lights here are just creating a little bit of visual interest across the tops of the seats and the aisle ways, to put a little bit of light across the tops of the seats, give me a little bit more visual interest. And that's the exact same thing that this is doing in the back corner. So it was like, alright, build the spotlights, that's in place. Make sure she looks how she needs to look, and then sorry, what is this? Okay, this is just, you know, too visually heavy over here with the shadow, let's put a light in there. Let's put a little bit of light across some chairs. Okay, now let's do it over there. Ah man, up in the top corner, it's also really dark. Let's put a light up there. That was just me looking through the frame and going, what's missing, what's missing, what's missing, what's missing? And then sometimes you have someone walk around the space. I'd have Lindsey walk around the space. Take a shot, fire it. Take a shot, fire it. How does this light look in different places? Alright, no, I like it here, great, alright. Let's anchor it down, hide it, put a CTO on it, it's ready to go. And so sometimes it was just a matter of finessing and figuring out where those little bits needed to go. I was curious why you used the modeling lights as opposed to flash. Was it just a power issue? It was totally a power issue. I was shooting at, like, 1600, 2000 ISO. Because I couldn't control the theater lights. And so I needed to get it pretty dark. 'Cause I was shooting at, probably, like, one-thirtieth of a second? Maybe even slower? And so the D1, the five foot? I turned it all the way down, still too bright. So then I ND'd it underneath to make it even darker. Then I turned it away. It was all about, because I needed the pop of flash to freeze her, but I needed the power less. And so that's, I had to keep... This thing as low as it was, in no way, shape, or form was this gonna be the minimal kick that I needed, so I used the modeling light. But I also didn't have to use a CTO on it, which I was short on. So it was just another solution to get to what I wanted. Yeah, good? Alright. So that said, let's take a look at the lighting walkthrough. Now we've gone through and we've made a lot of our changes. We've tweaked a lot of the lights that we were already working on before, and we really dialed in what we're trying to achieve with this image. It helped to get the model in position in her dress, and that really actually changed what we were lighting a little bit. So I wanna take you through where we ended up. Previously, I had said we were gonna leave the backstage lights on. I found that was casting too harsh of a shadow. We cut it off, but what ended up happening as a result is we lost any kind of fill light we had in the shadow area, so I ended up bringing in, this is just a regular Profoto B1 light. I'm not actually using it as a strobe. I'm using it, the modeling light. 'Cause I wanted just something with a really low power that was a little bit warm. And so that's why I have that in position there. I just used a giant umbrella at a very high setting on the modeling light 'cause it's not supremely powerful, but it's enough to give me a little kick to the shadows. The key light's roughly in the same place. We moved it forward a little bit. It's still a five foot octabox. It is also at a very low power. We couldn't quite get it low enough, so we ended up using additional layers of diffusion and ND on the inside to really bring the power of that down. And I wanted to make sure that my key light was a strobe because we are shooting at a really slow shutter speed, that's gonna freeze the light a little bit and make sure the subject is in focus. If I were to just shoot this at, like, a fifteenth of a second, which is what I'm at already, the subject's gonna be a little bit soft. So that key light as a strobe is gonna help lock that in to be frozen. Over on the camera left side, we ended up adding in a strobe light to give a little bit of kick because we turned off one of those background lights. So that's giving us a little bit of flare on the left hand side. We've left that corner practical light on, it's just giving me a little bit of an interest in that dark corner. In the back of the theater, we still have our two multispots with the Dedolight attachments to give us the spotlight effect. Those are both on the mezzanine. So let's break down a little bit of what's happening environmentally. So up top on the mezzanine, I have the two spotlights. That's my multispots with the Dedolight attachments, those are giving me my main flares, right at the camera. I also have one more light up there that's raking across the chairs to give me a little bit of light texture across what would otherwise be a pretty dark section of the image. Down below I have two lights on the chairs, again giving that same texture like I had before. And then I've also got another light raking across the stage to give me a little bit of texture across that as well. Once I got my model into position, I found that the light wasn't really glowing as much as I wanted it to, so I added a light on the backside of her dress, which is a B1 on the floor. Again, this is a modeling light, just cranked up really high. And then to get a little bit more creative, I happen to have a flashlight in my bag, which we gelled, and we turned this on. It's pretty bright, it's actually quite a bit brighter than the modeling lights, and so this is gonna create the flare and the spotlight of what would be hitting the back of my subject's head. And so those two together are kinda creating that full-bodied spotlight effect to kinda solve the problem of the spotlights in the back not quite being as bright as I would have hoped them to be. Alright, so for those of you keeping track at home, total number of lights. We've got eight strobes. We have two strobes as a constant modeling light, so think of those as just a regular constant light, and we have one flashlight, bringing the total number of lights to today's set to 11. Now we've done our lighting tests, we've got everything kind of in position where we want. It's the time to put all of the hard work into play, and bring out our subject and actually start taking some pictures. Alright, so I'm gonna put this up one more time, and while we do this, I'm gonna take a look at the Lightroom catalog one more time, and I wanna show you what the before and after is on the environment. By the time we've added in the haze, we've added in the spotlights back there, and obviously there's no hair light because it's a cleaner stage, but here's my octabox. You might've seen this, and it's not on the diagram, but you might've seen this in the video. There was a flag, and the reason that flag was there is because as I started to move the light, feathered off of her a little bit to decrease the power. It's pointing right at my camera, and because it's hazy and at my camera, it's flaring, and so the flag comes in and it blocks that light from being as strong on the right side of my frame and on my camera. And that's what that's for. It's just meant to stop the flare from hitting me in the face. You can see that little kind of kick over here. There's also another one scooting across that area down here a little bit. And you can't really quite see it all that much in this frame, but you'll see it in one of the other ones. But there's a little bit of texture to the seats up here. It's very, very faint, but you can kinda see a couple of them over here, creating a little bit of visual interest across the chairs. Otherwise it's like this just becomes a dark void, as does this a little bit. And then over here, you can see it flaring a little bit 'cause it's pointed at the camera. And so it's meant to mimic what was already happening over there, but it just gives me a little bit of texture to the light. And so this is basically where the background ended up before we brought in the subject, and huge difference, although I still think it kinda holds on to what it's meant to feel like. And so that's what that was. Now, from here, we actually brought into the subject, and this is what one of the early test frames ended up looking like, and you can see how that rim light creates this really beautiful outline of her all the way around. And it's also meant to mimic what these are doing. 'Cause they couldn't quite reach her in terms of power. So even at 1200 watts they weren't really giving me that rim that I wanted, so those lights behind her are achieved that way. 'Kay? Alright. Now put that lighting diagram back up there, and before we actually move away from this section toward the next section, I wanna maybe take some questions about the lighting setup? So Photomaker asks, "Can a grid modifier "be put on a flashlight, and would it behave "the same way as a grid on a more professional strobe?" I'm gonna say sure. I would think so. I mean, you were using a really small flashlight, it looked like, right? Yeah, it's a pretty small flashlight. It's the one that I was showin' earlier. I would probably think that if you were gonna do it, it would need to be a really small grid. Like, a small degree, would be my thought. But my beam was pretty tight as is, so I would think you may not need it. But I would think so in terms of possibility, it would make sense that you could, yeah. And as far as your flashlight goes, can you talk a little bit about, for somebody just starting out and who doesn't have access to all this stuff, how creative can you get with flashlights and stuff like that? Yeah, I mean, light, at the end of the day, is light. Light is light, you know? And whether it's, there're certain reasons that you go with one kind of light versus another. Sometimes it's power, sometimes it's the ecosystem that comes along with the modifiers and what you can buy for it, and sometimes it's certain features, sometimes it's the ability to fix them. I actually think that's a really important thing that a lot of people don't talk about, is how easy something is to be repaired, because things break and they're tools, and I can be hard on my tools sometimes and so I know that if something is broken, I wanna be able to send it in somewhere to get it fixed versus having to buy another one. Like, that's something I think about. The flashlight was more so just a fun thing to go, well we can do this so why not just be a little bit creative. And I think it's an important, 'cause you look at it and you're like, well I can't tell the difference between it being a flashlight and it being a regular light, and that's really the point. I mean, knowing what light does, knowing what hard light looks like and soft light looks like, the ways in which you modify it are endless. I mean, I change the color of it, and I, in just this particular instance, or you make it brighter or you make it darker. You can make it brighter by moving it in. And the more you understand just light in general and the tools of light, it really opens up the doors to being able to do whatever you want with it. Someone told me a long time ago, "Lighting is easy. "You put light where you want it, "and you block light where you don't." (audience member laughs) That's it. And it's very simple, like, once you understand the tools, once you understand how to move a light, point a light, modify a light, all you have to do is know what you want. It's just, we oftentimes go into a situation not knowing what we want or being unsure about what we want, and the more confident you are in knowing what that is, the easier it is to light and get your point across. I mean, obviously, you're not gonna be able to light a theater with two lights. It doesn't work that way. But you can compromise. Maybe you come in, you put a low-powered light on your subject, you put him out in the middle of the stage, and you drag the shutter like crazy. You could get a lit theater in an environment, you know, you can get it so that you're able to light and utilize the space. This is just kinda like saying, what if we could do whatever we want? Then what? And that was this. That was, what happens when I have total control and I can use as many lights as I want. What does that look like? And so it would be like, alright, we get the lights in place. I don't know, you got another light? Yeah, we got another light. Great, let's put a light way up in the top corner of that frame. Because in a lot of instances, like at the commercial level, where budgets are quite a bit bigger, you have the ability to just say, alright, let's go rent more gear. But just because you're not doing that doesn't mean you can't take the exact same methods that we are using to light and think about light and motivate light towards something that only requires one or two. And that's because, and with that, the second shoot uses one light. It's one light with one... I use an octabox for the entire second shoot. There're scrims to block the sun, but the actual lighting gear is one light, one modifier. And you can also get a really beautiful effect. It's just a matter of knowing what your tools can do and really getting out and practicing. Practicing and time are the best things that you can do to do stuff. You just have to get out and do it. Experience is the best teacher. Trial and error, make a lot of mistakes. Yeah. Alexander asked, "Were you happy with the shadows "and possible noise considering the higher ISO?" And how does that, sort of, interplay. Somebody else asked about the haze. How does the ISO interplay with that? So there are kind of a couple of points to contend with in terms of the ISO. One, like, I'm always cognizant of what my shadows are doing. And here's the thing. I have no shadow clipping, and I have a little bit of highlight clipping in the absolute brightest parts of the whites. That's negligible. The haze is gonna lower the contrast of the scene overall, but even if you look at an image like this, there's also no real clipping in the shadows. Now the difficult thing about something like this, so this is shot at ISO 2000. This is shot at ISO 2000. At one-thirteenth of a second. This is my full crop at 100% on that image. So I actually, and there's no noise reduction run on this either. I don't think that's terrible. I'm actually okay with that. And when I actually do the stitching, which occurs later, the image gets much bigger, which means the noise gets much smaller. And so that's also something that you can keep in mind. And listen, cameras today are really good with low noise. I mean, even at a 1600, I have no problem printing this huge. I mean, obviously, at 4000, no, I'm not gonna. But I'm not gonna print it at 4000 necessarily without doing maybe some, some nice noise reduction to it. But I was comfortable shooting this at because the way cameras handle low light nowadays is mindblowingly good. And they're only getting better. So you're gonna be able to do more and more with less light, you know, in the future. So it's a consideration, absolutely, but I also know that my limits of a 1600 or a are totally within the realm of acceptability for me. And if this only goes online, and if it's never printed this huge, even at 4000 ISO, like, you don't see it. I mean, just to kinda, well, I'll show you later. We'll look at the, once we actually get into the actual shooting, I'll show you the result of it, and I'll zoom in on the stitch, and it's just, it's the most negligible amount of noise. It's hardly anything. Especially in the grand spectrum of what it is. Haze also helps dial stuff into a more constrained tonal space because it lowers the contrast of the scene. So it helps a little bit with clipping. You just lose detail on the shadows because of it, but you know, it's more about atmosphere and effect than it is about being supremely technical with, you know, we need to make sure we have shadow detail everywhere. It's fine. So with cinematic lighting, a lot of, like, real movies and stuff are shot at 24 frames per second versus, you know, like, Lord of the Rings, which was, I don't know, 48 frames per second or something. Yeah. You know, so images tend to feel a little softer, and is that also what you go for when you're doing stuff? I mean, I still try to adhere a little bit to photography with trying to make it, because it's a still. I mean, we're not looking at it in motion. So I do tend to, I wanna make sure my subject is sharp. If I get, like, I think this is pretty good. And now, here's the other thing. Sharpened screen. Like, it's not, you know what I mean? So it is actually a little better than the sharpened screen. But yeah, I mean, that's... I wanna make the subject the focus. So that's why I was shooting with a strobe, that's why I wanna make sure the focus is good, you know, hold the flashlight, make sure it's right, stuff like that. So yeah, I mean, I'm not really necessarily trying to shoot it soft on purpose, but sometimes if it's, I mean, listen, if it's a little bit soft... I'll give myself a little bit of leniency based on the environment, but I mean, I think that's a totally acceptable degree of sharpness.
Class Materials
Bonus Materials with Purchase
Ratings and Reviews
Bruce Walker
This course is simply terrific, and I highly recommend it. Firstly it arrived at the perfect time for me as I am soon to do a studio shoot very much in keeping with a cinematic or theatrical aesthetic. Secondly it's taught by Chris Knight who I swear is like a long-lost twin brother. :-) There are so many parallels in the way he thinks and works to my own style. So I avidly watched this as soon as it was available for anytime streaming. This is the first time I have made extensive use of the CL iPhone app, btw, and I love how it pretty much enabled me to seamlessly switch back and forth from desktop viewing to my iPad that I carry around the house during the day. I was able to make coffee and still carry on taking in the course, uninterrupted. The content is fantastic, delivered succinctly yet entertainingly. Some material and ideas are already in my repertoire and were reinforced and validated by Chris' demonstrations. But he also introduced a lot of ideas and methods new to me and very welcome. I was particularly glad to see how practical it is to stitch a series of tripod shots into a wide pano. I have been afraid to try that but I will now be using that in my next shoot, for sure. As alway, his post production practices revealed all kinds of tips about Lightroom and Photoshop I didn't know. Negatives. The volume level mastering is iffy. It started out at a decent level then midway through one of the early lessons dropped so much I had to turn up my sound system to compensate. And as I write this one lesson (34) is missing and in its place was a duplicate of the next lesson (35). I expect CL will have that fixed shortly though (I sent support a note).
Jeph DeLorme
One of the best classes I have viewed at Creative Live. Definitely worth the investment of time and money. The pace of the class allows you to learn extra tips and tricks throughout the process. Great instructor, highly recommend this class to anyone looking to step up their creative game.
a Creativelive Student
excellent class in all regards. outstanding instructor with experience in complicated cinematic shoots but who also is willing to thoroughly cover the basic nuts and bolts. i wish all creative live classes were of this quality.
Student Work
Related Classes
Lighting