Adding 3D Label Art to Your Product
Lesson 10 from: Commercial 3D Composites in Adobe Photoshop CCCorey Barker
Adding 3D Label Art to Your Product
Lesson 10 from: Commercial 3D Composites in Adobe Photoshop CCCorey Barker
Lesson Info
10. Adding 3D Label Art to Your Product
Lessons
Class Introduction
01:02 2Create a 3D Product Composite from Adobe Stock
01:56 3Adjusting Your 3D Image
04:50 4Adding 2D Images to 3D Image
05:08 5Creating Realistic Lighting Using IBL
04:59 6Creating a Text Layer
07:20 7Creating a Background
08:50 8Final Details & Rendering Your Image
15:05Lesson Info
Adding 3D Label Art to Your Product
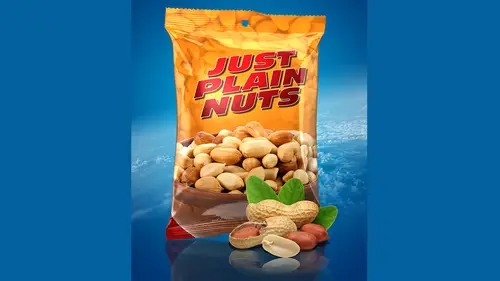
what we're looking at when we created label art on the food bag and obviously was just one material layer and it had all the faces of it in that one document. What we're looking at here is actually the extrusion of our original shape. So we're not We don't even see the front or back inflation because they're now face to facing each other cause we wrapped it around, and now they're touching. So all we need to do is at the extrusion material right here. So with shape one extrusion material selected, we're gonna go into the properties panel here. We're gonna create a new document for the diffuse, the fuses, the base art of the object. That's what we worked on when we created the the object earlier. We put all that label are on the diffuse layer here. I'm gonna go to Kruger and create a new document for this. And what I want to do is because it's stretched in a sense, it's extruded and wrapped around. I want to make this longer or a wider document. And shorter in the tight. I'm gonna make ...
the with 2048 pixels. I'm gonna make the height 10 24. So I'm going to create that now it's gonna open up the document with the label element or with the overlay. So it's give me the same wire frame overlay. The way to look at this overlay is think of the round object. If it were just laid out flat, you just rolled it out flat. And this gives you the guides to where you can place the elements. So let's establish a background color. So I'm gonna go in here and let's get kind of Ah, deep blue color something like this. If I save it, this is we've been doing. If I save it there, you can see the element looks really good. And I'm going close that because I like to see the cool ibl lighting as I'm designing the label. You could do the ideal lighting at the end, but I like to do it in the beginning just because it looks awesome. Never time, I say. When I'm working on the label, I say that I'm like, So let's go in and create that. I'm just gonna go ahead and do my normal thing of just creating new texture. Actually, a slightly a bit different this time around. So again, I'm gonna make it 1000 by pixels and make the background black. I'm going to do a slightly more slender oval shape here. Let's go ahead and put it on. A new layer is going drag down. Do that like before. But I'm also gonna go down here in the lower corner and just kind of add a little Grady it down here like that. Nope, that's too small. And I'm also going to run up the opacity that a little bit more close that and save the changes. Now we don't see anything happening on the bottle, and that's because we haven't adjusted the reflection properties yet. So back in our three d panel, we need to select the extrusion material once more and then go in here and and dial up the shine and the reflection. And now, if I select the environment and go in here and move it around now we're getting much more realistic lighting on there. You can see the two separate IBL elements there. This is just giving us the effect of a soft box shot on. You can even take a picture of a soft box. Apply it as an A B. L. And it will give you a realistic vision that it was shot in the studio. So? So you can definitely have some. Really cool. Now that little speculate highlight right here that is being generated by the default light, which is that infinite light right here. So in the light section, you can see right here when I select the infinite light, you get this little orb that's really a visual aid that helps you place the light. And as I move the light around, you'll notice that the shadow changes, but also that little speculate highlight changes, so we'll get into adjusting that in just a little bit. But now that I've got the IBL lighting in place, let's go and, ah, just the label or the continue designing the label art. So back in the diffuse property that's going here and edit texture. All right, so here's where the improv Parkin's. I'm gonna create a new blank layer, and it's gonna, uh, kind of generate a circular logo elements. I'm gonna draw out a circle shape layer. Rather, this is the vector shape layer. Hold down the shift key and drawing a circle. And then I'm gonna hold down the option key, draw another circle and create kind of a framing element. Let's actually to have this subtract front shape. There we go. So they create this kind of ring element here, and I want a line or center these two shapes. So I'm gonna go and select them both, and we'll do a horizontal and vertical center there. There we go now. I don't want the stroke. Obviously, it's it's remembering in the previous settings I had for the stroke element. So I'm actually go up here in the options bar and go to the stroke settings. And let's just set that to none and again because it's vector we can adjust. These shapes make a little bit bigger there. There we go. So now I'm gonna set some text. Well, let's call it C B. It's a C B shot. I'm gonna put that will scale it up, maybe even rotate a little bit. Kind of a cool logo. Now, what I want to do is put a kind of bevel effect on this label. Um, but I don't want to separate the don't emerge the elements because I've got a separate text layer and I've got a separate shape layer. I want to apply the same lair style. Eso it kind of looks like it's fused together. But like I said, I don't want a few Z's. I want a restaurant, these layers emerging together. So go and select both layers and go and contain them in a smart object. And now we can apply a layer style to the smart object and actually get the effect we're going for without put. And I just did. OK, there it is. So now you can see the beveling is fused together. Even those two efforts elements are separate inside the smart object. When it's ah, when you're applying this to the smart object, you actually see the effect. Oliver. I think I want to change the color of that as well. So So hit. Okay, there. Let's go into the smart object. So now we've got a label art inside the three D object and then inside the smart object we're going, we're doing inception again. It's over here. Actually, I think I want to make this more of a gold color. It's There we go. Something like that. See how that looks? There we go. That's looking a lot better. So now back in our working design art, Let's get it in position on the bottle. And this is where it's gonna get a little tricky. Now, I'm gonna do a save here and you're gonna see the label is just completely in the wrong position. This is what you're going to run into. So now you've got to reposition it and get it right in the right place. This is where the wire frame comes into play. You can see me may adjust the wire frame color. Here, you can see those lines. So these larger areas and a way to kind of interpret this is you'll see how the overlay the lines here are, are spaced out a lot in some areas, and then they're really bunched up in other areas. On the way to think about that is these areas worth really bunched up? That's the bend of the bottle of here. That's what you're seeing in there in this area that's got the longer lines. That's obviously the long area of the bottle it we're seeing here did you notice. Also, it's rotated, and it's because of the nature of the extrusion in the rotation. So we're just gonna have to go in here and rotate the object itself. So let's go rotated this way. I think that's the right direction. There we go, but you'll notice. Also, it's more oval. It's not a perfectly rounded shape. Now there's two ways to address that, and and the first way is to adjust it right here inside the object. Now, because it's a smart object, we can scale this disproportionately without affecting the quality. So I put this smart object in here in free transform mode and hold down the option key. And I grabbed this top middle handle here and stretch this out while looks stretch here. When I save it to the document here, it's gonna give me that more realistic, rounded shape that's one way around. This is the way the method I used most often, but another way real quick, I'll show you and the reason I don't like to do this. This would actually proud of this. This one about to show you would actually work on this because we have a solid background um, on the product, but in the event it was a textured background or had other elements than this technique would probably work so well. But what she can do is with that extrusion material selected. Go to that diffuse property. And instead of going to edit texture, go right to the property below, which is edit UV properties. And this allows you to scale the object on that specific access so I can actually stretch this along. Well, it looks like it's reposition. It's actually stretching it out, and FYI, I can actually reposition it. So this allows you to manipulate the positioning of the texture on the three D surface. I'm gonna put it right there in the front and then stretch of settlement Mawr and get that more realistic rounded shape. And while it looks like it's just suggesting the logo, it's adjusting the whole texture, the blue area and well, because the blue is a smooth, solid surface. We don't see any change in it, but that was a textured surface or a graphic element. You would also see that change as well, so it works again like this when it's a solid background. But we're gonna be adding in a few other elements here. So I'm gonna go ahead and back in here, so back into the edit texture there, you and just do this method of stretching the element. But make sure you contain it in a smart object. Before you do this this way, it will non destructively, um, scale the image that won't be doing any re sampling, like at, so to keep it nice. A nice resolution there, One skill that a little bit more here.
Class Materials
Bonus Materials with Purchase
Ratings and Reviews
Lael
Valuable for going deeper into using 3D tools, the course had a great amount of info on using the 3D tool panels & manipulating lighting, modeling materials, merging elements together in 3D space, creating your own lighting & materials as well as trouble-shooting tips. Really helped me feel less intimidated as a newcomer to 3D.