Adding a Frizzy hair girl to a Floral background in Photoshop
Lesson 12 from: Complex Selections: Furry, Fuzzy, and HairyBen Willmore
Adding a Frizzy hair girl to a Floral background in Photoshop
Lesson 12 from: Complex Selections: Furry, Fuzzy, and HairyBen Willmore
Lesson Info
12. Adding a Frizzy hair girl to a Floral background in Photoshop
Lessons
Color Range Selection on Smoke in Photoshop
16:27 2Adding Drop Shadow to Selection Layer in Photoshop
02:23 3Initial Selection in Photoshop
05:45 4Refine Edges in Photoshop
04:59 5Using Overlay View to make detailed edits in Photoshop
18:30 6Brush size demo in Photoshop
03:18 7Detailed Baby Hair Selection in Photoshop
04:40 8Decontaminate Colors in Photoshop
03:31Lesson Info
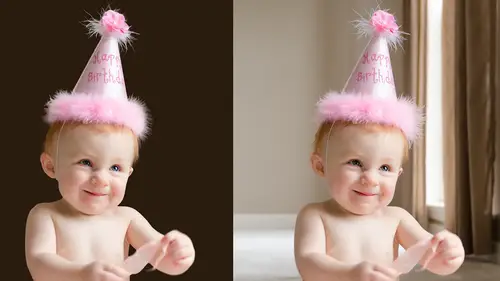
Adding a Frizzy hair girl to a Floral background in Photoshop
Let's say, I have this person I want to put on this background. What I would do is select both layers here in bridge, in bridge. I can choose tools photoshopped load files into photoshopped layers, and that just means stack these images into a single document where I end up with one layer for each image. If you happen to not use bridge and study used light room because life is a replacement for bridge, you can go to the photo menu there's, a choice called edit in and then you'll find a sub menu called something like load files into photo shop players or might be slightly, uh, different in name. But it does exactly the same thing on occasion, it will tell you that photo shop is busy. Just tell it. Yes, I want to cue this in most, the time photo shop is not busy at all. It will just work on occasion. I think photoshopped wants a break, but, uh, can be forced into doing work. So then I'll do a quick and nerdy selection here. And this one, I think we might end up with an issue similar to w...
hat we had on the last image. When it comes to, um, decontaminate colors, not helping, and so let's just see. Usually at this point, when I make the selection, I usually hit q and say how close is its matching on everything that's, not furry, fuzzy and harry, and if it doesn't match, fix it before we go in uh, then go to the select menu, choose refined edge and I will initially start off with the on white setting, even if I want to put it on the other background because I want to see where can I see the old background still showing up? And wherever it is, I can see it that's where I'm going to paint, you're not always certain if it's old background or not, but if it looks like it's blatantly old background paint on it, then it just like before all changes to overlay and I'll look for parts of the hair that are covered in red. That shouldn't be and come over here and get photoshopped control there and I'm going to purposely mess up in one spot without telling you what I did because oftentimes you'll mess out without knowing what you did. But I know that I just messed up in one part of my image because there is something that is going to make decontaminate colors not quite want to behave could he used a larger brush here? Can I see little frizzy hair is going all the way out there you don't want to include the frizzy hair is your welcoming not paint on them, although it can make it so the rest of the hair doesn't quite look right because then you're gonna confuse fighter shop where it thinks I should delete these colors that are really the color of hair because you allowed the red to overlap them. Uh, I find it's best to deal with the frizz ease afterwards instead of just selectively not painting over those areas. So we got that now let's go over here and chews on layers. This is when we'll see it on the actual image that should be on the layer that's underneath. There we go, it's really useful to do that? Because often times if you do it on white on black, you'll see issues that wouldn't truly be an issue on the actual background that you plan to put it on, and you're gonna waste a lot of time fixing things that no one would ever notice the problem with. And so that's. Why it's kind of nice to be ableto put it on another background. In this case, I see some colors over the left side, especially where it looks a little light compared to the background, and I think that's parts of the old background still showing up through the hair and that's what I'm going to turn on decontaminate colors and right away, I noticed the color shift a little bit right over here. It was somewhat subtle, though, in that I just want a teeny bit brown and I'll bring this up and see if I can get the here to look appropriate, okay? And I'm noticing one problem, and that is she's getting older in that her hair's turning gray at the top and that's how you see right up in here and that's, because if you use decontaminate colors and you think about the way it works, it goes a little bit inside the image grabs whatever colors there, it pushes it out to the edge. Well, if you go a little bit inside the image there you have a hair band, don't you? In her hair band, that color is not appropriate to push out into her hair. And so there we have a knish. You, uh, there's a way to tell where we've painted, and I haven't shown you how to do that yet, but there is a if we change this to the tribes called overlay, and then we turn on this check box called show radius that really means show where we painted, okay there's, where we painted that's where we're giving photoshopped permission to take control and do things, and I could look at that that just indicates where we've painted on where we haven't in first I noticed that never gave photoshopped control right here and I could add some there and then I noticed that right here do you notice how we gave photoshopped control? It came all the way in and it touched her hair band well, I could come over here and grab the icon that's got the eraser in takeaway control and just leave a little gap between her hair band and where it started to get control so that if photo shop is going to come the little list inside what it's going to actually do is come the little of bit inside this inner read in whatever colors there it's going to push out well if we leave a little gap between where the edge of the red is in the stuff we don't want to have pushed out there we might be ableto prevent it from doing that but to get this view which is kind of a different view what I did is I chose the choice on the preview that is called overlay and I turn on a check box called show radius and that's what allowed me to see it and that could be a nice of youto have because now I can glance around here and see if there's any hairs that are extending beyond the into that red stuff I can see exactly where I'm giving photoshopped control see if there's any sometimes they'll be a tiny little gaps that you didn't realize in there, you know? Just look all around there, there's a couple here sticking out couple more right about there, that kind of stuff to get out of that view, you can just turn off the show radius check box when you're back into just the red overlay view and then who wanted to see the end result? We could just change this to again on layers and now let's, see if that decontaminate colors is doing any better. I think it is because I don't notice they're having gray hair anymore. The reason why we had gray hair is we let photoshopped have control all the way up into that hair band, so when it looked at the area where it didn't have control to grab colors and pushed it out, it was right on the hair band leaving a little gap where didn't get control all the way to the hair band prevented that so it's uh, something think about click okay since we had decontaminate colors turned on, it created the duplicate that's, the original underneath. So if we wanted to do that trick where we wanted to see if the original colors are better, you take this one and put it on top and you clip it to what's underneath, so that means layer create clipping mask and now if I talk this on and off all see original colors versus decontaminate, original decontaminate and so let's see if it's useful everywhere. Maybe I like the original colors more on the right side of the photograph. They look more realistic right in here, then this which looks somewhat out of focus and soft. So I end up turning that on and all that a mask. If you add a mask, will be able to paint to control where the shows up and if it's only in a small area there's a trick that I use when adding a mask, usually that adam ask you, click in the layer mask icon into the bottom of your layers panel and that ends up with a mask that starts off with white in a white mask allows that entire layer this to show up to begin with, but here's the trick if you hold on the option key gultom windows when you click on the mask icon, watch what we get. Look at what color is in the mask. It starts off black black means hyde and therefore it starts off hiding absolutely everything that's there and therefore I can just tell it where I needed to show up, so I only do that where I hold on the option key when clicking the layer mask icon when it's a small area that I want to keep from this layer and so now I can come in here paint in that original color wherever I think it would look good and I go up to the mask hold shift and click on it just to disable it to say is there any other areas no glance there all the way around maybe elected better right there all right, so we've been talking for re fuzzy in here remember if we option clipped the mask looks like this might need some refining because that looks pretty sloppy remember, you can grab your paintbrush tool if you set up those presets then I come in here into find tune this mask it looks a little sloppy to me it might be a lot quicker because I don't have to remember how to set up my brush in hard mix a twenty percent capacity instead I can dial it in just by going to my pre set I want to you somewhat clean it up so free fries a herring refine edge is the start but then there's all sorts of refinements weaken do after it any questions, comments or other things? Yeah so when you made the clipping mask just now um could you have painted on the mask below it instead um if I painted on the mask below it it's going to hide or show more of the hair whereas when I clip it like this and I paint on, the mascots, actually layer above were just controlling. Where is original color, used versus decontaminated, color, used and it's not going to make the hair show up more or less anywhere, so is different. The top mask is for color. The bottom mask is actually defining where the hair shows up, so not quite. Thanks for tuning in hope. You learned something.
Class Materials
bonus material with purchase
Ratings and Reviews
Lonnie
Selections have always been my nightmare, Ben Willmore is a Godsend. His easy to comprehend teaching method and techniques make learning fun and the lessons taught stick. I now own others in his lineup of classes with more on my wishlist. Thank you Ben for making Photoshop Selections less daunting and complicated than it can sometimes be and thank you Creative Live for having one of the best teachers out there. I highly recommend this course to any and all.
a Creativelive Student
Terrific course with detailed and *clear* instructions on these essential skills. So happy with my purchase!