Lesson Info
12. Creating Levitation Effects with Compositing
Lessons
Day 1
1Introduction to Compositing
13:20 2Lighting for Compositing
17:55 3First Photoshoot with Model
41:26 4Developing New Ideas On-Set
57:32 5Matching Lighting and Camera Angles
22:57 6FreePreview: Testing Composite in Photoshop
21:18 7Shooting Second Image with Model
22:48Adjusting Lighting and Angles for Composite Image
1:01:01Day 2
9Introduction
13:21 10Pre-Shoot: Love at the Wash-n-Suds
1:14:04 11Test Shoot with Models
35:17 12Creating Levitation Effects with Compositing
33:57 13Shoot: Love at the Wash-n-Suds Part 1
1:11:35 14Shoot: Love at the Wash-n-Suds Part 2
48:52 15Culling the Images
20:47Day 3
16Wash-n-Suds: Lightroom Culling and Exporting
40:07 17Compositing: Wash-n-Suds Part 1
45:46 18Using the Pen Tool
32:38 19Compositing: Wash-n-Suds Part 2
35:43 20Swimming in Cereal: Culling and Exporting
33:22 21Compositing: Swimming in Cereal Part 1
42:24 22Compositing: Swimming in Cereal Part 2
1:02:49Lesson Info
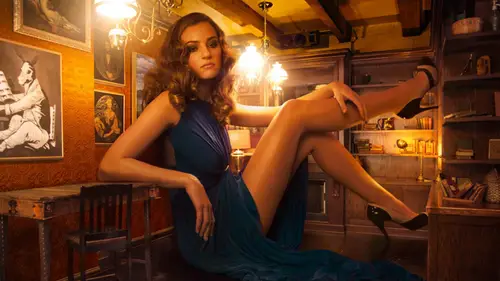
Creating Levitation Effects with Compositing
Let's, go ahead and start with the idea that we're going to be coming through I don't know if we'll have time to, like start throwing clothes and things like that in the year, but the next thing we want to work through is a relatively difficult element in this photo it might not wind up being that difficult, but it's the levitation and basically there are a lot of ways to do levitation and some of these air easier some of these air harder, it depends on your technique, we're basically going to be using a stool and shawn's going like leaning back looking like he's floating in the air. Now I'm in our heads this is probably gonna look really cool is when he's actually doing it there's a chance that it just might look weird like it might not look natural, it might not look good. So that's, what we built in time today to say like, okay, this levitation is what we're going to try first because it's the easiest and if it works it's probably it's the safest at a simple test if it doesn't work,...
we're going to try other things like maybe having you could, like, jump in place or maybe even built bringing a crash pad for you to like, jump actually like fall on this, they'd be pretty fun you're done with that okay, sweet well, I'm hoping this doesn't work then we'll get you to fall into a crash that so all these things I've done in photo shoots as well general tryingto do the crash pad very last because it is like, you know, if you're actually follow it to something but we're going to go ahead and have you start levitating so maybe come out forward just a little bit more for me there we go something like that and the whole goal here is for you to be sitting I'll just do it if if you want me to or not, I actually usually will do this on a photo shoot sit on this and like, you know, do something like this that you kind of look like you're levitating and it's goingto be a pretty good core workout, so if you need to take a break just living, you know, hurt you or anything like that, okay? Pretty cool so that's, what is basically going to be a start of our levitating there we go and let's take a shot there and we'll see what that looks like, okay, you can you can come back and rest, so we'll talk about it we'll talk about this there we go pretty cool and now we want to talk about now that he's kind of changed positions how does everything else look how does our concept look? How does the image look in relation to what he's doing? And is he? Is he well enough to find is does he look like he's levitating? What do we think here? Here in the audience? Get some feedback? Yeah, he looks like he's levitating maybe if he was a little more engaged in many little farther back would be more interesting. I did notice that his leg does come up and cover the back ground a bit, so we might want to think about positioning on that, okay, definitely yeah is in question when you put something on a platform to levitate and this is a question I've had forever is there any considerations at that point where they're at the platform where they meet? Because, you know, it's going to squish them flat it's totally gonna squish in flat? Definitely so that's just to be expected there's there are a couple things you could do and that is a really good question now in this shot in particular because we did design it to actually have clothes being the thing that is that, you know, causing that levitation obviously he's just not like floating for no reason they're going to be closed pushing him, we're actually in a safety pin close to your existing clothes that will kind of like hangover here and they're going to cover up that flat spot now if we didn't have that obviously we do plan on removing the stool in photo shop later but if we didn't have that what you could do is use like a pen tool and actually cut him out and then used like a liquefy tool or the transform tool and then like actually push out that flat spot give you give your butt back basically on dh there are a lot of other methods to do it a lot of people like if you're doing levitation and someone's wearing dressed let's say hannah was going to be levitating instead of shawn what she would do is put maybe like her half of her but on the stool and then her dress would hang out in front of this so if we did have like loose clothing or something like that that can hang out in front of the stool and then you just cut the stool out and that'll help out as well so it totally depends on what type of like levitation or floating you're doing but in this case I think it's going to work because we're gonna wind up putting putting the clothes there all right? This looks pretty good now suggestions from the internet studio modern suggest more light on shawn he's not really defined enough there he's not refined enough sark was saying that maybe should be closer to the camera he should be a little bit closer to the camera okay, cool well we could definitely try that now if he does get a little bit we could bring the power up of our strip box that we have there if he does get a little bit closer he's going to be more in line with our strip box which is our main light right up there and that's going to help light him up a little bit more as well so let's try that jon if you wouldn't mind let's come forward a little bit there we go right about there and yeah let's go do your thing your levitation thing right on maybe put your right leg up a little bit higher if you can there we go and if you could let take towards hannah there we go really cool all right. So let's see what that looks like a faras lighting and during this we can work on our lighting but we can also work on our posing and things like that. All right, so let's bring that in I think then one more shot we have your leg maybe just a little bit higher up let's try it again. I'm actually gonna bring you back a little bit to make you and what we want to do is it's just getting a little bit confusing he's not separated out from the background really well enough in my opinion because we kind of lose, like part of his foreground, so what we're going to do is shine if you don't mind, I'm gonna kind of pull you back and we have these white washing machines, which is going to do a pretty great job, like separating out him from the background, so if you want to lean and if you could scoot towards this side of the stool, that would be great, and I'm gonna go ahead and get here and actually looking frame so I can see what we've got going on and there we go if you could put your right leg up and your left arm down so you're kind of like doing something like that there we go and then rotate towards the camera a little bit with your with your chest there we go, very cool. All right, let's, check that out waken look at these and tell a couple of things. First of all, when he's rotated perfect, could we look at this, uh, this image, mike as well as the one before it? If you don't mind, he made a man to disappear I made a bandit disappear oh my gosh is magic well, that's awesome because we already have her in the frame and just like we said earlier she can go about her day, she could do she can do her job and we can make sure that she will be able to enter the final because she was in the background she was not interrupted by anything and in the foreground all will have to do is make sure we cut out shawn's leg if it's going to be over top of her so that's the media frame compositing and thank you too amanda for being a very did you see her hair amazing so back to our image basically we've got a couple different options and we're looking here at posing now wish on and we've got can you get somebody like kind of between the left and the right? What do you guys like a little bit when you do you like more the right everyone likes to write more and it's probably pretty obvious but should I ask why? Well it's more animated number one on dh you since he's turned slightly to the camera you can see him so it's part of the reason we have the mirror so be a good thing yeah so he's engaging the camera more perfect he's definitely engaging the camera more and this is that these air group points we want to make sure that we're posing I mean we're doing it a levitation floating type shop but we want to make sure at the same time that you're posing in a way that's going to be interesting to the camera so this you know it still might look like you are levitating but you know, facing away from the camera this is you know, the line on your bodies it's not as interesting and we're not seeing your face so here where you're facing towards the camera it is quite a bit maur it is quite a bit more interesting and I do think I was going to say a shot out from the internet right now just ponies saying that the male model you're still losing his chest and arm in the machine that was something that they noticed and the color another shirt in the front area are too close so it kind of just blends the foreground of shawn's shirt blends into the background of the wash machines window that's a good point okay, perfect yeah the coloring basically we've got a grey shirt on shawn and then this kind of like color back here so we got a couple options we could see like opening that window but I believe it's still dark in there or sean could change his shirt right? Are you cool doing that? Yeah let's go for it maybe put on something like a little bit brighter maybe like a like a lighter blue or something like that yeah let's try it a little something out of the laundry and well, you know you don't have to change in front of everyone, by the way and another teo work on another suggested from the internet this one from tommy nikon place handed front closer to the camera on the right make her the star had a little bit closer to the camera. Okay, perfect and I do I love all these suggests we totally have these options and hannah can come closer. There is one thing that we kind of did deal with earlier is as hannah moves off to the left of the frame a little more she's going to be subject to perspective distortion which is like pretty much the when when your photographic in person that's pretty much one of the big things you want to avoid and when doing any type of compositing if I really did want hannah to be here on the left side of the frame and have a to be rather large in the left side of frame, what I would do is I would make sure I would photograph our subject. We would photograph sean in place and I would actually move my camera over so she would be the center of the frame and then I would composite that version of her that would eliminate perspective distortion so instead of her being on the outermost side of the frame she would be then on the center of the frame because with perspective distortion people tend to look really weird. It'll stretch people out in really weird ways you know it'll it'll thicken people like hannah and it would actually like make her look a little bit thicker and things like that things that you really don't want to do teo tears subject they're not gonna be too happy with it but that's definitely we can definitely give it a try and if that is the if that's the composition and the framing that we wind up liking the best than what I would do is shift the camera over take a couple pictures of her and then ship that back but I would definitely wait until the very end to do that it's gestion alright cool who wants to be the clothing thrower? We're not going to do it just yet but is anyone in the audience want to be the yeah tell me your name again gave okay gabe, get short for gabriel okay? You introduced yourself scary earlier okay way could be the holding thrower awesome fellas great. Now we'll see if we're if we're still blending in if we continue to blend into the background there's still more things we can do we have our room like that's in the back there we could make sure to bring it more from behind sean and pump or power up a little bit which should help kind of define him out from the background a little bit more so we're going to try this and you could just stand there like that for a little bit how you doing back there lee yeah how are you actually reading magazine okay, cool. There are other magazines here if you if you can't afford your role is to read back cassie's perfect all right let's see what this there we go shawn looking great and we'll see if we can address some of the concerns that we had earlier all right so is he standing out of the background he is definitely not blending in here is the blending in too much the washing machine now what do you guys think you little bit it's like he's blending into the other thing now do we have a different color shirt like maybe something that's a little bit more vivid in my opinion he's not blending in too much but if we could send out a little bit more that would be kind of cool maybe something with the checkered pattern yeah he's not gonna blend into anything with the with the like plaid better all right so heavy perfect alright, cool and what? We're taking a break and we've got our sean is changing a shirt we'll talk a little bit hannah kind of like posing and things like that so the inspiration is you're kind of like the spokesperson for for this brand the washington so as shawn's gonna be levitating towards you you're definitely be holding it up like you know, like maybe doing like something really cute maybe like a leg up or just doing like this and, you know, smiling really big like exactly like that that's exactly what we want we want this image to be like funny and kind of cheesy like, you know, we set up our lighting to be realistic but like we've got someone levitating in here like it's totally time to have fun so we actually started to get shooting like yeah put it like, oh, we like you should use this and I think that's perfect so that's kind of like getting you into character lee you're doing great it's just you're reading a magazine and miguel you're doing really well as well. So perfect let's try a couple frames like that if if we do, you know decided do frame compositing while shawn is out of frame we can still take some pictures of hannah and haver haver you know, basically played the subject here which it probably would help if you was here but just pretend like there was a guy here and we can kind of like get some practice while he's well he's upset all right ready perfect let's lift the leg I love that awesome are you sure you don't actually work for washington's beautiful maybe bring the jug out to the front a little bit more perfect there we go perfect let's try putting both both feet on the ground and you know yeah do the bend forward a little bit yeah there we go and maybe I'm gonna have me like look directly at the camera because it's supposed to have like kind of like cheesy feel to it a little bit less of a smile maybe like you there we go it's the perfect face like washington is perfect and if we are gonna have you bending forward like that let's have you step back just a little bit if you don't mind there we go perfect and you can kind of bend in face the camera just a little more there we go let's see that face again who washes beautiful that's awesome awesome perfect you can take a quick break let's go ahead and look at these frames and we can we can kind of talk through what we've got here if we wouldn't mind kind of like flipping flipping back and forth so very very cool if you wouldn't mind flipping I guess there's still kind of like load again so what do we see here any any problems or concerns that we see here with hannah does anyone see anything that they would maybe want to fix no not yet huh just kind of coming in I do see a couple of things that I would like to fix some of those things are in some of the images when she's like bending a little bit, far forward, her the shadows under horizon to be a little bit dark, especially when you're doing anything like, you know, like beauty or focusing on someone like that. You really don't want those like dark shadows underneath the person's eyes. It's just going to make him look a little bit worse than they need to be. Also she's like when her dresses like this it's really not as well to find it almost looks like a little bit. It almost looks like just a like a a massive red instead of like being being well defined. So we can take care of this in a couple of ways, the dark shadows that are underneath her eyes. We can take care of that with, like a phil or a white card. So, john, if we want to bring in a phil card or a white card, we can actually have those that directly under, and that should basically take the light that we're using from overhead and fill those shadows in there. So we can use our fill a white card to kind of like self some of those problems and then we can always composite that out afterwards if we need to do that or we could use some room lighting here do we have some suggestions from the internet? Yes, actually, quite a few people are saying that the clock behind hanna is a little bit distracting it's like halo in her head and taken away from her expression yeah totally does yeah definitely could we flipped back a couple more and see like maybe maybe if she's off to the left a little bit more the clock would be yeah let's keep going back maybe somewhere she's off the clock I wonder, yeah, so here it was probably like a little bit less distracting so we've been we should have you step back a little bit when she's doing that if not, we can totally just take the clock off the wall or we have some photos of the clock you know what? I'll just do this because it'll be an interesting technique in photo shop. I'm going take the clock off the wall because we already have a picture of the clock and I'll just put it wherever I wanted to be in photo shop after the fact how's it boom before it was not like glued on, you look like you're trying to take it off all right, there we go. Clock is officially off the wall and if I decide I want it back I can always put it back in photo shop because we have a frame good, good point and a cool teaching point, which is gonna be great tomorrow in photo shop and you just made that so simple, right? I was, like, the most simple scenario a solution? Yeah, take it off. We already have a picture of it, and we're gonna put it back in photo shop if we need to. All right, where do you want to feel from let's? Try and write about write about over here. The goal when you're using a phil card or, you know something like this, the the real goal is to not having being framed so you don't have to photo shop it out later if it just happens to where we are not going to be able to avoid that, then you know, then that's the case, but all right, let's, try it again and we've got a new shirt and hopefully this blends in with nothing unless a plaid penguin decides to run behind you. All right, here we go in three, two, one and go, if you could step back just a tiny bit, hannah, that would be great, and three, two, one and go. And I'm gonna have you more like, stand like straight up we can put both feet on the ground. There we go. And if you could bring your hair this way the other one's sight there we go. Bring it more behind. There we go so we can see. Yep. Beautiful. There we go. Perfect. And then you can look directly. Yeah. Look at me for a minute. Perfect. You can go ahead and stand straight up. One. There we go. Perfect. I love it. All right, sean, how you doing? It will add realism to it. You're supposed to look like you're being shaken up. All right, john, if we come in here, I'm still seeing a little bit of dark under hannah's. I see if we can figure out which oh, I think it be I think it would be that, like, basically, yeah, so this this would have to come in. So in the case that we do want it using this phil cart if we don't take care of this problem in a different way, which I can go about doing that as well in the case, if we do want abusing this phil card, we're going to have to basically have a shot with her. With her face with just her face and then take the phil cord out so I could use her body and match the same face and the body as well so let's try it and see if that solves our selves our issue there we go and let's just take a look at that at that shot and see if it doesn't facts off our under the eyes and it's still looking a little bit dark to me what do we think? So we change this shirt is it better now definitely not blending in perfect I think we're definitely looking a lot better the levitation is it still looking? I think it looks pretty good right? I think that you're doing a really great job this definitely looks like really yeah I think we're the only things that I want to take care of a little bit I do like when you're standing straight up because we can see the definition between highlight and shadow on your dress and I think the ruffles really worked well I would like to fill in a little bit of shadow there on right here so we do have one more light and we can go ahead and stick this in there and this is what it's all about guys let's go ahead and bring our bring our last light in that shouldn't be on a roll I said I only brought six lights to creative lives so if I can't do this in six worship, we have to use flashlights I don't know that brings up an interesting question actually from the internet everybody has been wondering how many lights you normally use on set what's the maximum likes you have used oh it's a really good question, okay, um I really like using lighting it's one of the things that I love about photography some of the people that I know who are amazing photographers don't use any lights at all because that's not what they love about photography, so by any means, I do not think that using lights makes you a good photographer or that you need to use him to be a good photographer. I don't think that it's just one of the things that I really love, and in my opinion I uses many lights as possible to get the shot to be great. A lot of my photographs are taken with a little bit more on the like a quote unquote fine art side where people actually have like pretty dark shadows on I'll take a lot of photographs for people are ringlets, maybe from the side when I'm using just one light and maybe has a gel on it too, but you can't really see a whole lot of detail with that person, so in those cases are really only used maybe one or two lights in this case where we have an entire scene, we have our subjects back there we've got subjects in the foreground, we've got subjects in the immediate foreground we want to make sure she look beautiful, we want to make sure he looks levitating and he's separated from the background when we have all those things to consider, we're going to take like, you know, we're basically using lights for each one of those different subjects we're kind of like imitating like that would actually happen in a in a laundromat, which you would totally have, like, you know, lamps and overhead lighting and maybe window lighting and things like that, so we're kind of using all those things today I only brought six droves with me tio raved on type written on her face from camera or yeah, what do we what we have is faras modifiers go uh, how many seven inch reflectors did you bring to? So there should be one hiding, some one hiding someplace. All right, let's use one seven inch reflector with a grid shooting from down below up. And if we match that excuse me with our ambient and that should fill in the shadows, they're just underneath her eyes, so we're just solving a little bit of these problems here and using many life's possible the most like that I've ever used fifteen or sixteen lights on an image, but that I was trying to do like some special effects crazy stuff. So that was like, I don't normally do that do that many things on baby we could use a control arm so it could come from below from below or do you want from cameras just at her just to fill the faith? Um, good point, let's try bring it over here if you wouldn't mind, john, but that could be good could work. We do want to put agreed on the tough thing about when we're doing this sort of thing is basically just trying to, like, fill in some shadows here that air that are on our subjects face the tough part about that is if our lighting ratios aren't right she's just going to get a blast, the light in her face and it's gonna look like totally it's gonna look lit and it's gonna look totally weird so that's a little bit more difficult. I think it probably has to come a little bit closer. Yeah, I just want to get way have an extension cord there. Aaron jozias technique. If you were to I need a seven flight yeah, or you didn't bring six lights could you steal light from somewhere else on your set, use it because you've already shot whatever it's lit that's a really good question and it totally depends on how quote unquote important that light is and what it is lighting like you know it's it's like splashes of water it affects everything we've got, you know, a light up here but that's lighting, you know, it's like washing machines it's causing shadows, it's lighting hand a little bit it's even probably going back and hitting li a little bit of fighting their floor so it's it's bouncing around and getting quite a few different things so I would generally try to not to death but if we didn't like if it was if it was something that looked like that where we super needed toe have phil like here with hannah, what I would do instead is like figure out and I was limited on the amount of lights I would figure out what other light in my image is not important and then I would remove that one in this case I might go ahead and take this light out because I already have some photographs of this and if it wasn't shining a lot of light here and then back down, then all I would use is this part of the image in the last frame, so as long as as long as the light wasn't hitting back on the ground very harshly, then then I think that would work wind up working pretty well get it maybe a little bit closer if we can and what we want to do is basically just because it does have a grid on it if you look straight into a grid um here we go. We get a camera on this grid yeah, okay, cool. So if a camera or your subject this is how I always tell if if the light is pointing in a subject ifyou're looking straight into the grid you can actually see the light, but as the grid turns off to the side, you start to not be able to see the light that's coming through it that's the entire point of a grid, right? So what I basically do is whenever I'm working with a subject and I want to make sure that they have a fill light on their face just asking the fig and see directly into the light and what do we think? Here we go, cool and as long as I can see directly into the light, then then we're good and the light is in fact shining on their face so I'm gonna use a relatively low power here and never go. We're also going to turn our modeling light off now that we know it's shining pretty much directly into hannah's space and then we're gonna try another picture what all right, chances are this is gonna look horrible exposure is probably not at all correct your face is probably going to be blown out but we have to just wait and see yeah way, way too bright right? So let's bring our exposure down just a little bit there we are. All right, let's bring it a little bit more camera exit on camera access I think you were right without john there we go and then we'll rotate it around so hannah can see directly into the life perfect. All right, there we are and beautiful how we looking here? Let's see, I think we could probably wanted pulling pulling the power back up just a little bit there we are and let's try it again. All right now as letting gets more and more specific just like we're doing in this shot you kind of lose a little bit of your leeway like if she decides she's going to move like a foot or two to the left or the right we're gonna lose she's not going to live the same. So it's just a compromise that we were going to wind up having to make do we want to make sure she stays right there and she's lived perfectly or do you wantto let it be a little bit free and maybe she just has a little bit darker shadows under her eyes that's just it's a choice that will wind up having to make the other thing we could do is what we could wind up bringing up our fill light in general, and that would help out with the dark area under eyes wait, zoom in, mike, if you're listening, who resume in tow, hand his eyes and just see if we conquered that fill light issue. Yeah, I think it's pretty nice way still see a decent bit of definition. It's probably like a little bit overexposed. Maybe we could join think you're right. I think we could bring that back on access just a little bit more. And when I say on access, I mean on camera, I'm not explaining to you, by the way, I was letting teo everyone else when I say on access, but basically it means on the axis of the camera, so more towards like where that position the camera? Yeah. Is that blocking still? All right. Is it on you? Okay. And what degree spot that we have on there? Ten. Perfect. So a ten degree spot good is going to be a lot more concentrated. Twenty is going to like this thirty and then forty degrees, and especially if something is this far away from your subject, we do want it to be nice and focused, so let's, go, I think ten looking and let's see what we've got and then I might have my kind of zoom in to hannah and see how that looks you haven't doing great by the way thank you for all your patients there we go to we can everyone see how she's lived quite a bit better maybe like I don't know if you can do this but if you can find a shot maybe like go ten back where she's got way did not bring that fill light in we can probably see the difference and then if you there we go something like that yeah that's a perfect example of that one and the latest one and if you bring those up in and zoom in hopefully zoom into her face it should zoom into both of them no you can only zoom into one at a time there we go okay perfect so there we can see the difference and hopefully that helps out everyone here and everyone watching at home as well. So this is this is the whole point of this is doing a couple of things for us first is we've got, you know, our gorgeous subject here we want to make sure she does in fact look good and is that that she looks bad here but she's not really well lit our exposure isn't perfect here it's just it's a tiny bit over exposed so we can pull it down but it should be pretty clear that this not only is its carving her face out a little bit more with the highlights and the shadows that air on her face but it's just lighting it up in the dark areas here that are under her eyes are tending especially because we do have kind of like dark eyes, you know, dark eye makeup in dark eyes in general kind of bringing that out the other really cool thing is we're getting a little bit of a catch like you here in your eyes makes her look like magical and she's got like, a little bit of that sparkle going on, which like for the washington's girl like you totally want sparkle in your eyes so everyone see the difference it's pretty cool, right? It's still, in my opinion, this the it's too harsh it's just a little bit too harsh, but we can see we're definitely on the right path, sean, you don't matter as much, but you're not like the pretty girls both person, so we don't wait. Well, you really don't need all the sparkle in your eyes, but you're you're actually lit really well because you've got a soft parks directly back on you all right? Let's try it again, guys, we're getting pretty close is everyone excited how this shots like evolving it's pretty cool right there we go gorgeous. So we've done all this stuff and we're building up towards a really wonderful image and a great composite all right? That's soon that and maybe we could bring up the power just a little bit here. Let's, zoom in there we can see what we've got gorgeous. Now we are getting a couple of things that I would love to talk about here is well, the shadow here that's happening on has face is that what do you guys think? That shadows from former hair, right? Okay, so if we didn't want that, all we would have you do is like, pull pull your hair back I think would be on this side. There we go. If the shadow was from something like this the washington we could pull that I really like the light that we've got coming on here does anyone maybe could zoom out mike and see so everyone could try to figure out where the this highlight coming on from the washington we figure out where's that light coming from john you're not supposed to say your partner said you could see it from here that's gotta move no he's totally right we've got a background light that's back here with a white card and that's that's creating that that's a bearable back there and that's creating that reflection all right, we're going to put a camera right back there, so that's, that bare bulb light that's kind of like shining back, which is giving our subject just that little bit of room light on there and it's lighting up our washington, it was kind of it really does make it look more like, you know, it's a product and things like that if we could, mike, if you don't mind zooming in here to the back of shawn's head going to stare it in the back, shaun said, so the separation that we see here between the highlight that we see, especially on the back of his neck and things like that that's coming from our strip box, which is right behind him as well. So each one of these lights, we can see it starting to serve a purpose. Now we do see just a little bit of shadow here under shawn's eyes, so the only thing we have to do that is make sure sean, when we're posing, you make sure you're not looking down. If you're looking up in the light that's right above you is going to catch right there and it's going to make sure that you're wonderfully lit, just like hannah, so all these cool little things that we're doing with our lighting is really coming together. And in our next section, we're actually going to start the levitation, and we're going to start pulling all of our pulling all of our efforts together to make this image really, really great as a final. But could we pull up like this versus the starting shot, like when we first started where this the room was dark, even keep on going out mike, where the room was just dark and we had almost nothing in there. There we go. Yes, that one is perfect. So we started off with that guys. We started off with that, and we've just been placing lights around and playing him around, and we can see we're starting, carve out each one over subjects and build this like, in a really interesting, cool, creative way. And I hope he hasn't really enjoyed this segment because it's been it's. Been a lot of fun for me, and I hope it's been fun for you guys, too.
Class Materials
bonus material with purchase
bonus material with enrollment
Ratings and Reviews
a Creativelive Student
Great moment i Won't miss. 2 of my favourites learning web sites in one !!! Thanks Aaron for all you bring to me including lessons of English...(don't understand every joke but...when you smile , i do too... ) Best regards from Brittany (France)
Mohamed Rasoon
i'm amateur photographer.i had a hope move on as professional, this is great lesson and CreativeLive motivate my self step by step to fulfills my hopes.