Lessons
Lesson Info
People & Places
Let's talk about some tips and techniques for capturing people and places. So when it comes to shooting people, you want to consider your lens choice. So for portrait's, I like shooting with my 50 millimeter lens. You might use something like a 50 millimeter lens, maybe an 85 millimeter, or even more, maybe a 200 millimeter lens orb. Or more generally, a more telephoto lens works really nicely for Portrait's gonna help compress the background as we'll see in a minute. Um, and it also can help exaggerate that shallow depth of field and give you a nice background blur. So in this example, we see a blurred background. I think I shot that it. I don't remember something really wide open. It may have been 1.2 or something close to it, so her eyes are in focus. Oh, or at least one of them. And then, as as the distance from her eye moves forward or back, things become blurry. So it just helps create sort of a dreamy look. Here is the difference that the lens itself can make. So both of these p...
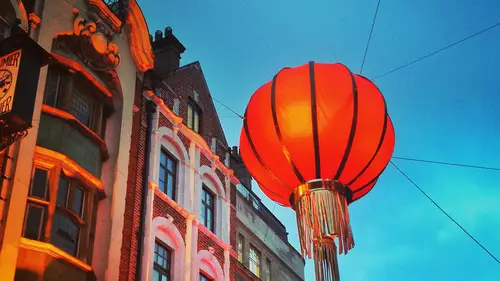
hotos of my son were shot at F 2.8. But the image on the left is not very blurred in the background because it was captured with a wider lens, a 35 millimeter focal length. And the image on the right, also shot at an aperture setting of F 2.8, has a more blurred background because it was captured with a longer focal length 200 millimeters, which also compresses that background. So he's sitting in front. He's sitting in a pile of wood chips and he's got a tree stump behind him, and the tree stump appears closer on the right than it does in the image on the left. And that's because of the compression that the telephoto lens creates, so it just creates a different look. So, you know, if you have a preference, then you want to choose your lens accordingly. With Portrait's um, you know, the often the most important thing to focus on would be your subjects eyes. So here's my son and my husband focusing on eyes. You also want to make sure that you don't crop your subjects at their joint lines, so you know, with people don't crop the edge of the frame at their risk. further elbow or their knees or their waste their neck or something weird like that. You want, Oh, crop in a non joint area because it just is weird toe look at when it's cropped like that is uncomfortable Visually. You also want to be trying to put your subjects at ease, whether you know, whether that's your kids or your your friends, what you're photographing or subjects that you may not know too well at that point. So it's a good idea to put them at ease. How do you do that? One of the things I like to do is to keep them busy. So I like Teoh. I'm asking them questions, trying to make them laugh. But, you know, maybe I'm not so funny, So I like to also give them things to do with their hands. So maybe that's, you know, play with your hat, play with your your shirt. Can you button and unbutton your best Or, you know, put your hands in your pocket for a minute or fiddle with your glasses or whatever is around. I try to just help them forget that the cameras there and that I am taking pictures of them and it could potentially feel awkward. I just want them to be engaged in something else so I can get a more natural portrait when you're composing scenes with people who are doing things. Ah, it's nice to give them room to do whatever it is they're doing. So in this example, this was captured on the streets of Morocco and I put these gentlemen on the right third of the frame because they are looking to camera left. So if I had positioned them on the left third of the frame, they would be basically looking at the very edge of a frame, which I think would be awkward and uncomfortable to to look at. So they're looking, um I gave them room, toe look there, looking across from the far side of the frame there, looking over to the left. So I gave them room to do that. Here's another example where these women have room to walk there, just walking through us a plaza through square, and I gave them room to walk. When you're doing this, it also helps to what do what I call compose responsibly. Just like we build responsive websites. I think we should be composing responsibly, especially if you're shooting, you know, candid stuff, live action, unscripted, not posed moments on with little kid. They're moving around a lot. So here's an example of my son and the swing, and he's looking to the right and I have him awkwardly on the right, 1/3 of the frame, and he's looking basically into the wall of the frame, and it's just a little bit awkward. So here he is, looking the same direction, but I have moved to position him in the left of the frame, so he has room toe, look to the right. So what happens if he turns his head and suddenly looks to the left? Then I move and I positioned him on the right, so he has room to look to the left now, so those are some tips for working with people. Let's talk about shooting landscape. Even with people in them. Landscapes are generally captured with a wider focal length, so here we have the desert captured around maybe 24 millimeters, so you want to go wide. Another thing is, you might want to try grabbing a tripod. You're doing night photography that could be a fun thing to play with. You can do some longer exposures. They don't even have to be very long. I think this was, like one or two seconds, and I was able to get this nice streak of the water in the fountain so we don't see individual drops. We see a nice flow of the water. It just looks soft and flowy. But, of course, that slower shutter speed is going to require a tripod or something to set your camera on. It doesn't have to be a big tripod that you have to lug around, carry around all day. It could just be the like. This is the example of a little Jobe gorilla pond, and it's bendy, so you can wrap it around things like senses or rails. Um, and it's really small, I confer thought in my pocket. I mean, you can see it here in relation to my cell phone, so that's a really handy thing that I like to have within reach if I am, especially if I'm going on some really fun vacation, and I plan to take a lot of pictures, often times the opposite of portrait in landscape photography, we generally would want a more squinty or tiny aperture, so we have a deeper depth of field. So in the portrait example we saw earlier with blurred backgrounds here, when we're shooting landscapes, generally you would want as much depth of field as possible. So here we see some boats in Venice and we can see that the front row of boats isn't focused, as are the remaining rose in the back and even the buildings behind that. They're all pretty, pretty well in focus. You also want to keep an eye on the sky in your shots. The sky itself, of course, can become a subject. So that could be fun to include in your images and, you know, wait for good skies people who who are really until shooting landscapes they, you know, watch weather app and make sure that they're gonna have good skies to capture those landscapes. One thing to do with the horizon is mind the horizon and keep it not in the center of the frame, so you can decide when you're when you're shooting images like this. Do you want the horizon in the top third or the bottom third in this example, I put the horizon in the bottom third, so it's really emphasizing the height of the buildings. And, um, that, I think, draws attention to the narrowness of the street. So the buildings and the line that they're making create like a tunnel, so that's putting the horizon at the bottom third. This image, then, in contrast, has the horizon at the top third so we can see more emphasis on the the village there on the mountainside, which makes for a really nice competition.
Ratings and Reviews
bobbi
Khara does a great job! She is thorough, has a great teaching style, uses fantastic examples of the "snapshot" version and the good version. She is enthusiastic, has wonderful explanations. I'm not a beginner and knew everything she said, but still found the way she put it together interesting. I referred several beginners to her courses. I hope she comes out with more advanced courses.
a Creativelive Student
Too often, I hear budding photographers lament, “My pictures aren’t that great because I don’t have a good camera.” Khara dispels this myth with clear examples taken with her cell phone! Of course, good gear helps; but it’s the skill behind the lens that separates a snapshot from a photograph–not the hardware. One caution, however, with Khara’s explanation of the rule of thirds. It is true that the intersection of the horizontal and vertical third is very powerful. Indeed, it is so powerful that it has a name–a bullseye; and you want to avoid it! Seldom will you see a point of interest on a bullseye in any major work. Near it–maybe; but not on it. When an area of interest, like the eye in a portrait, is on the intersection of the thirds, the viewer’s eye is drawn there and it locks into place. Without anywhere to go, the bored eye moves on to something else. Fledgling photographers (and seasoned professionals!) fall into this trap and it would have been prudent of Khara to warn of this danger. Khara does a great job describing tilt and her bird on a wire photograph is an excellent example of dynamic symmetry. While not exactly in the realm of basic composition, dynamic symmetry a powerful concept to explore once the principles outlined in this course are mastered.