Lessons
Lesson Info
Techniques
Let's talk about some techniques that you can use to achieve all of these things. So one thing you can do is to change your viewpoint. Ah, lot of times we approach a subject. We walk into the scene and we're holding up our cameras, and we're just capturing things from our standing height. Or as I showed you earlier, sometimes from the sofa. If you are having a lazy moment and you can't even be bothered to get up, to take the picture on that doesn't usually result in a very good image. So a better thing would be to actually get up and look around your subject. You know, if I'm gonna photograph this, uh, container the glass, I would be thinking, Okay, if I stand here, that's pretty boring. Maybe I want to shoot from underneath or up above or over to the side. So here's an example of this little guy was captured in a park, believe it or not in downtown Miami. So it doesn't look like that in this photo. It looks like he's in some national park leaping on giant cliff rocks or something. But...
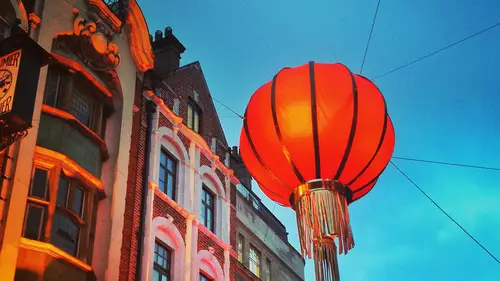
he was really only like three feet off the ground in a park completely in downtown Miami. And on the other side of the camera there was actually a parking lot filled with all kinds of cars and people. We got down there to do the shoot, and I didn't know that there was going to be some sort of fair going on. So there were, like, fire trucks and stuff for kids. And it was a mass, really. And I didn't want all that in the photo, obviously, and I thought, How am I going to get a shot here? But we climbed up a bit of a hill in this park. He climbed up on these rocks and then I actually laid down on the ground and shot upwards to be able to capture this. And the result is that we don't see any of that junk in the background. So I could completely craft a very different story, Um and really isolate him. And then I had him jump from one rock to the other, and now he looks like this little daredevil adventurer. And I love that show. I think it's very dynamic, and you would never guess that we shot it. Basically surrounded by a parking lot very close to the ground. Here's another example. Photographing kids at the playground is definitely not an armchair activity. You don't get to sit on the bench and get great photos. You have to really be active. And a lot of times that means climbing up on top of stuff and maybe shooting down at the kids. Or I could have let her crawl up that, and I could have shot from down below. But Portrait's, I think, tend to work best or better, at least shot from above than below in most cases. So I ran up ahead of her. So sometimes it means, you know, directing your ear subjects like Come on up here and I ran up inside Come climb up the thing. Sometimes it means just trying to anticipate where they're gonna move and get there before they dio. So it's a little bit of both, but changing your viewpoint can make a big difference. Here's another scene from a restaurant and the red from that. It's really just from the restaurant, if you can believe it. It's a really cool place. They have a lot of very theatrical lighting, so the room really did look that red and shot from above. It really became more of a graphical situation. So we see a lot of those other elements. We see repetition in the shapes of the tables. Um, we have sort of a leading line, a curved leading line leading through the past that the server is following. So there's a lot going on, and that scene was quite different when I was down on the ground. So I I actually wasn't really interested in photographing that room until I was up above looking down on it. And then I thought, Now this looks interesting, so changing your viewpoint can be huge. Another technique is to take advantage of natural framing. So we've seen some of these examples already. Here's an example from right here in Seattle, walking through, um, the surrounding area, I looked up at one moment and said, Look, there's a space needle and look at that. It's in a perfect frame of these trees right here, so those trees are perfectly framing the space needle, and that makes for an interesting composition. Here's another example from D. C. Where this monument is inside this porthole sort of circular frame on some bridge I was crossing. Here's another one with some clients in a literal frame in the doorway, the doorframe. So you never know what kind of frames are going to be around. You just have to keep an eye open and see what you find. Another example is to add foreground elements. So this, I think, is also a lot of fun. We're so used to in our photos thinking about, um, you know, our subject and then the area behind them. At least hopefully we're thinking about the background. We want to keep an eye on background. So we, uh, know what's happening, what we're putting in our photo. But another dimension is we can add foreground elements, so that's going to be the stuff that's actually in front of our subjects, and that can add a lot of depth and interest. So here is an image from a wedding reception that I shot and actually climbed up on the stage and then got behind the band a little bit and shot back towards the crowd. And I loved this vocalist. She was so much fun, and I love how she's framed by some of the other vocalists on the stage. And then, of course, she has that nice light on her, creating some rim lighting. And I love that image. Here's a fun photo of my husband caught in the in the ocean and the splashes creating kind of a nice frame. Of course, this was more of a lucky grab. I don't know how I can really control the water and the way it's splashing, but a lot of times, you know, if you just keep shooting and put yourself out there, you can get lucky with some shots like that. Some other stuff I've done for clients. So, um framing or having some framing with the scene around them, but also the foreground in front of them and choosing to focus on the foreground. In this case rather than my subject. That's a bit more unusual, but I thought it might be fun to try, and I like how it turned out. Here's another example of ah, father of bride walking her down the aisle, and I love. I love shooting through the people in the weddings when I'm shooting the ceremonies. I love shooting between the guests, and I think it just adds an interesting element. And then it looks like you know this. This is a viewpoint of guest, Really? So not everything's just captured from the middle of the ill. Here's another example from another wedding reception. So they're having their first dance. We see some people in the background and we see some symbols from the band again. I was up on the stage, shooting through some of the instruments. This was the first look. We shot this actually in an art gallery at home where I live. And there was some, um, interesting art that probably they didn't want to have shown and making an appearance in their album. So I was very strategically positioning myself and them to block these sculptures. And so they're kind of laughing because that was so funny. But also having him in the front like that makes a really great foreground with the bride in the back. So that's one thing. So foreground elements. Another thing that I do a lot is to tilt the horizon a little bit, and I love this because it adds, it adds movement to photos. A lot of times when I'm shooting stuff I love movement, even if it's just a little even if it's, you know, the wind and someone's hair or somebody, just their clothes swing because they're moving or whatever, Um, or a laugh, I think is great. And to really amplify that I often tilt the horizon. So here is one example bride and groom having a little moment. Something was funny. I don't remember what, but I caught a great laugh. And the tilted horizon just really amplifies that. Sometimes, of course, this bird's not gonna laugh for me, um, or toss his hair or anything like that, pretty much unless he's flying away. He's just gonna be sitting there. But by tilting the cable that he's sitting on tilting my camera so the cable runs at a diagonal, it adds, I think some hint of motion in another rise, very stagnant image. Here's another thing I love to do with my wedding parties is I'll have them line up on, get link arms like this and then just walk towards the camera, and it's great because they think it's ridiculous and they're like, Why are we doing this? And they feel Philly, which makes them laugh. So I get really good expressions. But then I also control the camera, which gives me a longer line so I can actually fit more people in, because now they're running from corner to corner at a diagonal, so the line is longer than if it was just a straight horizontal shot. But again, we have more exaggerated movements, so they are actually walking. So there's that movement. And then the tilted camera angle really just accentuates that. Here's, um, black and white about just a street nighttime scene and even, you know, tilting a still life like thes martini glasses. Um, makes them or interesting. So here we see contrast of color. We see repeating patterns of the shape of the glass, and then we have that tilted her rising, which makes it a lot of fun. So some things to keep in mind when we're talking about tilting the horizon because it can really get overdone really fast. So some things we wanna remember about it is to not tilt it too much. So I found when I was preparing for this, I thought, Well, how much is too much? I don't know. So actually went into my catalog of tilted images, and I measured how much the tilt was, and I found that it hovered around degrees. So it was a flight tilt. You know, I'm not getting all the way to 90 or something like that. It's it's pretty Suttles just 14 degrees. And I think that's key. The other thing is, of course, you don't want until everything you don't want every shot that you're taking to be tilted. I think that would be nauseated. So, um, you know, think of it like a spice and just use it. You that with finesse. The other thing is that you want to be intentional. You don't want it to look like you just can't take a straight photo. You know, the tilt should look like, Oh, you did that on purpose. Not like you tripped and fell and took the picture while you were going down. And now it's crooked, so you don't want it to look crooked. You want it to be looking like it was intentionally tilted, and then you also want to consider the direction that you're tilting it. Maybe compositionally speaking, maybe there's a reason why you might want to tilt to the right for example, or maybe to the left. So it might have to do with the direction that somebody's looking. Maybe someone is doing something in the frame that lends itself toe one direction more than the other, so you kinda have to just play with it, and, um, through trial and error, you will get better and better.
Ratings and Reviews
bobbi
Khara does a great job! She is thorough, has a great teaching style, uses fantastic examples of the "snapshot" version and the good version. She is enthusiastic, has wonderful explanations. I'm not a beginner and knew everything she said, but still found the way she put it together interesting. I referred several beginners to her courses. I hope she comes out with more advanced courses.
a Creativelive Student
Too often, I hear budding photographers lament, “My pictures aren’t that great because I don’t have a good camera.” Khara dispels this myth with clear examples taken with her cell phone! Of course, good gear helps; but it’s the skill behind the lens that separates a snapshot from a photograph–not the hardware. One caution, however, with Khara’s explanation of the rule of thirds. It is true that the intersection of the horizontal and vertical third is very powerful. Indeed, it is so powerful that it has a name–a bullseye; and you want to avoid it! Seldom will you see a point of interest on a bullseye in any major work. Near it–maybe; but not on it. When an area of interest, like the eye in a portrait, is on the intersection of the thirds, the viewer’s eye is drawn there and it locks into place. Without anywhere to go, the bored eye moves on to something else. Fledgling photographers (and seasoned professionals!) fall into this trap and it would have been prudent of Khara to warn of this danger. Khara does a great job describing tilt and her bird on a wire photograph is an excellent example of dynamic symmetry. While not exactly in the realm of basic composition, dynamic symmetry a powerful concept to explore once the principles outlined in this course are mastered.