Lessons
Lesson Info
Additional Book Constructs
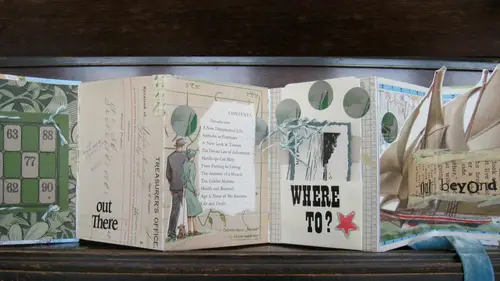
So we're going to dio something a little extra to have a little pop up in this particular book a little three d dimension so I ended up using this peace that I talked about earlier as a frame for six different photographs of this young lady as she went through her life in the scouts because the back is not that appealing I'm going to take some of this paper that we used earlier and actually cover the back I'm not a run adhesive over this because you can see through this so if I wouldn't put glue on the back here and then put this onto something you'd be able to see the glue through there so I'm actually going to use the double stick tape the little bit firmer one and just go along the black edges of this plastic and this will allow me to attach the paper along the back side without seen any glue from the front side so while I'm not a big perfectionist don't really like seeing glue through things I find it sort of takes away that charm of the idea of what we're trying to make so I'm goi...
ng to cover that completely the back side and then we're going to make this little piece stand out from our book so uh cut down the paper this will also give it a little more strength so it won't be quite so flimsy when we attach it um, using scissors or blade are are both both a good idea with this kind of paper, whatever kind of cut you want to get as clean as you want to get, we're going to make a little slice right here in one of the edges of our book in one of the folds of our book, and we're going to make a slice as wide is this tape because then we're going to put the tape right through there and this tape is going to hold this page so it's an extra page in our book that will stand out, I'm gonna put it lower it's a heavier piece that's in the book, so I'm gonna put it lower because I think if it were up here on its own, it might not stand completely we're going to put it a little lower, so when the book is open, it will have the florida stand on and it will still be movable like that. So putting it on here first and hearing the image first remember with bookbinding tape, you need a little water, so just moisan it enough again not with your tongue, but with a little bit of water and we're going to hear that on there and then I'm going to make that cut in the fold, so I'm just checking the measurement of it I don't want to make too big a cut because when I put that book finding tape through, I want to make sure it's firm and very carefully make a little cut. I always like to use a self healing matt below my work because when I used to just cut on my lap, I end up cutting right through whatever I was wearing, so have a lot of holes in my clothes, too, so having a self healing matt and a good firm surface to work on is ideal, anything can go back and be repaired if you find that something rips or it wasn't as clean as you wanted it to be the great thing about collage that the layers being an important part of collage, you can go back and layer over something, and you'll never know that it was just a mistake that only you know about no one will ever know, so we're gonna put that through the fold, so this could be our pop out and it's nice and tight, which is how we want it will attach that to the paper back there, but otherwise this is now what you have to fold out in your book kind of an alternative page, so her photos air in there, and then we can keep collage ing on these other pages you wanted here this to the back and because this is bookbinding tape and I have the adhesive on that side, I can use that to pieces if you didn't have it, it's okay, you could use another kind of tape to tape this down with you could use your double stick tape, you want to give it a little bit of room to fold in and out. So I'm just going to hear this back part, leaving a little bit of movement on the front part from there we have it, that's, our other page are alternative page, and so when we close up the book, you'll just see a little smidge of that and because we've covered the back it's great, so it's collaged as well. So the book, the back in front and that's our alternative page, I'll probably do a little bit more here may be put in the letters that I'd pulled out for to spell out scouts so that can go across the top uh, double stick tape for something this hard is great. I just need a little bit on each, and we'll just spell that out of that the top, and then we'll keep going with the book and with the theme and as you go along, you may start coming up with other things that you like seeing. And think, oh, that would be a great thing to add in let's say you're making a memory book about your vacation in italy and you are doing all the adding in and then you realize I have three more photographs I want to add in the great thing about any of this collages that you could just keep layering in and you'll you'll have a better book by the end of it if you do that, so we'll add in that which goes all the way across, I'm actually going to take it to the next page and I'm going to use the final lesson scouts and put it on the envelope so it carries over the whole story. So even though we have three separate pages to separate that we're working on, they all kind of run together so you can see that as well and then eventually will close and fold. So we've added a couple more things to our book, a little image here that I thought seemed like a great shot of things she'd gone for like badges she'd gone for but comes from an old french history book a child's notebook, so I just punched a little hole up there at the top and tied a little string and we've added this page here, which we're going to add a little mini book inside our book, so outside of this I've just made a little book which is a folded piece of paper on the outside I covered the two insides with some marble paper and then used these old legendary pages with a double stick tape and folded them in and then these they're going to be girls that she's been in the scouts with over the years so she wants to keep the memory of that so that we're going to put right in here on that page and we're going to use a little bit of, um dot glue for that on the back of this book I'm going to go down the hole back panel of it to really keep it firm in there and that's going to get put right in in there towards the bottom of the page and so now we have a little mini book inside of what will be our total book and then the last little extra project we're going to do is actually lace c pages together so this something you can do with twine or a ribbon they both work and depending on the size hole punch you have depends on the size of the ribbon or the twine that you can use so I'm going to use about a medium size hole punch and I am going to use this little twine the same twine that we used here so it kind of pulls it back together and we're going to use the last card the last pages of our book and we're going to tie these two pages together and remember, this is our back page so keeping keeping in mind that that's our back page will be glued to our cover we're going collage that as well and this I'm still keeping track of my front page so in order to do a tie together page a lace up page I'm going toe put these together just to keep him out of our way and kind of like when you were holding the seams together to use the book finding tape you're going to hold the seams together but is if it's bent so is if it's folded like this I've got them both together and I'm going to use my whole punch and just go down along the seam of the book there's no perfect measurements I'm not going to go a specific inch between or half a kn inch I'm just going to kind of eyeball it and you could actually do a total variation on this as well. So if you just wanted to punch a hole here and punch a hole here and one in the center, you could do just a three part tie up I'm going to go along the whole thing so we see the we see the twine in between so um very close to the edge I'm going to punch the hole and I'm going through a couple layers paper besides the card and the book signing tape, and it just is a slight punch, making those holes all the way down to where my two pages air going to attach. So now I've got those hole punches on both sides, one there and one there, I'm going to keep those together while I laced them up with the twine. Um, I would cut mohr twine probably than you need what I like to do is I like to tie it around the back and you can actually see it from both sides, so you're going to cut a length of twine you to keep those two pages together like that, and just like your lacing a shoe or any other kind of a bag or something that laces up, you're going to do that same thing. So I'm just going to go in and out of those holes and lace up the pages together, not gonna pull them super tight. We still need a fold in the pages, so I don't want to go to tight with it. I'm gonna leave that side out since it got a little I'm a little messy there and that'll be our end, anti and back and forth, lacing up the pages and leaving a little bit of looseness. If you're using a twine that's made up of other strings like this it can get a little messy as you go back and forth between the holes she trying to hang on to all the strings so you just want to try to keep them all together in your fingers and again remembering that you want to use I want to leave a little space this could be done with a needle and thread it could be done with a much bigger thicker ribbon excuse me just depends on the look that you want and, uh we're going to cut this off again just give us a clean start back and forth back and forth so I'm leaving a little room each time I do this and because I've left a long tail if I need to pull and make it a little bit looser I can do that as well you want to leave a long tail on both sides uh ok, we're almost to the top and and then I'm going to take them behind the pages so in the back of the book and tie them in the back of the book and again I have these two long tails to go to tie around the back but this is where your lace up is because I want this to be able to still have that same kind of fold in and out I want to leave it this loose so I conceived with my book, standing up like this that's how loose I don't want them going to keep him exactly like that, make sure folds as well, and then I'm going to take them both and tie them behind. I could see I have a little bit of looseness there that'll all bring in slightly thiss went down here at the bottom just a smidge, and then I'm going to flip this behind in the back of the book and a cz well, is this one in the back of the book? And I'm gonna tie them back here again pretty loosely, because I want the ability to open and close my book have the fold be fairly loose, but this is just to give an idea, and you can do this with any things say you're making a book about one of your little kids, and you want to use an old shoe lace from one of their shoes would be a great thing to include in there or say, you were doing a wedding book for somebody, and you wanted to use some of the ribbon that came off of their bow. Ok, that would be a great thing to tie this up with so it's just a dash of something that kind of brings the whole thing together, but also adds a whole lot more. So that's lacing up the pages of your book. And if you wanted, you could actually do that in every page. Your whole book could come together like that. But again, you want to leave a little room for them to be able to move back and forth. And then, finally, we are going to collage this last page, and then we're going to construct our covers. And we'll have a complete concertina collage.
Ratings and Reviews
Nola Passmore
I really loved this course. So many creative ideas that sparked my imagination. Molly's instructions are really clear, and I loved that things didn't need to be perfect to work well. I applied what I learned immediately to make a concertina book for a friend's 50th birthday. I'll definitely be doing more of these. A great way to make gifts or use for your own memorabilia.
mary gabriola
This was a really fun class. I’ve made a few concertina books in the past, but I’ve never added other elements like pop-ups and inserted tabs. I got lots of ideas for new things to try, and a really good demonstration of the basics. I especially appreciated the discussion of all the alternatives - things like different kinds of adhesives, and when you might use each one.
Rachel Lyons
thank you thank you! i have sooo many greeting cards that i can't bear to throw away...now i don't have to! great ideas and easy to follow.
Student Work
Related Classes
Paper Craft Ideas