Looking for Natural Light in Your Home
Lesson 17 from: Craft Photography FundamentalsCandice Stringham
Looking for Natural Light in Your Home
Lesson 17 from: Craft Photography FundamentalsCandice Stringham
Lesson Info
17. Looking for Natural Light in Your Home
Lessons
Session 1
1Introduction to Craft Photography Fundamentals
04:59 2What Your Visuals Say About Your Brand
04:56 3How to Become a Photographic Author
10:44 4How to Use Natural Light for Your Product Photography
10:00 5Setting Up Your Photo: The Basic Rules
09:07 6Becoming the Viewer to Take Better Photos
10:30 7Shooting 3 Setups: Creating the Backstory with Images
34:32Shooting from Top Down with an iPhone
19:49 9Shooting Paper Products with an iPhone
10:54 10Shooting Jewelry with an iPhone
19:01 11Editing on your iPhone
15:28 12Finding Your Brand's Aesthetic
18:39 13Find Your Product and Customer Target: Exercises
11:12 14Figuring Out Your Audience
08:46 15Interview with Gilit Cooper of The Bannerie
08:45 16Branding Beyond Instagram
19:47 17Looking for Natural Light in Your Home
19:36 18Building a Styling Prop Collection
08:22 19Creative Backdrops
13:52 20The Essential Product Photography Props
11:18 21DSLR Basics
02:39 22Understanding Shutter Priority And When To Use It
26:29 23Understanding Aperture Priority And When to Use It
37:16 24The Basics of White Balance
12:52 25Photographing Jewelry
37:27 26Setting Up a Bedroom Set and Photographing Pillows
19:59 27Photographing Greeting Cards
06:53 28Shooting Products on a White Background
17:24 29Top Down Photography on a White Background
13:06 30Shooting Products on a Black Background
07:23 31Shooting Reflective Items
12:20 32Shooting with Backlight
04:01 33Top Down Photography: Shine & Reflection
24:50 34Basic Editing in Lightroom
31:37 35Batch Editing in Lightroom
06:00 36Editing Jewelry in Lightroom
10:01 37Editing White on White in Lightroom
06:54 38Editing Shine and Reflection in Lightroom
17:03Session 2
Lesson Info
Looking for Natural Light in Your Home
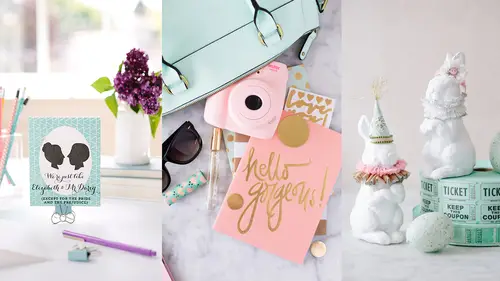
Setting up a home studio. This is where stuff gets real. And I'm gonna say stuff 'cause I'm a bum. But this is where I show you the behind the scenes of everything. And this is where I end all of your excuses of why you can't take good photos. We are just gonna look at how things really are. Here's this shot in my house on my kitchen table. So oftentimes I'm working between two spaces. I have a little office space in my house and we have our kitchen. And that kitchen table has a window by it and so that's where I shoot. And so sometimes we eat out at night because I'm in the middle of a shoot and I don't wanna move things. No space is not an excuse. You can find a space in your home that you can do this. Here we are just set up right by the window. I'm using white foam core boards. I've already talked about my deep, deep love for white foam core and I use it all the time for all sorts of things. Looking for natural light in your home. This has been a question all day. And we're gonna a...
ddress that right now. So how do you know where to set up? How do you know what windows would be good? How do you know if there's going to be enough light? All of that stuff. What to look for? You're gonna look for windows without direct sunlight. How do you know that? Okay, northern windows never have direct light. That's why painters always painted using northern light. It's supposedly the most clear, color wise, and you're never gonna have direct light coming in through those windows. So I literally told my realtor when I bought my house, I want a family room with northern windows, why? I live in Texas, so it's really hot and I don't wanna light coming in to the main space of my house, but also because I wanted to be able to shoot in my family room at any time of day and get really great photos of my kids. They thought it was like the weirdest request ever, but I am very happy with my family room. So when you saw that in that last shot because it's all the same, let's see. Oop, yes, go back a way. This is all in the same room. These are all northern-facing windows. I can shoot any time of day in this space and never have direct light. Just have nice, soft light. Am I going backwards now? Okay. Here's the thing though, doesn't matter if you don't have northern windows because at different times of day, different windows will not get direct light. So just think about it. The sun rises from the east, so in the morning your windows are gonna be getting direct light if they're east facing. So it's gonna be a much harder light and we don't want hard light, we want soft light. In the afternoon, if you have windows that face the west, it's going to be getting light from the sunset 'cause the sun sets in the west, so you're gonna be getting hard light on the west hand side of your home. So all you would have to do is know in the afternoons I'll set up on the, or in the mornings I'll set up on the west side and in the afternoons I'll set up on the east side. That's all you have to know. Now if you don't even know what directions your windows face, you don't have to, okay? We are going to just look at your floor outside your window, okay? And when you look at that, if you see that soft light is kind of coming in, then it's getting indirect light. If you look at the floor below your window and you can see that harsh rectangle of the window shape on your floor, it's getting direct light and you don't wanna use that. Or you just need to alter it and we'll tell you how to do that also. Or if you see the blinds. You know how you can see that shadow, highlight, shadow, highlight from your blinds? It's getting direct light, so we have to figure out a way to correct that or you can move to a different side of the house that's getting indirect light. Does the size and type of window matter? So just like we talked about this morning, the larger the light source, in this case your window, the softer the light and the less contrast between highlight and shadow. So I have less control over where my highlights and shadows are, but they're softer. I'm not gonna lose a lot of detail in my shadows as I would if it was harsh sunlight. So if you're outside at noon and that harsh sunlight is hitting you, we get those raccoon eyes, right? Because the sun hits us here, our eyes are a little set into our face, and then we get those harsh shadows. That's because it's direct light hitting it and then that shadow is hard. And the sunlight, even though it's huge, is super far away, so it's a small light source and that's why it's so hard and harsh. So the smaller the light source, the harder the contrast is between highlight and shadow, but the more control we sort of have over that. And again, the way we control that is by how close we get to our window 'cause we're making the light source bigger when we get closer, or how far away we move from that window. So we call that light fall off or shadow fall off. We can see as I move my subject literally farther from the window, I will see the shadows getting harder and deeper as I go. And this is something, because the sunlight's always there, that you can literally see as you're moving your subjects. Okay, so the farther, closer away. This is where that slide was (laughs) so look at the floor in front of the window. If you see the harsh bright light on the floor, you know it's not great. If you see soft light, then you know it's good. So this is where we were today. This is another shot from our producer over there. And you can see that this room at this time was getting soft light, right? If it was getting hard light, we would see a very hard line from where the light is hitting that table on the floor. But we're not getting that. We just have like a gradual light coming in. So what if you only have one window? What if you're in a apartment and you only have windows facing one way and you have to take a picture during that time of day and it's getting direct sunlight? Well then we need to diffuse or soften that light ourself in a very similar way to where you see soft boxes in a professional photo studio, those big white lights, we can create that with our window. So you can soften the light with a sheer curtain or a white curtain, or you can buy a 5-in-1 reflector and on the inside of that is, I call it a scrim or in photography they call it a diffuser, because my husband's in theater I'm used to those theater terminologies. But it's a sheer fabric. You can like transparent, you can see your hand through it if you were to press it up there, and it's round and you can just hold it up in front of the window or just prop it there and it's gonna then diffuse that light. So you can use a window at any time of day, you just might have to alter it slightly if you're getting direct light. Here's an example of that. So I have white curtains in my office for that very reason because late in the day I get the hard light that will come across and hit here. And so it's like this bright lines of sunlight that come through. So I keep white curtains, cheap from IKEA, on my windows so that I can close those. I still get enough light through to use the windows as window light. And there's my other setup. So this is the office setup and you just saw the kitchen setup. And this is the type of image I can create there, okay? I've never not once had someone ask me, oh, are you just doing that at home? No, they look at that and they think that I have that done in a studio, right? And it's just knowing how to find that, how to find that light in your house, and now you do. And it's also about testing. So taking pictures at different times of days, by different windows, until you find what you really love, because the light quality can be different. In fact, in saying that, one of the reasons why I really love this window as opposed to any other window in my house, is my neighbors built this huge hideous, hopefully they're not watching this, they're not watching, white brick monstrosity of a fence, right? It's like 10 feet tall, white brick. Like being in a prison yard on that side of our house. But it's like eight feet outside this window, so when the light hits that, it's like a beautiful reflector coming in and giving me amazing light, so I will forgive them for that, I guess. But that's one of the reasons why I love that window. So think about that. Like what is outside your window. If you have a blue or green trash can right outside your window, it's going to be reflecting that light in. So you wanna look around, see what's around the window you're using to know what color tones might be bounced in. Okay, I've already talked about this. I love it so much. Can you hand me a white foam core board? My number one piece of equipment for lighting is a $5 foam core board. And I rarely shoot without using one, either as a base or a wall or a reflector. $5 and I can make anything. I can make you a palace, okay? Maybe not a palace, but I can make it look like you're in a room in a palace by what I cover this white foam core board with. And so we're gonna show you some of that as we move on. Okay. So here I'm using the white foam core board and actually to show a crop shot that we're gonna see later on. And I am using it here as back lighting 'cause I am facing the window and taking the photograph. This is where white balance and exposure becomes really tricky and we're gonna have an entire lesson on that later, how to deal with tricky lighting situations. But I wanted to point this out because when you're using an in-home space, you wanna be sure that you turn off the overhead lights. You do not want two different light sources lighting your subject, okay? And a lotta times I'll have people be like, I bought daylight balanced lights. It doesn't matter. It'll still have a different cast to it. So I really highly recommend, and also, it's a lot harder to deal with multiple light sources if you don't understand lighting. So when we're starting out, I want you to start out with one window and one reflector and that's it. You can create beautiful light that way every time. So now we're gonna talk about creating your own backdrops and you can do that with not a lotta money. I told you at the beginning I can hack anything. And so we're gonna talk about all of these. I'm gonna set this here for a minute, but first I want to show you a few before we make some. So these are items that I have or love using as backdrops. Most of them come from hardware stores. I love walking the aisles of hardware stores and figuring out things that I can do with inexpensive items. So the first one I wanna talk about is actually here up on stage and we've already shot it today. And that is this marble slab. And I'll get into it just a little bit with when we have a picture. So faux table tops, we're gonna show you how to make those. Crates, I love old apple crates. I'll just flip 'em over and use the underneath for the wood. Trays, I'm always looking at like cheap, like discount home places for different trays that I can use for different colors and textures. Bead board, super cheap. You buy it by the sheet, it's already painted white. It makes a great fake wall, especially now that shiplap is super popular. Turn it sideways, now you have a skinny shiplap. White boards, foam core. And what I love about this too is unlike poster board when you paint it and it'll start to curl, this is so stiff I can paint it different colors. I can literally color match my product. I can take it in to the paint store, have them color match it, and paint my backdrops to completely fit my brand. So it's a really great way to create backdrops and not feel like you have to invest in a whole bunch of expensive photography paper rolls, but just paint it yourself. Here's an example of a white-washed piece of plywood and bead board. And it looks like a really pretty kitchen, right? Okay, so formica countertops and seashelled sinks be darned. I'm putting those in here because our house was built like six years ago and whoever built it decided that seashell sinks were really cool and they were in like the '80s and early '90s, but they're not really anymore, unless you live by a beach, which I do not live by a beach. So I'm not going to shoot a bathroom product in one of my bathrooms because they are not current and my market would not respond well to that, right? They know that that's not current. They may be like, oh, that? So it dates my product. So I need to keep up with the trends. Now I'm not gonna, I don't have the money to redo my bathrooms or I would. They're seashelled sinks, come on. And I also, like my kitchen is beautiful, but it's not a bright white kitchen like I would like for my brand. And obviously I'm not gonna redo a kitchen just to match a brand. So we have to find ways around that. So at Handmade Mood, our blog, we get asked all the time, like how do you have such expensive kitchens? How do you have, because they're seeing the marble and they're seeing the tile backdrops we create and they think we have these amazing things. Now I'm not telling you to be fake, we're not fake. We tell 'em it's a set, but in my personal opinion, I am selling a look, I'm selling an item, and I need to create something that supports that. It's not fake. Would you call it fake if a magazine did that? If they built a set? No, so I'm okay with doing that. So here's our bathroom set that we use a lot. And we're gonna show you how, what these tiles are and how to put them together and the cost on them. This is the marble slab that I've been talking about. And then a white board. And that's all I need to have a beautiful bathroom. So if you were selling soaps or you are selling bath salts or bubble bath, you can create a simple set like this that doesn't take a ton of space and doesn't take a ton of money and it looks straight out of Martha Stewart, right? It's beautiful. So the marble. The story on this is we decided we wanted to be able to shoot on marble countertops. I have granite and it's just too distracting, the granite that I have, and so we went to the counter store and we asked them for a three by three piece of marble and we were just gonna buy it. And the guy came out and was like, "Why do you want a three by three piece, "like what are you gonna do with this?" And we told him. And he's like, "Well, that's several hundred dollars "for that and even more than that, "that's really, really heavy. "Like you are never gonna be able to move that." Because see how thick that is? I mean it's a thick piece of rock. So he was like, "You know, I shouldn't tell you this, "but I'm going to," and now I'm telling all of you. Under three by three feet, they can't resell, they don't resell and so they throw it out in their back whatever, they get rid of it. So he's like, "Go back there and see if you can find "a piece of marble that'll work for you," whatever, you weird girls, take this whatever. So we literally went back through the trash, rocks, with a cloth 'cause it's all dusty from the cuts and just wiped down these pieces of marble until we found one that worked for us. And because we're shooting table top, it doesn't need to be that wide or that long because we want it to look like a counter anyway. So we got it for free. So there's a tip for you. But there are, the likelihood of that happening again is probably not super high. So there are other options. This is a baker's piece of marble. Bakers use this, they need that cold marble when they're creating pastry or dough. It's, depending on where you buy it, can range from $20 to $150. So if you're going to like Williams-Sonoma versus Crate & Barrel, versus wherever, Amazon, wherever you're looking it up, but they have them all over because bakers need this item. So it's the exact same feel and look. This one actually has little feet on it, which is really nice because then when you put a wall behind it, it gives it a real feel to it. It gives it that height and it's not quite as heavy as that one because it's not as thick, that gives you the look of thick. So you can buy it and the other thing that we have done is you can get marble pavers from a garden store that are two by two and they're about $40. So it's one initial investment, but if that's a product you're selling, then you're gonna be using it all the time and it's worth it. And that's why those brand words are so important because we wanna invest in pieces that are applicable and that you're going to use over and over and over. You don't want a whole room full of props that you use one time. It's just not realistic. So here's what an image on that looks like. It's beautiful. I have a question. Yes? How far away is the whatever those are, marshmallows, they're not marshmallows clearly in a bathroom. Bath melts or something. Yeah, how far away are those from the backdrop? So it's the same length as this piece you're seeing right here, so probably about two feet. And we'll show that tomorrow. We're actually gonna move things closer and farther away from the background and show what that does 'cause I think that's really important to talk about.
Class Materials
Bonus Materials with Purchase
Ratings and Reviews
a Creativelive Student
This class taught by Candice was amazing. She teaches in such a step-by-step, easy to understand pace. She shares so much of her own tips and tricks she uses to create beautiful images without spending a fortune or having all kinds of expensive equipment. Having the DSLR lessons included was really great for anyone who wants to do more than the camera phones are capable of. Learning the basics of how to use a DSLR is confusing for most people, but Candice broke it down in the simplest way possible. Social media is all about imagery, so if you want to put out the most beautiful eye-catching photos, then you want to learn how to use more than the camera phone. I don't have a business where I need to take photos of things I sell and I still enjoyed her class so much. As a photographer, I am going to use her ideas and insight when I photograph things for fun. There is so much to gain from this class. I would highly recommend taking her class. She is a wealth of great ideas and information and has that friendly personality of someone you'd want to sit and have coffee with.
yomichaela
A wonderful class to get you going with craft/product photography. Candice provides (and shows) fantastic examples and it's really fun to watch her work through a shoot, moving items, etc. to create the final image. She also covers some basic photography tips which is very helpful. Great class! I definitely recommend to others!
Melinda Malamoco
I loved this class! Candice is so personable, clear and relatable. I would want to hang out with her and be creative! I have been taking pictures for YEARS, and for my Etsy store for over two years, and I still learned a lot in her class. The lessons are set up in a way that you can follow, take what you want and don't worry about what you don't need. I will say that I got a TON of ideas for how to better display my brand, what my personal style is and how to be consistent with it. I so recommend this class for anyone who has small business or just wants to be able to take better pictures of their products. Okay, off to build a prop kit!