Lessons
Lesson Info
Creating Atmospheric Effects
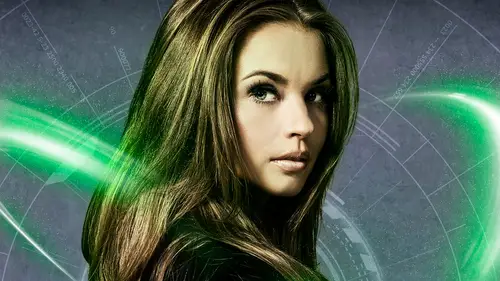
we'll add some or effect so subject as we go Now, we're ready to start adding the light effects around our subject. Here, I'm gonna go back to this layer containing the original extractive subject was going to reveal a little bit more of the background here. There we go. You're OK now flares a big fan of flares. A big fan of special effects when one of things that really drew me to being inspired by movie posters is the flares and design elements that you could do with it with these sorts of things. So I want to show you how I do with flares and some creative things you can do with them, even from a three d sampling. Um, so go and create a new document. Go ahead and say what we're working on now when I'm creating elements that I'm gonna use, um, design elements or special effects of things like that, I tend to like to create them in their own documents. Um, in this particular case, I needed to be a square document because we're gonna do on effect that needs. It's the document to be squ...
ared. But the other reason like to do it is that I like to keep the elements separate in the event that I do something that I really like and might want to use in another design. I can take that file, save it, and then pull that from whatever I need it again. But also kind of keeps the help to keep the file size down by, um, working another document, just dragging, dropping over. So I like to look at the final design is just the the assembly point of all the cool effect that we have. So in this document, wanna make the background Blackstone Franks, Commander Control. I just inverts the back room, so I want to take a flare. Now, I've got a lot of flares. Um, that I have put together as brushes which I'm gonna include is part of the class download. And I have a collection of flair brushes I might add in here, but I'm going grab this one right here. I think that there we go have about a dozen different flair brushes I use. I affectionately call them the JJ Flares because if anybody seen a J. J. Abrams movie knows what I'm talking about, Um especially the first start tracking. Well, he went a little nuts with that, but used well, they have a really, really cool effect. So I thought, Why don't I want to take that into a static design element? So I went and just started, Ah, search for all kinds of different anamorphic flares, and at first I was taking them and pulling the images and putting him on a document changing the blend mode, and it would look good. It was limited and limited. In that way, though, that's what I discovered is why not make it a brush. So here I have a brush into flair, and it's it's actually define us of Russian. I can just use it all day and usually flares are are. Flares are on a black background, usually, especially if you have a stock image. So you just take the image inverted. Define it as a brush. I have time at the end. Maybe I'll show that role trickle quick. So but this one I defined as a brush. Now what I want to do with this flare, normally I would have taken design. You can actually go in here and just just give an idea. Sound effects help, too. Here we go. Done. No. But in this particular case, just having the flares themselves. Great. They look awesome. But if you start to play with them and some of the photos feature, you can do some interesting things with them. Like for here. I'm gonna go to the make the brush a bit smaller to go to the bottom of the document here. The bottom of this square. I noticed I created a new layer right here. And let's go in here and we're gonna dab a few flares at the bottom. Tom a day. And I go up here to the filter menu, go to distort and choose polar coordinates, and you wanna have rectangular polar selected when a hail. Okay, now we're gonna get a circular flair and you get to this point, you're like, That's kind of cool. I actually do talk to myself like that. When I'm working all by myself at home, I'll do something like I'll call my cat over, she'll jump up and say, Look, that's not true. Cat hates Hey, Cat hates with footage of, but, you know, um, so that was saying I see this. I'm like, That's kind of cool. So notice it's got a little bit on edge here. Picked up as it could. Ran the polar coordinates. Effect him. And I just kind of used my racer tool. Another forbidden tool in photo shop, the flatten image and the racer tool. The two most forbidden tools ever. Yet we still use them. I'm gonna do Ah, right here. Where the edges. You know what poll accordance does in case you don't know, is it? And that's the reason I strategically put those elements at the bottom. I took those elements and wrapped them around in 3 60 moon. You'll see that the ends, the edges meet here at the top. Those of the edges that went right off the edge of a document, the bottom there. So it's kind of just wrapped it up right there. I'm just gonna give a little dab with the eraser. Told us to kind of let that fade right there. So now we're gonna take this element again. Dragon, drop it over. I'm gonna put it at the top of the layers stack here. Who's going to scale this and it's gonna give us this kind of cool flair. I'm gonna rotate it around something about like that. Now I'm gonna put a layer mask on the subject or on this flair, flair, Layer. I said in my head first, and I was like, OK, I'm gonna say it out loud. Flare there, the flare layer. And I'm gonna go in here and get that same Grady until been using the foreground to transparent with the radio And this kind of give it a fade in areas where black is my foreground. Give a little bit of a fade in areas. I don't want it to be obstructing the subject, Of course, around her face, I'm gonna give a little bit of fade down here because we're gonna have some text elements were going to be putting down here as well. So, like that you can see a little bit of the edge of that. Oh, no. I got start the flare brush. I was a little confused. Why is my brush a weird looking here? So there's that little bit of that edge of the flare. See that straight edge there? It was going to go ahead and take care of that. A little bit. You're OK. Now, this point, the flare looks pretty good, but I want to make it look awesome. So it's gonna go in here into the layer itself and add a layer style. I'm gonna go the, uh, layer style menu And let's just, uh, choose out or glow and let's make it a blue flare and think hard light. Yeah, I think are light years ago. Give it a blue glow with a hard light blend mode really adds something to that floor. And this is another reason Excuse me. I am. I discovered that I liked doing these brushes because you can create the flares of brush. And then it has the transparency on the layer to add a layer style so you can get this cool glow like that. And, of course, the layer style. It's layers that you can go in here and adjust the glow, the intensity of it, even the color. If later on in the process, you realize that it's not looking like you hope you can go in there and change that don't click. OK, there. That looks really good. Now what I want to do now that I've got this flare element in place. What I want to do is actually make the look like the subject is being literally surrounded by this light flare element. Right now, this looks like she's kind of standing in it. If this flare was existing around her and you've got to kind of ask yourself, this question, as you're designing, especially with human characters, is if this element was surrounding the subject like this, how would the light emitting from it land on the subject? How dramatic wouldn't be? Where would it fall on the subject? So what I'm gonna do is create a new layer and gonna make the layer blend mode gonna put it in overlay. We don't see anything change because there's nothing on the layer yet. What I'm gonna do is select this kind of bright blue color in my swatches panel. Here, get my great aunt tool. Once again, I'm gonna come in from the left side here was gonna use a linear grading at this time. I was gonna hold down the shift key and dragon and that's gonna give me could enhance the glow of the flare. Looks like there's light emanating from the flare and It's casting on the hair of the subject. Here, give me that. Really interesting look there. And I need All right, so now it's gonna go in here, give a little bit of a flare coming in from this side as well. I'm actually gonna do that with a radio. It's a little element of it here. I do like that. There we go. Going here. Get a little bit more. There we go.
Class Materials
Bonus Materials with Purchase
Ratings and Reviews
kasmath
So happy to find this class by Corey Barker and loved it! It definitely helps if you are familiar with Photoshop but he teaches you so many fun, new things in regards to poster development. I love this is in video because you can watch and re-watch if you don't understand something the first time. You can see how much Corey loves his work and he shares his passion with you! Thanks for another great class!! I look forward to owning more of his classes and they are so affordable!! Thanks Corey!!
a Creativelive Student
One of the best classes I've taken with Creative Live! Like another reviewer said, I too was yelling at my computer in excitement and taking pages of notes along the way. I learned so many valuable techniques in this short but sweet class. Thank you Corey!! You rock!
a Creativelive Student
I was literally screaming at my computer while watching this... like it was a football game or something!! YES! OMG!! SO much information - was taking notes every 2mins, and laughing along with the studio audience. Best CreativeLIVE course I have seen. Watched in it all in one go, and will re-watch many times I am sure. Very happy with my purchase. Thank you, Corey!!